Internal Shoulder Rotation Stretch: Form, Benefits, Sets, Tips & FAQ
Learn how to perform the Internal Shoulder Rotation Stretch in a supine position with proper form. Improve shoulder mobility, target the rotator cuff, avoid common mistakes, and discover useful equipment.
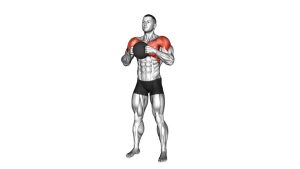
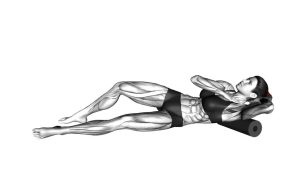
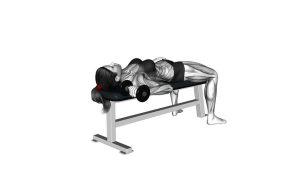
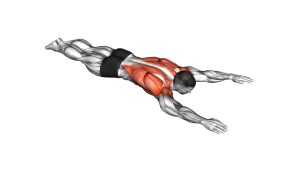
Internal Shoulder Rotation Stretch
This stretch is especially useful for people with restricted shoulder mobility, lifters who perform pressing or overhead work, and anyone working on balanced shoulder range of motion. Because the body is supported in a supine position, it becomes easier to focus on the shoulder joint itself without unnecessary torso movement or poor posture. Keep the motion slow, keep the elbow stable, and stop well before any pinching or sharp discomfort.
Quick Overview
| Body Part | Shoulders |
|---|---|
| Primary Muscle | Subscapularis |
| Secondary Muscle | Anterior deltoid, pectoralis major, posterior shoulder stabilizers |
| Equipment | None, flat bench or floor mat optional |
| Difficulty | Beginner |
Sets & Reps (By Goal)
- Mobility improvement: 2–4 sets × 8–12 reps per side with a 2–3 second pause near end range
- Warm-up before upper-body training: 1–3 sets × 6–10 controlled reps per side
- Rehab-style shoulder control: 2–3 sets × 6–8 slow reps per side with very light effort
- Flexibility maintenance: 2–3 sets × 20–30 second gentle holds per side if using a static version
Progression rule: Increase control and range gradually. Better shoulder mechanics matter more than pushing deeper into the stretch.
Setup / Starting Position
- Lie on your back on a flat bench, exercise mat, or firm surface with your head and spine supported.
- Raise one arm out to the side so the shoulder is roughly level with the torso or slightly below, depending on comfort.
- Bend the elbow to about 90 degrees so the forearm points upward.
- Keep the shoulder relaxed and avoid shrugging toward the ear.
- Brace lightly through the trunk so the ribcage stays down and the torso does not twist to create fake range of motion.
Tip: If your shoulder feels sensitive at 90 degrees of abduction, lower the elbow slightly closer to your side and work in a more comfortable angle.
Execution (Step-by-Step)
- Start in the neutral position: Elbow bent, upper arm stable, forearm vertical.
- Rotate the forearm downward in a slow arc toward the floor or bench, creating internal rotation at the shoulder.
- Keep the elbow fixed in place so the movement comes from the shoulder joint rather than the wrist or torso.
- Pause briefly at the deepest comfortable position without forcing the range.
- Return under control to the starting position and repeat for the desired number of reps.
Pro Tips & Common Mistakes
- Move slowly: Fast reps make it harder to feel true shoulder rotation and easier to compensate.
- Do not force end range: The stretch should feel controlled, not aggressive or unstable.
- Keep the elbow position consistent: If it drifts, you lose the isolation of the movement.
- Keep the shoulder packed: Avoid shrugging or letting the front of the shoulder collapse forward.
- Use pain-free range only: Mobility improves best when the joint feels safe and controlled.
- Pair with external rotation and scapular work: This helps create more balanced shoulder function.
FAQ
What should I feel during the internal shoulder rotation stretch?
You should feel a gentle stretch or controlled effort around the shoulder, often through the back or front of the joint depending on your restriction pattern. You should not feel sharp pain, pinching, or nerve symptoms.
Is this exercise good for shoulder mobility?
Yes. It can help improve internal rotation range of motion and shoulder control, especially when performed consistently and paired with other rotator cuff and upper-back mobility drills.
Should I do this before or after a workout?
It can work well before training as part of a warm-up when done with light controlled reps, or after training if used as gentle mobility work.
What if I feel pinching in the front of the shoulder?
Reduce the range immediately, adjust the elbow angle, and slow the movement down. If pinching continues, stop the exercise and reassess technique or consult a qualified professional.
Can beginners use this stretch?
Yes. This is a beginner-friendly mobility drill when done gently. Start with a small range of motion and focus on control rather than depth.
Recommended Equipment (Optional)
- Non-Slip Yoga Mat — useful for comfortable floor-based shoulder mobility work
- Stretching Strap / Yoga Strap — helpful for assisted range-of-motion work and shoulder flexibility drills
- High-Density Foam Roller — useful for upper-back mobility prep and posture support before shoulder drills
- Half Round Foam Roller — a more stable option for positioning, chest opening, and gentle mobility work
- Cervical Support Pillow — can improve neck comfort when performing supine mobility drills or recovery work
Tip: Choose supportive tools that improve comfort and control. Avoid any equipment that encourages you to force the shoulder deeper into painful range.