Band-Assisted Dip: Proper Form, Sets, Tips & FAQ
Learn how to perform the band-assisted dip with proper form to build chest, triceps, and shoulder strength. Includes setup, step-by-step execution, sets by goal, mistakes to avoid, FAQs, and recommended equipment.
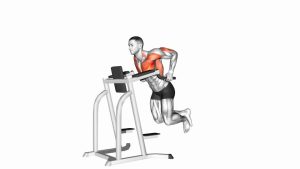
Band-Assisted Dip
This exercise is ideal for lifters who want to master dip mechanics without losing depth, control, or confidence. The band gives the most help near the bottom, where dips are usually hardest, then provides less assistance as you press back to lockout. Performed correctly, the movement teaches clean elbow tracking, shoulder stability, and strong chest engagement without the need for heavy machines.
Quick Overview
| Body Part | Chest |
|---|---|
| Primary Muscle | Pectoralis major |
| Secondary Muscle | Triceps brachii, anterior deltoids, lower chest fibers, scapular stabilizers |
| Equipment | Parallel dip bars or dip station, loop resistance band |
| Difficulty | Beginner to Intermediate |
Sets & Reps (By Goal)
- Strength foundation: 3–5 sets × 4–6 reps with a thicker band, 90–150 sec rest
- Muscle growth: 3–4 sets × 8–12 reps, 60–90 sec rest
- Dip progression practice: 3–4 sets × 5–8 controlled reps, focusing on full range and stable shoulders
- Upper-body accessory work: 2–3 sets × 10–15 reps with moderate band assistance, 45–75 sec rest
Progression rule: First improve control and range of motion, then reduce band assistance over time. A thinner band or slower tempo is usually a better progression than simply adding more reps with sloppy form.
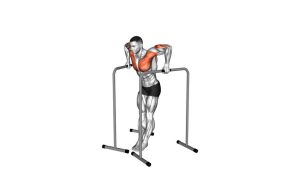
Setup / Starting Position
- Anchor the band: Loop a resistance band securely across both dip handles so it creates a stable platform underneath you.
- Get into position: Place your knees or feet into the band and grip the bars firmly with straight arms.
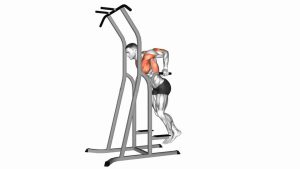
- Support your body: Lift yourself to the top with elbows locked or nearly locked and shoulders pressed down away from the ears.
- Lean slightly forward: Tilt the torso forward a bit to increase chest involvement instead of staying perfectly upright.
- Brace lightly: Keep your core tight, legs controlled, and gaze forward or slightly down.
Tip: A thicker band gives more assistance and is usually better for beginners who are still learning depth and shoulder control.
Execution (Step-by-Step)
- Start tall at the top: Stabilize your body over the bars with shoulders down and chest slightly forward.
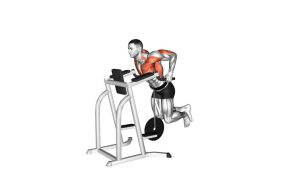
- Lower under control: Bend your elbows and descend slowly while keeping the torso leaned slightly forward.
- Reach a strong bottom position: Lower until your upper arms are about parallel to the floor or slightly below, as long as you stay pain-free and stable.
- Maintain alignment: Let the elbows move naturally backward and slightly outward without excessive flare or collapse.
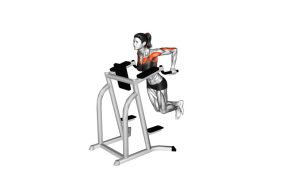
- Press back up: Drive through your palms, extend the elbows, and return to the top without swinging or bouncing.
- Reset at lockout: Finish each rep with controlled support at the top before starting the next repetition.
Pro Tips & Common Mistakes
- Use the right band tension: Too much assistance can make the movement awkward, while too little can ruin your depth and control.
- Keep the shoulders depressed: Avoid shrugging at the top or during the descent.
- Lean slightly forward for chest emphasis: Staying too upright shifts more work toward the triceps.
- Do not dive-bomb the bottom: Lowering too fast can overload the shoulders and reduce tension where you want it.
- Avoid half reps: Use the band to earn full, clean range of motion rather than cutting depth short.
- Control body swing: Keep your legs quiet and core braced so the band does not turn the exercise into a bouncing motion.
- Progress gradually: Reduce band assistance only when you can complete every rep with stable shoulders and a smooth tempo.
FAQ
What muscles does the band-assisted dip work?
It primarily trains the chest, especially when performed with a slight forward lean. It also heavily involves the triceps, front deltoids, and several upper-body stabilizers.
Is the band-assisted dip good for beginners?
Yes. It is one of the best dip progressions for beginners because the band reduces bodyweight load at the hardest point and helps you practice proper movement mechanics safely.
Should I put my knees or feet in the band?
Both options can work. Knees in the band often feel more stable for beginners, while feet in the band can sometimes allow a slightly different body position. Choose the setup that feels most secure and controlled.
How low should I go on each rep?
Lower until your upper arms are around parallel to the floor or slightly deeper if you can maintain control and stay pain-free. The goal is full, clean range of motion without shoulder discomfort.
How do I progress from assisted dips to full dips?
Start by improving tempo, range of motion, and consistency. Then gradually switch to a thinner band or use fewer assisted reps while keeping your technique sharp.
Recommended Equipment
- Loop Resistance Bands — essential for scaling the dip and reducing bodyweight load during progression work
- Dip Station — provides a stable platform for performing dips at home or in a private gym setup
- Calisthenics Grips / Hand Grips — helps improve grip comfort and hand control during repeated pressing sessions
- Gym Chalk — useful for reducing hand slip and improving grip security on dip bars
- Push-Up Parallettes — useful for building support strength, lockout control, and related bodyweight pressing patterns
Tip: For most people, a strong dip station and a few band resistance levels are the best starting combination for long-term dip progression.