Bottle-Weighted Seated Shoulder Press: Form, Sets, Tips & FAQ
Learn the Bottle-Weighted Seated Shoulder Press for stronger shoulders, better overhead control, and beginner-friendly upper-body training. Includes setup, step-by-step form, sets by goal, mistakes, FAQs, and recommended equipment.
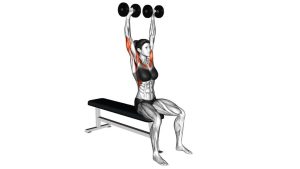
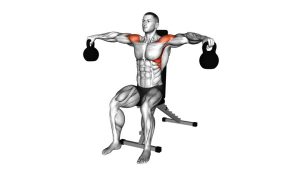
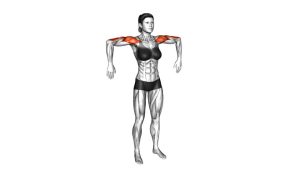
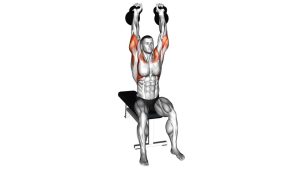
Bottle-Weighted Seated Shoulder Press
This variation works well for home workouts because it can be done with small dumbbells, water bottles, or similar hand-held weights. The goal is to move through a controlled overhead path while keeping the torso stable and the shoulders doing the work. You should feel the movement mainly in the deltoids and triceps, not in the lower back or neck.
Quick Overview
| Body Part | Shoulders |
|---|---|
| Primary Muscle | Anterior deltoids (front shoulders) |
| Secondary Muscle | Lateral deltoids, triceps, upper chest, core stabilizers |
| Equipment | Two bottle weights, light dumbbells, or similar household hand weights; bench or padded stool |
| Difficulty | Beginner to beginner-intermediate |
Sets & Reps (By Goal)
- Technique practice: 2–3 sets × 8–10 reps with light weight and smooth tempo
- Muscle building: 3–4 sets × 8–15 reps with controlled reps and 45–75 sec rest
- Shoulder endurance: 2–4 sets × 12–20 reps with lighter loads and strict form
- Home workout circuit: 2–3 sets × 10–15 reps paired with lateral raises, rows, or push-ups
Progression rule: Add reps first, then increase load only when you can press overhead without leaning back, shrugging excessively, or losing control on the lowering phase.
Setup / Starting Position
- Sit tall: Use a bench, chair, or padded stool that lets you keep your torso upright and feet flat on the floor.
- Hold the weights at shoulder level: Start with one weight in each hand and elbows bent under the wrists.
- Set your posture: Keep the chest lifted, ribs stacked, and core lightly braced so you do not arch the lower back.
- Keep wrists neutral: Avoid bending the wrists back too far. Stack the weight over the forearm.
- Start in a strong press position: Elbows slightly in front of the body usually feels smoother and safer than flaring them too wide.
Tip: If you are using water bottles or uneven household weights, grip them tightly and move slower to keep both sides balanced.
Execution (Step-by-Step)
- Brace and prepare: Sit tall, keep your eyes forward, and lightly tighten the core before each rep.
- Press upward: Drive both weights overhead in a smooth arc until your arms are nearly straight above you.
- Keep the torso quiet: Avoid throwing the chest back or using leg drive. Let the shoulders and triceps do the work.
- Finish overhead: At the top, the weights should be above or slightly inward from the shoulders without crashing together.
- Lower with control: Bring the weights back down slowly to shoulder level while keeping the elbows under control.
- Repeat smoothly: Use the same path on every rep instead of rushing the press or dropping the weights on the way down.
Pro Tips & Common Mistakes
- Press slightly inward, not straight out: A natural overhead path is usually more comfortable for the shoulders.
- Keep the core active: This helps prevent lower-back arching during the press.
- Don’t shrug too early: Let the delts press the weight instead of hiking the shoulders toward the ears from the start.
- Lower just as carefully as you press: The lowering phase builds control and keeps tension on the target muscles.
- Use matching tempo on both sides: Uneven bottle weights can make one arm move faster than the other.
- Avoid excessive range if mobility is limited: Press only through a pain-free path you can control well.
FAQ
What muscles does the bottle-weighted seated shoulder press work?
It mainly trains the front delts, while the side delts and triceps help with the pressing motion. Your core also works to keep your torso stable.
Can I use water bottles instead of dumbbells?
Yes. Water bottles, sand-filled bottles, or other small hand-held household weights can work well for beginners, as long as they are secure to hold and similar enough in weight on both sides.
Should I do this seated or standing?
Seated is often easier for beginners because it reduces momentum and makes it simpler to focus on shoulder-driven pressing. Standing variations demand more balance and core involvement.
What if I feel this more in my neck than my shoulders?
That usually means you are shrugging too much, pressing too heavy, or losing posture. Use lighter weights, keep the shoulders down at the start, and move slower.
How heavy should the weights be?
Start with a load that allows you to complete every rep with clean posture and a controlled lowering phase. If you have to lean back or rush, the weight is too heavy for your current form.
Recommended Equipment
- Adjustable Dumbbells — versatile for progressive home shoulder training and easy load changes
- Neoprene Dumbbell Set — a beginner-friendly option with comfortable grip and lighter loading choices
- Adjustable Weight Bench — useful when you want a more stable seated pressing setup than a basic stool or chair
- Wrist Wraps — optional support if wrist position gets uncomfortable during pressing
- Resistance Bands Set — great for pairing shoulder presses with pull-aparts, face pulls, and warm-up work
Choose equipment that matches your strength level and lets you keep strict form. Adjustable dumbbells, neoprene dumbbell sets, benches, and wrist wraps are all widely available on Amazon, and the bench and dumbbell listings specifically emphasize home training use and beginner-friendly setups.