Kettlebell Advanced Windmill: Form, Muscles Worked, Sets, Tips & FAQ
Learn how to perform the Kettlebell Advanced Windmill with safe overhead control, strong hip hinge mechanics, core stability, step-by-step form, common mistakes, FAQs, and recommended equipment.
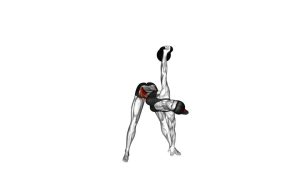
Kettlebell Advanced Windmill
The Kettlebell Advanced Windmill is best used when an athlete already understands basic hinging, overhead kettlebell control, and trunk bracing. It trains the body to stay strong while moving through rotation, lateral flexion, and loaded shoulder stabilization. Because the kettlebell remains overhead, every repetition demands focus, patience, and precise alignment.
This exercise mainly targets the obliques, but it also challenges the glutes, hamstrings, shoulders, upper back, and deep core muscles. A clean repetition should feel controlled through the hips and waist. The shoulder should feel stable, not strained. The lower back should stay long and supported, not rounded or twisted aggressively.
Quick Overview
| Body Part | Obliques |
|---|---|
| Primary Muscle | Obliques |
| Secondary Muscle | Shoulders, glutes, hamstrings, spinal stabilizers, upper back, deep core |
| Equipment | Kettlebell |
| Difficulty | Advanced |
Sets & Reps (By Goal)
- Technique practice: 2–3 sets × 3–5 reps per side with a light kettlebell and slow tempo.
- Core stability: 3–4 sets × 5–8 reps per side with controlled breathing and strict alignment.
- Shoulder stability: 3 sets × 4–6 reps per side with a 1–2 second pause at the bottom.
- Mobility and control: 2–3 sets × 5–6 reps per side using a lighter weight and deeper range only if form stays clean.
- Strength-focused training: 3–5 sets × 3–5 reps per side with a challenging but manageable kettlebell.
Progression rule: Increase range of motion first, then improve pause control, and only then increase kettlebell weight. The kettlebell should never drift away from its vertical stacked position.
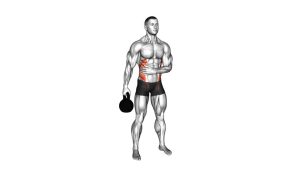
Setup / Starting Position
- Stand wide and stable: Place your feet slightly wider than shoulder-width. Turn the foot opposite the kettlebell side slightly outward to create space for the hinge.
- Clean or press the kettlebell overhead: Lock one arm overhead with the wrist stacked above the elbow and shoulder. Keep the shoulder packed instead of shrugged.
- Set your gaze: Look up at the kettlebell before you begin. This helps you monitor the bell and maintain overhead control.
- Brace your core: Pull the ribs down slightly, tighten the midsection, and keep the spine long.
- Position the free arm: Let the opposite hand rest near the inside of the thigh. This hand will slide down the leg as you descend.
- Prepare the hips: Shift the hips slightly toward the kettlebell side. This creates the diagonal hinge path needed for a proper windmill.
The start position should feel strong before the first rep begins. If the kettlebell feels unstable overhead while standing still, reduce the weight before performing the movement.
Execution (Step-by-Step)
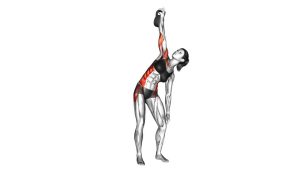
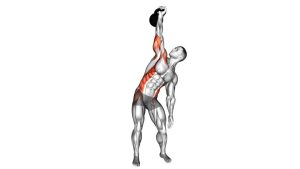
- Start tall: Stand upright with the kettlebell locked overhead. Keep your arm straight, shoulder packed, and eyes fixed on the bell.
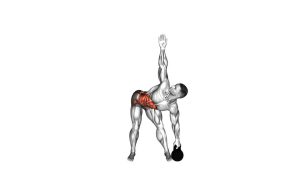
- Push the hips back: Begin the movement by sending your hips backward and slightly toward the kettlebell side. Avoid bending from the lower back.
- Slide the free hand down: Let your non-working hand travel down the inside of the opposite leg. Use it as a guide, not as support.
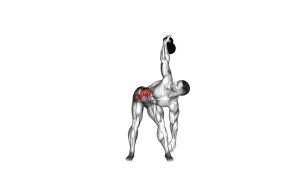
- Open the chest: Rotate the torso slightly so your chest stays open toward the kettlebell. Do not collapse toward the floor.
- Keep the kettlebell stacked: Maintain a vertical line from wrist to elbow to shoulder. The kettlebell should stay above the shoulder, not drift forward.
- Lower under control: Descend only as far as your hips, hamstrings, and trunk allow while keeping the spine long and the shoulder stable.
- Pause briefly: Hold the bottom position for a moment. Stay tight through the core and keep breathing shallow but controlled.
- Drive through the hips: Reverse the movement by pushing the hips forward and bringing the torso back to upright.
- Finish in lockout: Return to a tall standing position with the kettlebell still stacked overhead. Reset before the next rep.
Pro Tips & Common Mistakes
Pro Tips
- Think “hip hinge,” not “side bend”: The windmill starts from the hips. Your torso lowers because the hips move back, not because the spine collapses sideways.
- Keep watching the kettlebell: Your eyes help control the bell and reduce the chance of losing overhead alignment.
- Use a slow tempo: A controlled descent builds more stability than a fast drop. Move slowly enough to stop at any point.
- Stack the joints: Wrist, elbow, shoulder, and rib cage should stay organized. This makes the overhead position safer and stronger.
- Limit range when needed: You do not need to touch the floor. A shorter, cleaner windmill is better than a deep, unstable one.
- Brace before every rep: Reset your ribs, core, and shoulder before descending. Advanced exercises punish loose setups.
Common Mistakes
- Letting the kettlebell drift forward: This increases shoulder stress and usually means the torso is folding instead of rotating properly.
- Bending the overhead elbow: A soft elbow reduces stability and makes the bell harder to control.
- Rounding the lower back: The spine should stay long. If the back rounds, reduce depth immediately.
- Turning it into a toe touch: The windmill is not a forward fold. The hips must move back while the chest stays open.
- Using too much weight: Heavy loading too early can hide poor mechanics and increase injury risk.
- Holding the breath too long: Brace firmly, but allow controlled breathing so tension does not become panic or stiffness.
FAQ
What muscles does the Kettlebell Advanced Windmill work?
The main target is the obliques. The exercise also works the shoulders, glutes, hamstrings, upper back, spinal stabilizers, and deep core muscles. It is a full-body stability drill because the lower body, trunk, and overhead arm must work together.
Is the Kettlebell Advanced Windmill good for core strength?
Yes. It is excellent for core strength because it trains the trunk to resist unwanted movement while the body rotates and hinges. The obliques work hard to control the torso during both the descent and the return.
Should beginners do this exercise?
Most beginners should start with an unloaded windmill, bodyweight hip hinge, or light dumbbell variation first. The advanced kettlebell version requires shoulder control, hip mobility, core stability, and good coordination.
How low should I go during the windmill?
Go only as low as you can while keeping the spine long, chest open, hips back, and kettlebell stacked overhead. Touching the floor is not required. Clean alignment matters more than depth.
Why do I feel this in my shoulder?
Some shoulder work is normal because the kettlebell is held overhead. However, sharp pain, pinching, or unstable wobbling is not ideal. Use a lighter kettlebell and focus on keeping the shoulder packed.
Can the Kettlebell Advanced Windmill improve mobility?
It can improve usable mobility when performed correctly. The exercise challenges hamstring flexibility, hip control, thoracic rotation, and shoulder stability. Still, mobility should never be forced under heavy load.
How heavy should the kettlebell be?
Choose a weight you can hold overhead without shaking or losing alignment. For many athletes, a light-to-moderate kettlebell is enough. The windmill is more about control than maximum loading.
Recommended Equipment
- Cast Iron Kettlebell — ideal for practicing windmills, swings, presses, and loaded core stability work.
- Competition Kettlebell — provides a consistent bell size across different weights, which helps advanced technique practice.
- Kettlebell Wrist Guards — useful for comfort during overhead kettlebell positions and repeated practice sessions.
- Non-Slip Exercise Mat — helps improve foot grip and stability during controlled windmill repetitions.
- Resistance Bands Set — useful for shoulder warm-ups, upper-back activation, and mobility preparation before kettlebell work.
Tip: Select equipment that supports control, not ego lifting. For the Kettlebell Advanced Windmill, stability and clean alignment are more important than using the heaviest bell possible.