Kettlebell Windmill: Proper Form, Muscles Worked, Sets, Tips & FAQ
Learn how to do the Kettlebell Windmill with safe form, step-by-step execution, muscles worked, sets by goal, common mistakes, FAQs, and recommended equipment.
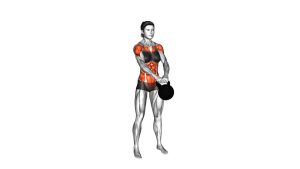
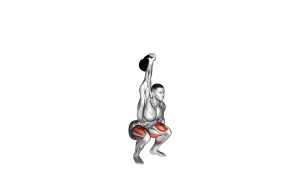
Kettlebell Windmill
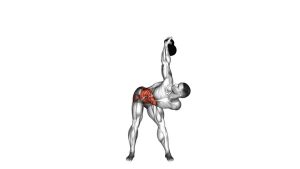
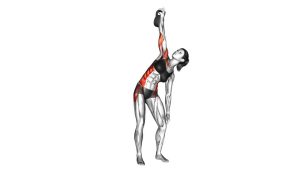
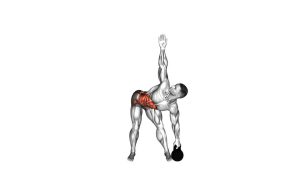
This exercise works best when each repetition is slow, deliberate, and well aligned. The kettlebell should stay almost vertical above the shoulder while the body moves underneath it. Meanwhile, the free hand slides down the leg as the hips shift to the side. Because the movement requires overhead control, hip mobility, and core tension at the same time, quality matters much more than heavy loading.
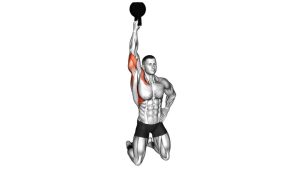
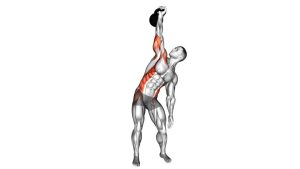
In the video, the athlete begins in a wide stance with one kettlebell locked overhead. Then, the hips move sideways as the torso lowers toward the floor. The free hand travels down the leg, while the eyes stay fixed on the kettlebell. Finally, the athlete reverses the motion by driving the hips back under the torso and returning to a tall standing position.
Quick Overview
| Body Part | Obliques |
|---|---|
| Primary Muscle | Obliques |
| Secondary Muscle | Deep core stabilizers, glutes, hamstrings, shoulders, lats, upper back |
| Equipment | Kettlebell |
| Difficulty | Intermediate |
Sets & Reps (By Goal)
- Technique practice: 2–3 sets × 3–5 reps per side using a light kettlebell.
- Core stability: 3–4 sets × 5–8 reps per side with slow, controlled tempo.
- Shoulder stability: 3 sets × 4–6 reps per side with a 1–2 second pause at the bottom.
- Hip mobility and control: 2–3 sets × 6–8 reps per side, focusing on smooth range of motion.
- Strength skill work: 4–5 sets × 3–5 reps per side with a moderate kettlebell only after form is stable.
Progression rule: First improve depth, alignment, and control. Then, increase the kettlebell weight gradually. Do not progress if the weight drifts forward, the back rounds, or the shoulder loses its locked-out position.
Setup / Starting Position
- Stand wide: Place your feet slightly wider than shoulder-width. Turn the toes slightly outward so the hips can shift naturally.
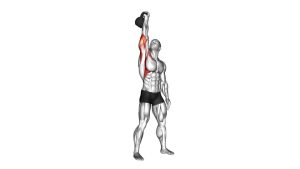
- Press the kettlebell overhead: Hold the kettlebell in one hand with the elbow locked, wrist neutral, and shoulder packed down away from the ear.
- Stack the weight: Keep the kettlebell above the shoulder, with the wrist, elbow, and shoulder forming a strong vertical line.
- Set your gaze: Look up toward the kettlebell. This helps you monitor the weight and maintain shoulder awareness.
- Brace lightly: Tighten the core without holding your breath. Keep the ribs controlled and the spine long.
- Position the free hand: Let the opposite hand rest near the inner thigh or front thigh so it can slide down during the descent.
Start with a very light kettlebell, especially if this is your first time practicing the movement. A strong windmill should feel stable, not rushed or forced.
Execution (Step-by-Step)
- Lock in the overhead position: Keep the kettlebell directly above the shoulder. Before moving, make sure the elbow is straight and the shoulder feels stable.
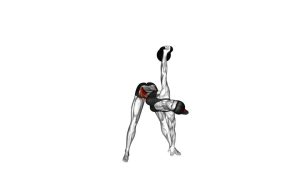
- Shift the hips sideways: Push your hips away from the kettlebell side. This hip shift creates space for the torso to lower safely.
- Begin the side hinge: Lower your torso by hinging through the hips, not by rounding the spine. The chest should rotate slightly upward instead of collapsing toward the floor.
- Slide the free hand down: Let the non-working hand travel down the leg toward the knee, shin, ankle, or floor depending on your mobility.
- Keep the kettlebell stacked: As you descend, the kettlebell should remain above the shoulder. Avoid letting it drift forward or behind you.
- Pause with control: Hold the bottom position briefly. Breathe, keep the core tight, and maintain your gaze on the kettlebell.
- Drive the hips back under you: Start the ascent by pushing the hips back toward center. The torso should rise because the hips move, not because the lower back jerks upward.
- Return to standing: Finish tall with the kettlebell still locked overhead, ribs controlled, and shoulders level.
- Reset before the next rep: Rebuild tension, check your overhead stack, and repeat only when balance is stable.
Pro Tips & Common Mistakes
Pro Tips
- Think “hips first”: The movement begins with the hip shift. This keeps the exercise out of the lower back and into the hips and core.
- Keep the shoulder packed: Pull the shoulder slightly down and back. As a result, the kettlebell feels more stable overhead.
- Move slowly: A slow descent builds better control and gives you time to correct the kettlebell path.
- Use your eyes: Keep looking at the kettlebell during the movement. This improves awareness and helps prevent the weight from drifting.
- Limit the range at first: You do not need to touch the floor. Instead, lower only as far as you can while keeping the spine neutral and the shoulder stable.
- Keep breathing: Controlled breathing helps you maintain tension without becoming stiff or shaky.
Common Mistakes
- Bending forward instead of hinging sideways: This turns the movement into a poor toe-touch pattern and reduces the core stability benefit.
- Letting the kettlebell drift forward: This increases shoulder strain and makes the lift harder to control.
- Rounding the lower back: If your spine rounds, reduce depth and focus on hip movement.
- Using too much weight: Heavy loads can hide poor mechanics and increase injury risk.
- Relaxing the overhead arm: The elbow should stay locked, and the shoulder should remain active throughout the rep.
- Rushing the ascent: Stand up with control. Otherwise, balance and shoulder position can break down quickly.
FAQ
What muscles does the Kettlebell Windmill work?
The Kettlebell Windmill mainly works the obliques and deep core stabilizers. It also trains the shoulders, lats, glutes, hamstrings, and upper back because the body must stabilize the kettlebell while moving through a hip hinge pattern.
Is the Kettlebell Windmill a core exercise or a shoulder exercise?
It is both. The core controls rotation and side bending, while the shoulder stabilizes the kettlebell overhead. However, the exercise should not feel like a shoulder press. The arm stays locked while the hips and torso move.
Should I touch the floor during the Kettlebell Windmill?
No. Touching the floor is not required. Depth depends on hip mobility, hamstring flexibility, and shoulder stability. A shorter range with clean alignment is better than forcing the hand to the floor with a rounded back.
Why does my lower back hurt during this exercise?
Lower-back discomfort often happens when the movement becomes a forward bend instead of a hip hinge. It can also happen if the kettlebell is too heavy or the torso rotates poorly. Reduce the load, shorten the range, and focus on shifting the hips sideways first.
Can beginners do the Kettlebell Windmill?
Beginners can practice the pattern, but they should start without weight or with a very light kettlebell. First, learn the hip shift and torso position. Then, add the overhead load once the movement feels stable and controlled.
How heavy should the kettlebell be?
Choose a kettlebell that you can hold overhead without shaking, shrugging, or losing wrist position. For many people, a light kettlebell is enough because this exercise challenges control more than maximum strength.
Recommended Equipment
- Cast Iron Kettlebell — the main tool for practicing the Kettlebell Windmill with stable overhead loading.
- Adjustable Kettlebell — useful if you want several weight options without buying multiple kettlebells.
- Kettlebell Workout Mat — provides a stable training surface and helps protect the floor during kettlebell work.
- Liquid Chalk for Lifting — improves grip security when holding the kettlebell overhead.
- Kettlebell Wrist Wraps — helps reduce wrist discomfort when learning overhead kettlebell positions.
Tip: Equipment should support better technique, not hide poor control. If the kettlebell feels unstable overhead, choose a lighter weight and rebuild your setup.