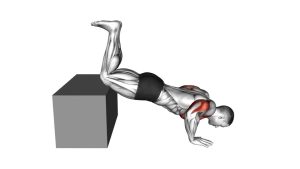
Kneeling One-Side Archer Push-Up: Form, Sets, Tips & FAQ
Build unilateral chest strength with the kneeling one-side archer push-up. Learn proper setup, step-by-step form, sets by goal, mistakes, FAQs, and gear.
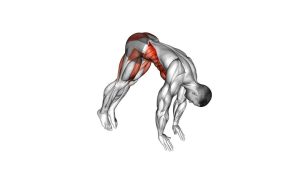
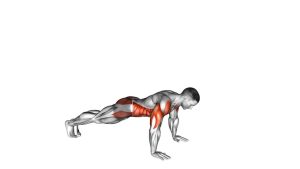
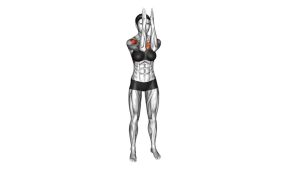
Kneeling One-Side Archer Push-Up
This movement rewards control more than speed. Your goal is to keep the torso stable while the working arm does the majority of the pressing. Keep the neck long, ribs stacked over hips, and avoid twisting as you lower and press. You should feel the most work in the working-side chest, with the triceps and front delts assisting.
Quick Overview
| Body Part | Chest |
|---|---|
| Primary Muscle | Pectoralis major (working side emphasis) |
| Secondary Muscle | Triceps, anterior deltoid, serratus anterior, core stabilizers |
| Equipment | None (optional: mat, push-up handles/parallettes) |
| Difficulty | Beginner → Intermediate (unilateral load with knee support) |
Sets & Reps (By Goal)
- Strength (unilateral focus): 3–5 sets × 4–8 reps/side (90–150 sec rest)
- Muscle/Hypertrophy: 3–4 sets × 8–12 reps/side (60–90 sec rest)
- Technique & stability: 2–4 sets × 6–10 reps/side (slow tempo, 45–75 sec rest)
- Push-up progression (volume): 2–3 sets × 10–15 reps/side (easy pace, 45–75 sec rest)
Progression rule: First add reps and slow control (2–3 seconds down). Then reduce assistance by moving the support hand slightly closer. Only progress when your torso stays steady and your reps are smooth.
Setup / Starting Position
- Kneel on a comfortable surface: Use a mat if needed. Keep knees under hips and feet relaxed behind you.
- Hands wide: Place the working hand closer under the shoulder. Place the support hand wider out to the side.
- Stack and brace: Squeeze glutes lightly, brace your core, and keep ribs down—avoid arching the lower back.
- Shoulders “packed”: Keep shoulders away from ears and feel the shoulder blades stable (no shrugging).
- Neutral wrists: Spread fingers and press through the whole palm. Use handles if wrists get cranky.
Tip: If balance feels tricky, start with the support hand a bit closer (less wide), then gradually widen it as you get stronger.
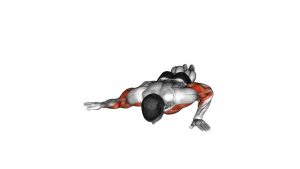
Execution (Step-by-Step)
- Shift toward the working side: Slightly lean your chest toward the working hand before you lower.
- Lower under control: Bend the working elbow as you descend. Keep the support arm straighter to provide light assistance.
- Stay square: Keep hips and shoulders facing the floor—avoid rotating your torso open.
- Hit a comfortable depth: Lower until the chest is close to the floor or until your shoulder stays pain-free and stable.
- Press up: Drive through the working palm to return. Let the support hand assist only as much as needed.
Pro Tips & Common Mistakes
- Use a slow negative: 2–3 seconds down increases chest tension and keeps form honest.
- Keep elbows safe: Don’t flare aggressively; aim for a natural angle (roughly 30–60° from torso).
- Avoid torso twist: If your hips rotate, reduce range or bring the support hand slightly closer.
- Don’t collapse the shoulder: Keep the working shoulder stable (no deep sinking/pinching).
- Control the top: Lock out gently without slamming the elbow; keep tension through the chest.
- Progress smart: Move the support hand inward gradually to increase difficulty—or elevate the knees less (harder) by shifting more bodyweight forward.
FAQ
Where should I feel this exercise?
Mostly in the working-side chest, with assistance from triceps and front delts. You’ll also feel your core working to prevent your body from rotating.
How do I make it easier?
Bring the support hand a little closer (less wide), reduce depth, slow down, and keep reps clean. You can also place hands on a slightly elevated surface (bench/box) for even less load.
How do I make it harder?
Move the support hand farther away, pause at the bottom for 1–2 seconds, or use push-up handles/parallettes to increase range. Progressing toward a full archer push-up (toes) is another step up.
Is this a good progression toward one-arm push-ups?
Yes. It teaches you to shift load, stabilize your torso, and press with one side dominating. Keep the motion controlled and reduce assistance gradually over time.
What if my wrists or shoulders bother me?
Use push-up handles/parallettes for a neutral wrist and reduce depth. If shoulders pinch, narrow the working hand slightly, keep the elbow from flaring hard, and stay in a pain-free range.
Recommended Equipment (Optional)
- Push-Up Handles — reduce wrist strain and help maintain a strong pressing position
- Parallettes Bars — increase range of motion and improve shoulder-friendly pressing
- Thick Exercise Mat — protects knees and makes kneeling variations more comfortable
- Mini Resistance Bands — great for pairing with warm-ups (serratus work, shoulder stability, upper-back activation)
- Ab Wheel — optional add-on for anti-rotation and core strength that supports unilateral push-up control
Tip: You don’t need equipment to benefit from this exercise—use tools only if they improve comfort, range, or consistency.