Grasshopper Push-Up: Form, Muscles Worked, Sets, Tips & FAQ
Learn how to do the Grasshopper Push-Up with proper form. Discover muscles worked, setup, step-by-step execution, sets and reps by goal, common mistakes, FAQs, and recommended equipment.
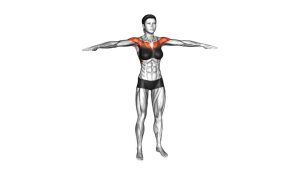
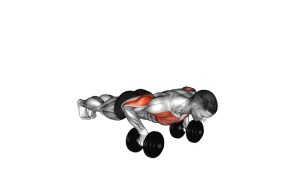
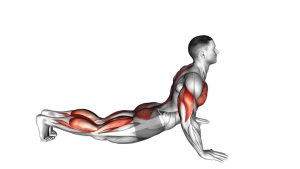
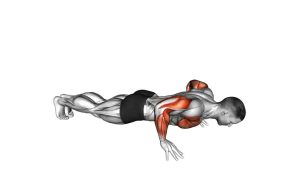
Grasshopper Push-Up
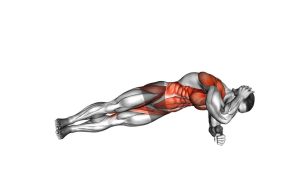
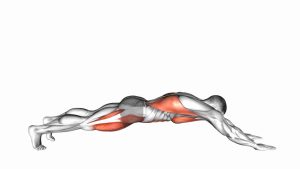
This exercise works best when you can maintain a solid push-up position while rotating through the hips just enough to bring the knee across the body. You should feel the chest, shoulders, triceps, and especially the core and obliques working together. The goal is not to swing the leg wildly, but to pair a clean push-up with a controlled cross-body knee drive.
Quick Overview
| Body Part | Chest |
|---|---|
| Primary Muscle | Pectoralis major |
| Secondary Muscle | Anterior deltoids, triceps, rectus abdominis, obliques, serratus anterior, hip flexors |
| Equipment | Bodyweight only (optional: exercise mat, push-up handles, sliders) |
| Difficulty | Intermediate |
Sets & Reps (By Goal)
- Strength endurance: 3–4 sets × 6–10 reps per side, 60–90 sec rest
- Core-focused conditioning: 2–4 sets × 8–12 alternating reps per side, 45–75 sec rest
- Push-up skill progression: 2–3 sets × 4–6 reps per side, slow tempo, 60–90 sec rest
- Fat-loss circuits / athletic training: 2–4 rounds × 6–10 reps per side with controlled pacing
Progression rule: Master standard push-ups first, then add slower cross-body knee drives before increasing total reps or speed.
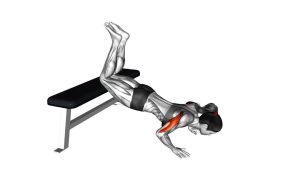
Setup / Starting Position
- Start in a high plank: Place your hands slightly wider than shoulder width with arms extended.
- Stack the upper body: Keep shoulders directly over or slightly behind the wrists.
- Brace the midsection: Tighten your abs and glutes so your body forms a straight line from head to heels.
- Set your feet: Keep the toes on the floor and position the feet about hip-width apart for balance.
- Lock in posture: Neck neutral, chest open, and eyes down slightly ahead of the hands.
Tip: A slightly wider foot stance can make the rotational portion easier to control when first learning the movement.
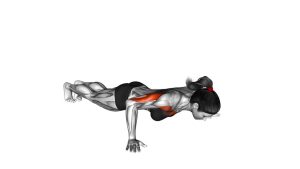
Execution (Step-by-Step)
- Lower into a push-up: Bend your elbows and bring the chest toward the floor with control.
- Keep elbows angled well: Let them travel back at roughly a 30–45° angle instead of flaring straight out.
- Drive one knee across: Near the bottom or during the descent, bring one knee toward the opposite elbow.
- Rotate only as needed: Allow a small, controlled hip rotation while keeping the core tight and the shoulders stable.
- Press back up: Push through the palms to return to the top plank position.
- Reset the leg: Return the moving foot to the floor under control.
- Alternate sides: Repeat the next rep by driving the opposite knee toward the opposite elbow.
Pro Tips & Common Mistakes
- Keep a real plank: Avoid sagging through the lower back as the knee comes across.
- Do not rush the twist: This is a controlled rotational movement, not a fast knee swing.
- Use full-body tension: Squeeze glutes and brace abs to stabilize the trunk.
- Protect the shoulders: Keep the chest active and elbows tracking naturally, not flaring hard to the sides.
- Bring the knee across with intent: Aim for opposite elbow range, but never force contact if mobility or control is lacking.
- Own the push-up first: If your standard push-up is shaky, build that before adding the grasshopper variation.
- Avoid piking the hips: Lifting the hips too high reduces the chest-loading and changes the exercise.
FAQ
What muscles does the Grasshopper Push-Up work?
It primarily trains the chest, while also challenging the shoulders, triceps, obliques, abs, and other stabilizers that help control the rotating plank position.
Is the Grasshopper Push-Up harder than a normal push-up?
Yes. It is generally more difficult because it adds core rotation, anti-rotation stability, and coordination on top of the pressing demands of a normal push-up.
Do I need to touch my knee to my opposite elbow?
No. Reaching the exact elbow is not mandatory. The goal is controlled cross-body knee travel without losing plank alignment or shoulder stability.
Can beginners do Grasshopper Push-Ups?
Most beginners should first master incline push-ups and standard push-ups. Once basic pressing strength and plank control are solid, they can progress to this variation with fewer reps and slower tempo.
Where should I feel it the most?
You should feel the chest, front shoulders, and triceps working during the press, with strong engagement through the obliques and abs during the cross-body knee drive.
Recommended Equipment
- Push-Up Handles — help reduce wrist extension stress and can improve push-up depth
- Exercise Mat — adds comfort for hands, toes, and floor-based bodyweight training
- Core Sliders — useful for progressing rotational core work and related bodyweight drills
- Resistance Bands Set — great for warm-ups, shoulder activation, and push-up support progressions
- Wrist Wraps — optional support if your wrists get irritated during high-volume push-up work
Tip: For most people, the best first upgrade is a good exercise mat or push-up handles. Choose tools that improve comfort and control without changing your movement quality.