Lever Bicep Curl: Proper Form, Muscles Worked, Sets, Tips & FAQ
Learn how to perform the Lever Bicep Curl with proper machine setup, controlled reps, and better biceps isolation. Includes muscles worked, sets and reps by goal, common mistakes, FAQ, and recommended equipment.
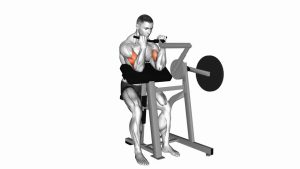
Lever Bicep Curl
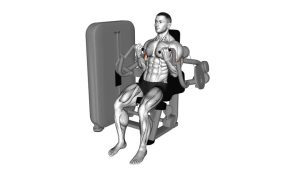
This exercise works best when you keep the torso stable and let the biceps drive the rep. The lever setup can make the movement feel more predictable than free weights, which is useful for beginners, higher-rep hypertrophy work, and lifters who want stricter form. A full rep should include a controlled lift, a brief squeeze near the top, and a slow return without letting the weight crash down.
Quick Overview
| Body Part | Biceps |
|---|---|
| Primary Muscle | Biceps brachii |
| Secondary Muscle | Brachialis and brachioradialis |
| Equipment | Lever bicep curl machine / preacher-style curl machine |
| Difficulty | Beginner to Intermediate |
Sets & Reps (By Goal)
- Muscle growth: 3–4 sets × 8–12 reps with controlled tempo and 60–90 sec rest
- Strength-focused machine work: 4–5 sets × 6–8 reps with 90–120 sec rest
- Technique / mind-muscle connection: 2–3 sets × 12–15 reps with light-to-moderate load
- Finisher / pump work: 2–3 sets × 15–20 reps with short rest and strict form
Progression rule: Increase reps first while keeping the same clean range of motion. Add load only when you can curl without shoulder swing, elbow lift, or loss of control on the lowering phase.
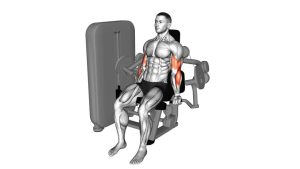
Setup / Starting Position
- Adjust the seat height: Sit so your upper arms rest comfortably on the support pad and your elbows line up naturally with the machine’s pivot point.
- Set your posture: Keep your chest up, shoulders down, and back supported against the pad if the machine has one.
- Grip the handles: Use a firm but not overly tense grip, usually with palms facing up or in the machine’s fixed curl position.
- Start near full extension: Let the arms lengthen at the bottom without locking the elbows aggressively.
- Brace lightly: Keep the torso still and upper arms planted on the pad before beginning the rep.
Tip: The machine should place tension on the biceps, not strain on the wrists or shoulders. If the line of motion feels awkward, adjust the seat before loading heavier.
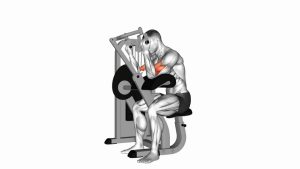
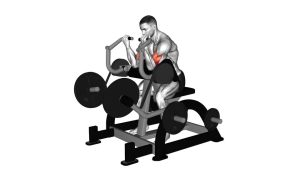
Execution (Step-by-Step)
- Begin the curl: Flex at the elbows and drive the handles upward using your biceps.
- Keep the arms fixed: Do not let your elbows drift off the pad or your shoulders roll forward to help the rep.
- Lift smoothly: Continue curling until you reach a strong contraction near the top without forcing excessive compression.
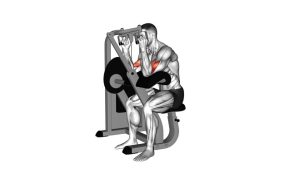
- Squeeze briefly: Pause for a moment at peak contraction to reinforce tension in the biceps.
- Lower under control: Return the handles slowly to the starting position, resisting the weight through the eccentric phase.
- Reset and repeat: Maintain posture and repeat each rep with the same range and tempo.
Pro Tips & Common Mistakes
- Use the pad properly: Keep the upper arms anchored so the biceps do the work.
- Control the eccentric: Lowering slowly can improve tension and reduce wasted reps.
- Keep wrists neutral: Avoid excessive wrist curl or extension that shifts stress away from the biceps.
- Do not overload too early: Heavy weight often turns a clean machine curl into a shoulder-assisted swing.
- Aim for full usable range: Work through a strong stretch and contraction without locking out harshly or cutting the rep short.
- Pause at the top: A short squeeze can improve control and mind-muscle connection.
- Avoid bouncing at the bottom: Let the biceps stay under tension instead of rebounding into the next rep.
FAQ
What muscles does the Lever Bicep Curl work?
The exercise primarily targets the biceps brachii. The brachialis and brachioradialis also assist during elbow flexion.
Is the Lever Bicep Curl better than dumbbell curls?
It is not automatically better, but it is often easier to keep strict form on the machine because the path is guided. Dumbbells usually demand more stabilization, while the machine helps isolate the biceps more directly.
Should I lock out at the bottom?
You can extend the arms close to full range, but avoid aggressively snapping into elbow lockout. Keep tension on the muscles and stay controlled.
How heavy should I go?
Choose a load that lets you complete the full range with no torso rocking, no elbow lift, and a controlled lowering phase. If form breaks down early, reduce the weight.
Where should I feel this exercise?
You should feel the work mostly in the front of the upper arms. If you feel more strain in the wrists, shoulders, or neck, check your setup and reduce the load.
Recommended Equipment
- Arm Blaster / Curl Support — useful for stricter curl mechanics and keeping the elbows from drifting during free-weight biceps work
- Preacher Curl Pad — a home-gym friendly option for recreating supported curl positioning similar to machine or preacher setups
- Heavy-Duty Cable Handles — useful if you want cable curls as a complementary biceps isolation exercise
- Resistance Bands Set — helpful for warm-ups, burnout sets, and travel-friendly arm training
- Adjustable Bench with Preacher Attachment — useful for lifters building a home setup and wanting more supported curl variations
These product categories are widely available on Amazon, including dedicated arm blasters, preacher curl pads, cable handles, and supported curl accessories for biceps-focused training.