Plate-Loaded Lever Deadlift: Form, Muscles Worked, Sets & Tips
Learn the plate-loaded lever deadlift for glutes, hamstrings, and back strength. Includes setup, form cues, sets, mistakes, FAQs, and equipment.
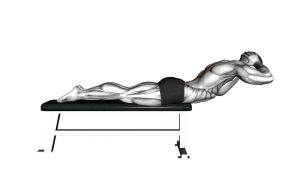
Plate-Loaded Lever Deadlift
This exercise is best used as a controlled strength and muscle-building movement. Because the machine guides the path of the load, it can be easier to learn than a free-weight deadlift, but it still requires proper bracing, hip control, and clean posture. Focus on pushing the hips back during the lowering phase and standing up by extending the hips, not by yanking with the arms or leaning backward at the top.
Quick Overview
| Body Part | Legs |
|---|---|
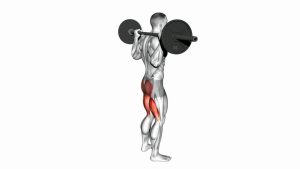
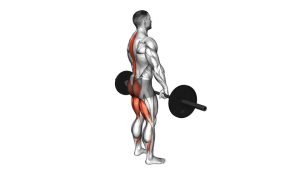
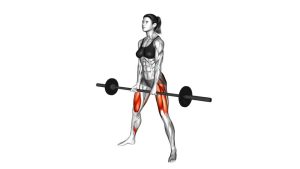
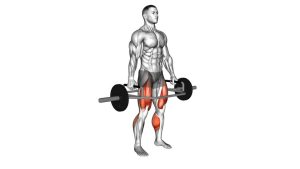
| Primary Muscle | Glutes and hamstrings |
| Secondary Muscle | Lower back, spinal erectors, core, upper back, grip, and quads |
| Equipment | Plate-loaded lever deadlift machine and weight plates |
| Difficulty | Beginner to intermediate, depending on load and range of motion |
Sets & Reps (By Goal)
- Strength: 3–5 sets × 4–6 reps with a controlled reset between reps and 2–3 minutes rest.
- Muscle growth: 3–4 sets × 8–12 reps with a smooth tempo and 60–90 seconds rest.
- Glute focus: 3–4 sets × 10–15 reps with a strong top squeeze and controlled lowering.
- Technique practice: 2–3 sets × 8–10 reps using light-to-moderate load and perfect hip hinge form.
- Finisher: 2 sets × 12–20 reps with moderate weight, steady breathing, and no rushed lockout.
Progression rule: Add weight only when every rep keeps the same hip hinge pattern, neutral spine, and controlled lockout. Do not increase load if your back rounds, hips shoot up too fast, or the machine pulls you forward.
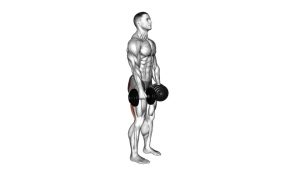
Setup / Starting Position
- Load the machine evenly: Add the same amount of weight to both sides of the plate-loaded lever arms.
- Step into position: Stand inside the machine with your feet about hip-width to shoulder-width apart.
- Set your feet: Keep your feet flat, weight balanced through the mid-foot and heel, and toes slightly turned out if comfortable.
- Grip the handles: Hold the handles firmly with straight arms and packed shoulders.
- Hinge your hips back: Push the hips behind you while keeping a soft bend in the knees.
- Brace your core: Tighten your midsection as if preparing to absorb pressure around your waist.
- Set your spine: Keep the chest proud, neck neutral, and lower back flat before starting the pull.
Setup cue: Think “hips back, chest long, arms quiet.” The handles should connect you to the load, but your hips should drive the exercise.
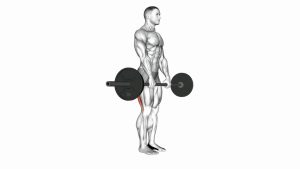
Execution (Step-by-Step)
- Create tension: Grip the handles, brace your core, and lightly pull the slack out of the machine.
- Drive through the floor: Push your feet down while keeping your back neutral and shoulders stable.
- Extend the hips: Stand tall by driving the hips forward, not by pulling with your arms.
- Keep the arms straight: Let the lower body move the lever while your arms act as hooks.
- Finish tall: Squeeze the glutes at the top without leaning backward or overextending the lower back.
- Lower with control: Push the hips back first and allow the knees to bend slightly as the handles travel down.
- Stop at your safe range: Lower until you feel a strong hamstring stretch while still keeping a flat back.
- Repeat smoothly: Reset your brace before each rep and maintain the same tempo from start to finish.
Pro Tips & Common Mistakes
Pro Tips
- Use the hips as the main driver: The glutes and hamstrings should create most of the movement.
- Keep the lever close to your body path: Stay centered in the machine so the load does not pull you forward.
- Control the negative: Lower slowly to build hamstring tension and improve hinge mechanics.
- Brace before each rep: A strong core position protects the spine and improves force transfer.
- Finish with glutes, not the lower back: Stand tall and squeeze without arching hard at the top.
Common Mistakes
- Rounding the lower back: Usually caused by going too low, using too much weight, or losing core tension.
- Turning it into a squat: Too much knee bend shifts the exercise away from the glutes and hamstrings.
- Pulling with the arms: Bending the elbows turns the movement into a messy row instead of a deadlift.
- Overextending at lockout: Leaning backward can irritate the lower back and reduce glute control.
- Dropping the weight: Fast lowering removes tension and increases the chance of losing position.
- Standing too far forward or back: Poor machine alignment can make the lever path feel awkward or unstable.
FAQ
What muscles does the plate-loaded lever deadlift work?
The plate-loaded lever deadlift mainly works the glutes and hamstrings. It also trains the lower back, spinal erectors, core, upper back, grip, and quads as supporting muscles.
Is the plate-loaded lever deadlift good for beginners?
Yes, it can be beginner-friendly because the machine guides the load path. However, beginners should still learn how to brace, hinge from the hips, and keep the spine neutral before using heavy weight.
Is this exercise more like a deadlift or a squat?
It should be performed more like a deadlift. The hips move back during the lowering phase, the torso inclines forward, and the glutes and hamstrings drive the lift. If the knees bend deeply, it becomes too squat-like.
Can I use this instead of barbell deadlifts?
Yes, it can be used as a deadlift alternative, especially if you want a more guided movement path. It may be useful for glute and hamstring training, machine-based strength work, or reducing balance demands.
How low should I go on the lever deadlift?
Lower until you feel a strong stretch in the hamstrings while keeping your back neutral. Do not chase extra depth if your lower back starts to round or your shoulders get pulled forward.
Should I squeeze my glutes at the top?
Yes. Finish each rep by standing tall and squeezing the glutes. Avoid leaning backward or pushing the hips too far forward, because that can shift stress into the lower back.
Recommended Equipment
- Plate-Loaded Deadlift Machine — ideal for performing machine-based lever deadlifts with a fixed path
- Olympic Weight Plates — used to load the lever machine progressively for strength and hypertrophy
- Weightlifting Straps — helpful when grip limits glute and hamstring work on heavier sets
- Weightlifting Belt — optional support for advanced lifters using heavier loads
- Heavy-Duty Gym Floor Mat — helps protect flooring and provides a stable training surface around plate-loaded machines
Tip: Equipment can support performance, but clean technique matters most. Start light, control the hinge, and increase load only when the movement stays stable.