Resistance Band Plank Jack: Form, Muscles Worked, Sets & Tips
Learn the Resistance Band Plank Jack for core stability, hip control, and cardio conditioning with step-by-step form, sets, mistakes, FAQs, and gear.
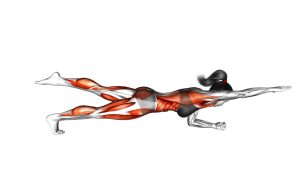
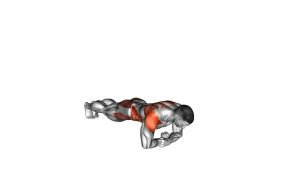
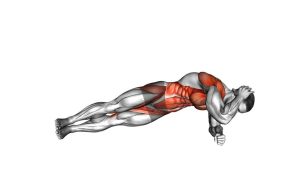
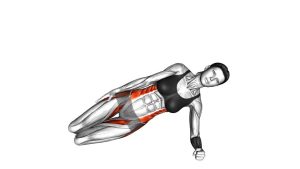
Resistance Band Plank Jack
This exercise works best when the plank stays strong while the feet move quickly. First, brace your midsection. Then, keep your shoulders stacked over your wrists as both feet jump out and back in. Because the resistance band pulls the legs together, your hips must work harder to control the outward phase without letting the pelvis twist.
Moreover, the movement should look smooth and athletic, not loose or bouncy. Your goal is to keep the torso quiet while the lower body performs the jack motion. Therefore, quality reps matter more than speed, especially when you are using a stronger band.
Quick Overview
| Body Part | Core |
|---|---|
| Primary Muscle | Abs, especially rectus abdominis and deep core stabilizers |
| Secondary Muscle | Hip abductors, glutes, shoulders, chest, triceps, hip flexors, and calves |
| Equipment | Mini resistance band or loop band |
| Difficulty | Intermediate because it combines plank strength, band resistance, and fast footwork |
Sets & Reps (By Goal)
- Core stability: 3 sets × 8–12 controlled reps, resting 45–75 seconds between sets.
- Cardio conditioning: 3–5 rounds × 20–35 seconds, resting 30–60 seconds between rounds.
- Fat-loss circuit training: 3–4 rounds × 15–25 seconds, paired with bodyweight squats, mountain climbers, or push-ups.
- Glute and hip activation: 2–3 sets × 10–15 reps with a lighter band and a slower outward jump.
- Beginner progression: 2–3 sets × 6–10 step-out reps per side before using a full jumping version.
Progression rule: First increase control, then increase time, and only then use a stronger band. If your hips bounce or your lower back arches, reduce the speed immediately.
Setup / Starting Position
- Place the band: Loop a mini resistance band around your lower legs, near the ankles or lower calves, depending on comfort and control.
- Set your hands: Start in a high plank with your palms flat, fingers spread, and hands under your shoulders.
- Position your feet: Keep your feet close together so the band has light starting tension.
- Brace your core: Pull your ribs down slightly, tighten your abs, and keep your hips in line with your shoulders.
- Lengthen your body: Keep your head, spine, hips, and legs in one strong line before the first rep.
Tip: A lighter band is better for clean reps. A band that is too heavy often causes hip twisting, short jumps, or lower-back sagging.
Execution (Step-by-Step)
- Start in a strong plank: Press the floor away, brace your abs, and keep your shoulders directly above your wrists.
- Jump both feet outward: Move both legs apart at the same time, stretching the band as your feet land wider than hip-width.
- Keep the torso stable: Resist the urge to let your hips drop, bounce, or rotate as the feet separate.
- Jump both feet back in: Bring your feet together with control while keeping band tension smooth.
- Repeat rhythmically: Continue the out-in pattern while maintaining a straight plank line from shoulders to ankles.
- Stop before form breaks: End the set when your core can no longer keep your hips level.
Pro Tips & Common Mistakes
Pro Tips
- Push the floor away: This keeps the upper back active and helps prevent shoulder collapse.
- Brace before jumping: A strong brace protects your lower back as the legs move quickly.
- Land softly: Light foot contacts reduce impact and help you keep a steady rhythm.
- Use even leg drive: Both feet should jump out and in together, not one leg first.
- Control the band: Do not let the band snap your legs inward. Instead, guide the return.
Common Mistakes
- Hips sagging: This usually means the core is losing tension or the set is too long.
- Butt lifting too high: This reduces core demand and turns the movement into quick footwork only.
- Using a band that is too heavy: Excessive resistance can cause sloppy jumps and hip rotation.
- Shoulders drifting behind the hands: Keep the shoulders stacked so the plank stays strong.
- Rushing every rep: Speed is useful only when your plank position remains clean.
FAQ
What muscles does the Resistance Band Plank Jack work?
It mainly trains the abs and deep core stabilizers. Additionally, the band challenges the hip abductors and glutes, while the shoulders, chest, and triceps help hold the high plank.
Is the Resistance Band Plank Jack good for cardio?
Yes. Because the feet move in a fast out-in pattern while the body holds a plank, the exercise can raise your heart rate quickly. However, it should still remain controlled rather than rushed.
Where should I place the resistance band?
In the video, the band is clearly looped around the lower legs. For most people, placing it around the ankles or lower calves works well. If the band slides or feels too intense, move it slightly higher and use a lighter resistance.
Can beginners do this exercise?
Beginners can start with a step-out plank jack instead of jumping. Step one foot out, return it, then repeat on the other side. Once the plank stays stable, progress to the full banded jumping version.
Why does my lower back hurt during plank jacks?
Lower-back discomfort usually happens when the hips sag or the abs stop bracing. Therefore, shorten the set, slow the tempo, or remove the band until you can keep a neutral plank position.
How can I make Resistance Band Plank Jacks harder?
You can increase the duration, use a slightly stronger band, or add the exercise to a conditioning circuit. Nevertheless, the best progression is only useful when your shoulders, hips, and spine stay controlled.
Recommended Equipment
- Mini Resistance Bands Set — the main tool for adding lateral resistance to plank jacks.
- Fabric Resistance Bands — useful if you want a band that feels more stable and less likely to roll.
- Non-Slip Exercise Mat — helps protect your hands and improve floor grip during high plank work.
- Workout Wrist Support Wraps — optional support for people who feel wrist fatigue during plank variations.
- Core Sliders — helpful for lower-impact plank jack variations when jumping is not ideal.
Tip: Choose equipment that helps you keep clean form. A lighter band and stable mat usually produce better reps than a heavy band that pulls your plank out of position.