Kettlebell Low Windmill: Form, Core Benefits, Sets & Tips
Learn the Kettlebell Low Windmill for oblique strength, hip mobility, and shoulder stability with step-by-step form, sets, tips, FAQs, and gear.
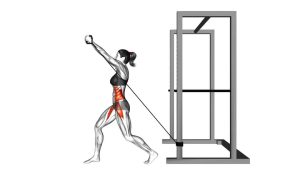
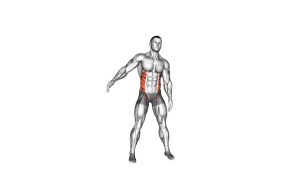
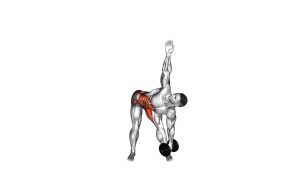
Kettlebell Low Windmill
This variation trains the obliques, deep core stabilizers, hips, and shoulder stabilizers through a slow side-bending pattern. Because the kettlebell is held low, the exercise gives clear feedback as the hand travels down toward the lower leg. Meanwhile, the overhead arm helps maintain alignment and encourages the chest to stay open.
Although the movement looks simple, it requires patience and precision. First, the feet must stay grounded. Next, the hips shift slightly away from the kettlebell side. Then, the torso tilts with control while the kettlebell follows a close path near the leg. Finally, the body returns to standing without twisting or rushing.
Quick Overview
| Body Part | Core |
|---|---|
| Primary Muscle | Obliques |
| Secondary Muscle | Deep core stabilizers, glutes, hamstrings, shoulders, and hip stabilizers |
| Equipment | Kettlebell |
| Difficulty | Intermediate because it requires balance, hip control, and shoulder stability |
Sets & Reps (By Goal)
- Technique practice: 2–3 sets × 5–6 reps per side using a light kettlebell
- Core control: 3–4 sets × 6–8 reps per side with a slow 3-second descent
- Mobility and stability: 2–3 sets × 6–10 reps per side with full control
- Strength focus: 3–5 sets × 4–6 reps per side after technique is consistent
Progression rule: Improve range, balance, and control first. After that, increase the kettlebell weight gradually. However, never sacrifice a long spine or stable overhead arm just to lift heavier.
Setup / Starting Position
- Stand wide: Place your feet wider than hip-width so you have a stable base.
- Hold the kettlebell low: Keep the kettlebell in one hand beside the leg on the working side.
- Reach the opposite arm overhead: Extend the other arm straight up and keep it active.
- Set your torso tall: Brace your core lightly, keep your chest open, and avoid rounding your back.
- Prepare your gaze: As you descend, you may look toward the overhead hand if it helps you maintain alignment.
Tip: Start with a very light kettlebell until the side hinge feels smooth. Additionally, keep both feet planted throughout the full rep.
Execution (Step-by-Step)
- Brace gently: Begin tall with the kettlebell hanging by your side and the opposite arm overhead.
- Shift the hips: Move your hips slightly away from the kettlebell side to create space for the hinge.
- Lower with control: Slide the kettlebell hand down toward the lower leg while your torso tilts sideways.
- Keep the top arm stable: Maintain a straight overhead arm as your chest stays open.
- Reach your controlled depth: Stop when you can no longer keep the spine long, feet grounded, and movement smooth.
- Reverse the motion: Drive through your feet, engage the core, and return to the upright starting position.
- Reset before repeating: Regain posture and balance before starting the next rep.
Pro Tips & Common Mistakes
- Move slowly: A slow descent makes the obliques and hips work harder while improving control.
- Avoid rounding the spine: Keep the torso long rather than collapsing toward the floor.
- Do not squat the movement: The action is mainly a side hinge, not a deep knee bend.
- Keep the overhead arm steady: If the top arm drifts or bends, reduce the weight or range.
- Use the hips: Let the hips shift slightly away from the kettlebell side instead of forcing the back to bend.
- Control the return: Do not bounce out of the bottom position. Instead, rise smoothly and reset.
- Train both sides: Perform the same number of reps on each side to build balanced core strength.
FAQ
What muscles does the Kettlebell Low Windmill work?
The exercise mainly targets the obliques. It also trains the deep core stabilizers, hips, glutes, hamstrings, and shoulder stabilizers because the body must stay controlled during the side hinge.
Is the Kettlebell Low Windmill good for beginners?
It can be used by beginners only with a very light kettlebell and a short range of motion. However, because it requires balance, hip mobility, and shoulder control, many lifters should treat it as an intermediate exercise.
Should I look up at the overhead hand?
In the visible movement, the head turns upward during the descent. This can help some people keep the chest open and the overhead arm aligned. However, if looking up bothers your neck, keep your gaze more neutral.
How low should the kettlebell go?
Lower only as far as you can while keeping your spine long, feet grounded, and movement controlled. For many people, the kettlebell may reach the shin, ankle, or just above the foot. Nevertheless, depth should never come from forcing the back.
What is the biggest mistake during this exercise?
The biggest mistake is turning the windmill into a rushed side bend or squat. Instead, keep the motion controlled, hinge through the hips, and let the kettlebell follow a close path along the leg.
Recommended Equipment (Optional)
- Kettlebell Set — useful for progressing gradually as your windmill control improves
- Adjustable Kettlebell — saves space and allows small weight changes for technique work
- Non-Slip Exercise Mat — provides better foot grip and comfort during controlled floor-based training areas
- Weightlifting Chalk — improves grip when holding the kettlebell during slow reps
- Mobility Stick — helpful for practicing windmill alignment before adding load
Tip: Choose equipment that helps you move better, not just heavier. For this exercise, control and alignment matter more than maximum load.