Seated Shoulder Flexor, Depressor & Retractor Stretch (Bent Knee): Form, Benefits, Tips & FAQ
Learn how to perform the Seated Shoulder Flexor, Depressor & Retractor Stretch (Bent Knee) with proper form. Improve shoulder mobility, open the chest, and stretch the front delts with setup tips, execution steps, common mistakes, FAQs, and recommended equipment.
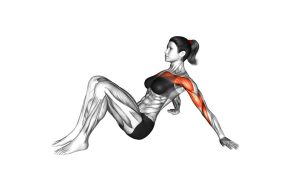
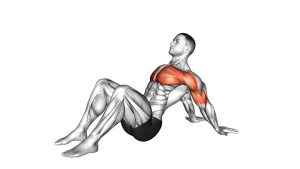
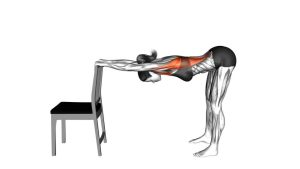
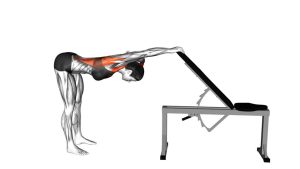
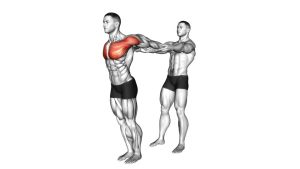
Seated Shoulder Flexor, Depressor & Retractor Stretch (Bent Knee)
This stretch is most effective when performed with a tall torso, relaxed neck, and controlled pressure through the hands. You should feel a broad opening across the front shoulders and chest, with light scapular retraction and depression rather than joint pinching. It works well as a warm-up, cooldown, posture reset, or mobility accessory for anyone who spends long hours sitting or does frequent pressing work.
Quick Overview
| Body Part | Shoulders |
|---|---|
| Primary Muscle | Anterior deltoid (front shoulder) |
| Secondary Muscle | Pectoralis major, biceps long head, scapular stabilizers |
| Equipment | None |
| Difficulty | Beginner |
Sets & Reps (By Goal)
- Mobility warm-up: 2–3 sets × 20–30 second holds
- Posture reset: 2–4 sets × 20–40 second holds
- Cooldown flexibility work: 2–3 sets × 30–45 second holds
- Shoulder mobility focus day: 3–4 sets × 30–60 second holds with easy breathing
Progression rule: Increase hold time gradually before trying a deeper chest lift or greater shoulder extension. More range is only useful if the stretch stays smooth and controlled.
Setup / Starting Position
- Sit on the floor: Bend your knees and place your feet flat for a stable base.
- Place your hands behind you: Set them slightly wider than shoulder-width with the fingers turned outward or slightly back, depending on comfort.
- Straighten the arms: Keep the elbows long without hyperextending them.
- Lift the chest: Sit tall through the sternum and avoid rounding forward.
- Set the shoulders: Think “shoulders down and back” before you deepen the stretch.
Tip: The closer the hands are to the hips, the more intense the shoulder extension may feel. Start conservatively and adjust hand position to match your mobility.
Execution (Step-by-Step)
- Brace lightly through the hands: Press into the floor and lengthen your spine.
- Open the chest: Gently draw the shoulder blades back and down.
- Shift the torso slightly forward or lift through the sternum: This increases the stretch across the front delts and chest.
- Keep the neck neutral: Do not crank the head back or shrug the shoulders upward.
- Hold and breathe: Stay in the stretched position for the planned duration with calm, steady breathing.
- Exit slowly: Reduce pressure through the hands and return to a neutral seated posture without dropping out of the position.
Pro Tips & Common Mistakes
- Lead with the chest: Think about lifting the sternum instead of forcing the shoulders back aggressively.
- Keep scapulae depressed: Avoid shrugging toward the ears.
- Use a mild bend in intensity, not posture: Bent knees make the setup easier to control, but your torso should still stay tall.
- Don’t jam the joint: Stretch sensation is good; sharp pressure in the front of the shoulder is not.
- Adjust hand angle: Turning the fingers slightly outward often feels better on the wrists and shoulders.
- Breathe through the hold: Relaxed breathing helps the chest open without compensating.
- Common mistake: Letting the chest collapse while the shoulders roll forward defeats the purpose of the stretch.
- Common mistake: Locking out the elbows harshly and dumping all the tension into the joints instead of the muscles.
FAQ
Where should I feel this stretch?
Most people feel it in the front delts, upper chest, and sometimes the front of the biceps/shoulder line. You may also notice the shoulder blades drawing gently back and down.
Is this a mobility drill or a strength exercise?
It is mainly a mobility and stretching drill. While the supporting muscles work isometrically, the main goal is to improve shoulder opening and posture-friendly range.
Can beginners do this exercise?
Yes. It is beginner-friendly as long as you use a comfortable hand position, keep the range modest, and avoid forcing the shoulders into a painful angle.
What if my wrists feel uncomfortable?
Try turning the fingers outward more, placing the hands slightly wider, or performing the stretch on yoga blocks to reduce wrist extension. You can also shorten the hold time.
When should I use this stretch in a workout?
It works well in a shoulder mobility warm-up, after upper-body training, or during posture-correction sessions. It is especially useful after long periods of sitting or pressing-focused workouts.
Recommended Equipment (Optional)
- Yoga Mat — adds floor comfort for seated mobility work and helps reduce pressure on the hips and hands
- Yoga Blocks — useful for elevating the hands if wrist mobility or shoulder angle feels restricted
- Stretch Strap — a practical add-on for chest, shoulder, and overhead mobility work
- Resistance Bands — great for pairing this stretch with band pull-aparts, face pulls, and posture drills
- Yoga Knee Pad / Support Pad — adds comfort for floor-based mobility sessions and general stretching practice
Tip: For this exercise, comfort and positioning tools matter more than heavy equipment. Choose items that make the stretch easier to repeat consistently and pain-free.