Stick Side Bend Stretch: Form, Benefits, Tips & FAQ
Learn the Stick Side Bend Stretch for obliques, lats, and side-body mobility. Includes setup, step-by-step form, sets, tips, FAQs, and equipment.
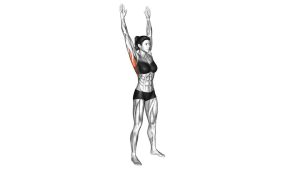
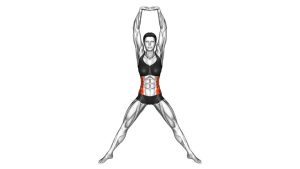
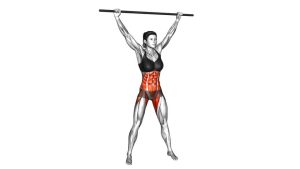
Stick Side Bend Stretch
This stretch works best when the body stays tall, the arms remain long, and the movement comes from controlled lateral flexion. Because the stick creates a longer overhead line, it can make the side-body stretch feel clearer and easier to control. However, the movement should still stay smooth, gentle, and balanced from side to side.
Quick Overview
| Body Part | Obliques |
|---|---|
| Primary Muscle | Obliques |
| Secondary Muscle | Lats, intercostals, spinal erectors, shoulders, and deep core stabilizers |
| Equipment | Stick, dowel, PVC pipe, broomstick, or mobility bar |
| Difficulty | Beginner |
Sets & Reps (By Goal)
- General warm-up: 1–2 sets × 6–10 reps per side with a smooth controlled tempo.
- Side-body mobility: 2–3 sets × 8–12 reps per side, pausing briefly at the end range.
- Flexibility focus: 2–3 sets × 20–30 second gentle holds per side.
- Posture reset: 1–2 sets × 5–8 slow reps per side during a light mobility break.
Progression rule: First improve control and breathing. Then, if the movement feels comfortable, increase hold time slightly before trying to bend deeper.
Setup / Starting Position
- Stand tall: Place your feet about hip-width apart and keep your weight balanced through both feet.
- Hold the stick wide: Grip the stick with both hands wider than shoulder-width so your arms can stay extended overhead.
- Reach overhead: Lift the stick above your head while keeping the elbows mostly straight.
- Stack the torso: Keep the ribs controlled, chest open, and spine long before you begin.
- Brace lightly: Engage the core just enough to prevent twisting, leaning forward, or collapsing through the lower back.
Tip: A wider grip usually makes the overhead position easier. Therefore, adjust your hand position if your shoulders feel restricted.
Execution (Step-by-Step)
- Start from center: Stand upright with the stick overhead, arms long, and eyes facing forward.
- Bend to one side: Slowly lean your torso sideways while keeping the stick aligned with your arms and upper body.
- Keep the hips stable: Allow the side body to lengthen, but avoid shifting the hips aggressively in the opposite direction.
- Pause gently: Hold the side-bend position for a brief moment while breathing into the stretched side.
- Return with control: Bring your torso back to the upright position without snapping or using momentum.
- Repeat to the opposite side: Move into the same side bend on the other side, keeping the motion smooth and symmetrical.
Pro Tips & Common Mistakes
- Move in a tall arc: Think about reaching up and over instead of collapsing down into the waist.
- Keep both arms long: The stick should help create length through the shoulders and side body.
- Avoid twisting: Keep your chest facing forward so the stretch targets lateral flexion, not rotation.
- Do not rush: A slow tempo helps you control the spine and feel the stretch more clearly.
- Keep the feet grounded: Stable feet make the stretch safer and more balanced.
- Relax the neck: Keep the head aligned with the torso instead of shrugging the shoulders toward the ears.
- Use comfortable range: A smaller clean bend is better than a deep bend with poor control.
FAQ
What muscles does the Stick Side Bend Stretch target?
The main target is the obliques. In addition, the stretch can involve the lats, intercostals, spinal erectors, shoulders, and other side-body tissues.
Is the Stick Side Bend Stretch a strength exercise or a stretch?
It is mainly a mobility and flexibility exercise. However, the core still works lightly to control the torso and keep the movement stable.
Should I bend as far as possible?
No. The goal is a smooth side-body stretch, not maximum range. Therefore, stop at a comfortable point where you can breathe, keep the feet grounded, and return to center with control.
Can beginners do this exercise?
Yes. This is a beginner-friendly stretch when performed slowly. Beginners should use a light stick, a wide grip, and a smaller range of motion at first.
Why use a stick for side bends?
The stick helps keep the arms long and gives the body a clear overhead line. As a result, many people feel a better stretch through the lats, ribs, and obliques.
What is the most common mistake?
The most common mistake is turning the movement into a forward bend or twist. Instead, keep the chest facing forward and move only side to side.
Recommended Equipment (Optional)
- Mobility Stick / Training Dowel — ideal for overhead mobility drills and controlled side-bend stretching
- PVC Exercise Bar — a lightweight option for beginners practicing shoulder and core mobility
- Yoga Mat — provides a stable non-slip surface for warm-ups and stretching sessions
- Stretching Strap — useful for additional flexibility work after side-body mobility drills
- Foam Roller — helpful for warming up the upper back, lats, and torso before mobility training
Tip: Choose equipment that helps you move with control. If a tool causes shoulder, neck, or back discomfort, reduce range or switch to a lighter option.