Raise Single-Leg Push-Up: Form, Muscles Worked, Sets & Tips
Master the Raise Single-Leg Push-Up to build chest strength and anti-rotation core stability. Learn proper setup, step-by-step form, sets by goal, common mistakes, FAQs, and optional equipment.
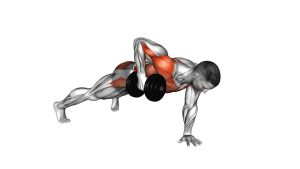
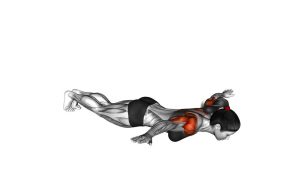
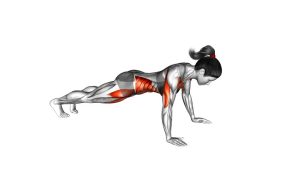
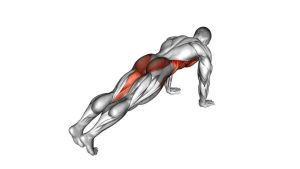
Raise Single-Leg Push-Up
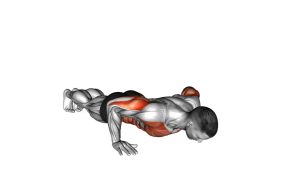
This variation rewards tight positioning more than speed. Your goal is to press up and down as one solid unit: head, ribs, hips, and planted heel moving together. You’ll feel the chest work harder than a standard push-up, while the obliques and glutes prevent rotation caused by the lifted leg.
Quick Overview
| Body Part | Chest |
|---|---|
| Primary Muscle | Pectoralis major (chest) |
| Secondary Muscle | Triceps, anterior deltoids, serratus anterior, core (obliques/TVA), glutes |
| Equipment | None (optional: mat, push-up handles/parallettes) |
| Difficulty | Advanced (requires strong plank control and stable shoulders) |
Sets & Reps (By Goal)
- Strength focus: 4–6 sets × 3–6 reps/side (2–3 min rest, perfect form)
- Hypertrophy (muscle building): 3–4 sets × 6–12 reps/side (60–90 sec rest)
- Core stability + control: 2–4 sets × 5–10 reps/side (slow tempo, 45–75 sec rest)
- Conditioning finisher: 2–3 rounds × 6–10 reps/side (short rests, stay strict)
Progression rule: First improve range + stability, then add reps. If hips rotate or your plank breaks, regress by elevating your hands (bench/box) or reducing reps per side.
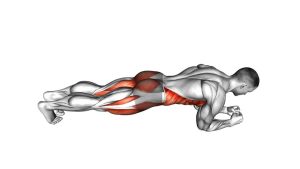
Setup / Starting Position
- Hand position: Place hands slightly wider than shoulder width. Spread fingers and “grip” the floor.
- Strong plank: Lock in ribs down, brace the core, and squeeze glutes. Keep a straight line head-to-heel.
- Feet: Start with feet hip-width for stability. Shift weight evenly into both hands.
- Raise one leg: Lift one leg straight behind you, toes pointed slightly down. Keep hips square.
- Neck neutral: Look slightly forward/down—don’t crane the neck.
Tip: If wrist comfort is an issue, use push-up handles or do the move on fists (only if pain-free and stable).
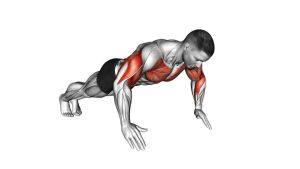
Execution (Step-by-Step)
- Breathe + brace: Inhale gently, tighten core and glutes, and keep hips level.
- Lower under control: Bend elbows and lower chest toward the floor. Keep elbows at ~30–45° from your torso.
- Stay square: Resist rotation—your belly button stays facing the floor, not turned to one side.
- Press up: Exhale as you drive the floor away and return to a strong plank.
- Repeat, then switch: Finish all reps on one side (or alternate each rep) while keeping the raised leg steady.
Pro Tips & Common Mistakes
- Think “glutes on”: Squeezing glutes helps keep hips square and protects the lower back.
- Control the tempo: Try 2 seconds down, brief pause, then press up without bouncing.
- Don’t flare elbows: Excessive flaring can irritate shoulders—keep elbows slightly tucked.
- Avoid hip rotation: The raised leg should not cause the torso to twist. Reduce height if needed.
- Don’t crane the neck: Keep a neutral gaze; “head forward” breaks alignment.
- Use smart regressions: Hands elevated, shorter range, or standard push-ups before adding the leg raise.
FAQ
What should I feel during a raise single-leg push-up?
Primarily your chest and triceps, plus strong work in your obliques and glutes to stop your body from twisting. If you feel mostly low-back strain, re-brace and squeeze glutes harder.
Should I alternate legs every rep or do one side at a time?
Both work. One side at a time builds better control and lets you focus on resisting rotation. Alternating reps adds a coordination challenge and can feel more athletic.
How do I make this easier if I can’t keep my hips stable?
Elevate your hands on a bench/box, reduce your rep count, and lift the leg only a little. You can also perform a standard push-up first, then raise the leg at the top for a brief hold.
Is this a good exercise for chest growth?
Yes—if you can keep strict form and train near technical failure. For hypertrophy, use moderate reps (6–12 per side), controlled tempo, and full range. Pair it with other chest movements for best results.
Can I do it if my wrists hurt during push-ups?
Consider using push-up handles, parallettes, or a neutral wrist position. If pain persists, switch to a wrist-friendly press variation and rebuild gradually.
Recommended Equipment (Optional)
- Push-Up Handles / Bars — neutral wrists, deeper range, and better pressing comfort
- Parallettes Bars — stable grip and extra range of motion for advanced push-up variations
- Non-Slip Exercise Mat — improves traction and knee/hand comfort on hard floors
- Resistance Bands Set — perfect for warm-ups (pull-aparts), push-up assistance, and upper-back balance work
- Wrist Wraps (Training Support) — optional support if your wrists fatigue quickly during pressing
Tip: Optional tools should make your reps more comfortable and more consistent. If anything causes pain or worsens form, remove it and regress the exercise.