Kneeling Dynamic Plank: Form, Core Benefits, Sets, Tips & FAQ
Learn the Kneeling Dynamic Plank to build core stability, shoulder control, and plank strength with step-by-step form, sets, tips, FAQs, and gear.
Kneeling Dynamic Plank
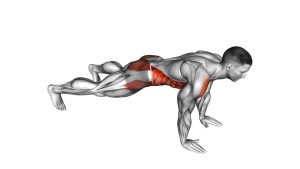
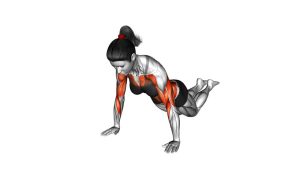
This exercise works best when the body stays long from the head to the knees. Although the arms are moving, the core should remain steady throughout every transition. Therefore, keep your ribs controlled, your hips level, and your shoulders stacked as you shift between forearms and hands.
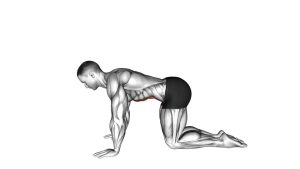
In the visible movement, the subject starts on both forearms with the knees grounded. Then, one hand presses into the floor, the second hand follows, and the body reaches a kneeling high plank. After that, one forearm returns to the ground, the other forearm follows, and the body resets into the starting position.
Quick Overview
| Body Part | Core |
|---|---|
| Primary Muscle | Rectus abdominis and deep core stabilizers |
| Secondary Muscle | Obliques, shoulders, triceps, chest, hip stabilizers |
| Equipment | Bodyweight only; optional exercise mat for knee and elbow comfort |
| Difficulty | Beginner to intermediate, depending on tempo and total reps |
Sets & Reps (By Goal)
- Beginner core control: 2–3 sets × 6–8 total transitions, resting 45–75 seconds between sets.
- Core endurance: 3–4 sets × 8–12 total transitions with a slow, steady rhythm.
- Shoulder stability practice: 2–4 sets × 6–10 transitions while alternating the lead arm each rep.
- Warm-up activation: 1–2 sets × 5–8 smooth transitions before upper-body or core training.
- Tempo challenge: 3 sets × 6–10 transitions using a 2-second press up and 2-second lower down.
Progression rule: Add reps only when your hips stay quiet and your body line remains stable. Additionally, alternate the lead arm to keep both shoulders working evenly.
Setup / Starting Position
- Start on the floor: Place your knees on the ground and set your forearms on the floor in front of you.
- Stack the elbows: Keep your elbows under or slightly in front of your shoulders so the upper body feels supported.
- Set the lower body: Keep both knees grounded and position the body in a straight line from head to hips to knees.
- Brace the core: Gently tighten your abs as if preparing to resist a push from the side.
- Keep the neck neutral: Look down toward the floor without lifting or dropping the head.
- Prepare the hands: Keep your hands close enough that you can place one palm under the shoulder during the press-up phase.
Tip: Use a soft mat if your knees or elbows feel uncomfortable. However, avoid an overly thick surface that makes your hands unstable.
Execution (Step-by-Step)
- Begin in a kneeling forearm plank: Keep both forearms down, knees grounded, and torso long.
- Press one palm into the floor: Lift one forearm and place that hand under the shoulder.
- Push through the first hand: Extend the first elbow while keeping your hips as still as possible.
- Place the second hand down: Move the other hand to the floor and press up into a kneeling high plank.
- Pause briefly at the top: Keep shoulders over wrists, abs braced, and knees on the floor.
- Lower one forearm back down: Bend one elbow and return that forearm to the floor with control.
- Lower the second forearm: Bring the other forearm down and return to the starting kneeling forearm plank.
- Repeat smoothly: Continue alternating sides while keeping your torso quiet and your breathing steady.
Pro Tips & Common Mistakes
- Move one arm at a time: The exercise should look controlled, not rushed or bouncy.
- Keep the hips level: Avoid twisting the pelvis each time one hand leaves the floor.
- Brace before each transition: A quick abdominal brace helps protect the lower back and improves control.
- Do not let the chest collapse: Push the floor away so the shoulders stay active and stable.
- Avoid shrugging: Keep the neck long and the shoulders away from the ears.
- Alternate the lead arm: Lead with the right arm on one rep, then lead with the left arm on the next rep.
- Control the lowering phase: Dropping hard onto the forearms can irritate the elbows and reduce core tension.
- Use a smaller range if needed: If the transition feels too hard, practice only one hand placement at a time.
FAQ
What is the Kneeling Dynamic Plank?
The Kneeling Dynamic Plank is a modified plank variation where you move from forearms to hands and back down while keeping the knees on the floor. As a result, it trains core stability and shoulder control with less intensity than a full plank up-down.
What muscles does the Kneeling Dynamic Plank work?
It mainly works the abs and deep core stabilizers. Additionally, the shoulders, triceps, chest, obliques, and hip stabilizers assist as you press up and lower down.
Is the Kneeling Dynamic Plank good for beginners?
Yes. Because the knees stay grounded, this exercise is more beginner-friendly than a full dynamic plank. However, it still requires control, so start with low reps and focus on steady movement.
Should my hips move during this exercise?
A small amount of movement can happen during the transition. However, the goal is to minimize hip rotation, side-to-side rocking, and lower-back sagging.
How can I make the Kneeling Dynamic Plank harder?
First, slow down the tempo and add more controlled reps. Then, reduce hip movement, alternate the lead arm, or progress to a full plank up-down when your form stays stable.
Why do my shoulders feel tired before my abs?
This can happen because the shoulders and triceps help you press from forearms to hands. To keep the core involved, brace before each transition and avoid collapsing into your shoulder joints.
Recommended Equipment
- Exercise Mat — adds comfort for the knees, elbows, and forearms during floor-based plank work
- Thick Yoga Mat — useful if you need extra cushioning while keeping enough stability for hand placement
- Foam Knee Pad — supports the knees during kneeling plank variations and other floor exercises
- Push-Up Handles — optional tool for wrist comfort during the high-plank portion
- Core Sliders — helpful for progressing into more advanced core stability drills later
Tip: Choose equipment that improves comfort without reducing control. If a tool makes your shoulders, wrists, or knees feel unstable, return to the basic bodyweight version.