Lying Double Legs Hammer Curl with Towel: Form, Sets, Tips & FAQ
Learn how to do the Lying Double Legs Hammer Curl with Towel for stronger biceps, brachialis, and forearms. Step-by-step form, sets by goal, common mistakes, FAQs, and recommended equipment.
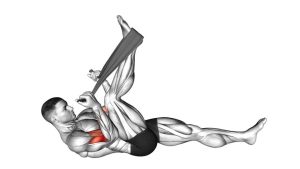
Lying Double Legs Hammer Curl with Towel
This exercise is especially useful for home workouts, travel training, or anyone who wants to train the upper arms with minimal equipment. Because the load is created by your own leg drive, you can easily adjust intensity from rep to rep. The key is to keep your elbows steady, wrists neutral, and the towel under continuous tension from start to finish.
Quick Overview
| Body Part | Biceps |
|---|---|
| Primary Muscle | Brachialis |
| Secondary Muscle | Biceps brachii, brachioradialis, forearm flexors |
| Equipment | Towel and floor space or exercise mat |
| Difficulty | Beginner to Intermediate (easy to learn, harder when more leg resistance is applied) |
Sets & Reps (By Goal)
- Muscle building: 3–4 sets × 8–15 reps with controlled resistance and a 1–2 second squeeze at the top
- Endurance / pump work: 2–4 sets × 15–25 reps using lighter leg pressure and short rest periods
- Home strength practice: 3–5 sets × 6–10 reps with harder foot drive and slower eccentrics
- Warm-up / activation: 1–2 sets × 12–15 smooth reps at moderate effort before a full arm workout
Progression rule: First increase tension quality, pause time, or eccentric control. Then increase total reps or sets. The best progress comes from keeping the towel tight and the reps strict, not from rushing.
Setup / Starting Position
- Lie flat on your back: Use a mat if needed for comfort. Keep your head, upper back, and hips supported.
- Loop the towel under both feet: Hold one end of the towel in each hand using a neutral grip so your palms face each other.
- Bend the knees slightly if needed: Adjust leg position so the towel is secure and tension feels balanced on both sides.
- Set the arms: Keep your elbows close to your torso and your upper arms relatively fixed throughout the curl.
- Create light starting tension: Press gently with the feet so the towel is taut before the first rep begins.
Tip: A thicker, non-slippery towel usually feels better in the hands and gives you more control during the exercise.
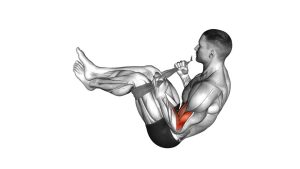
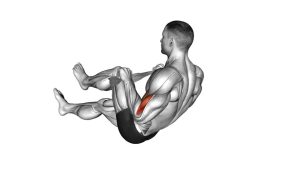
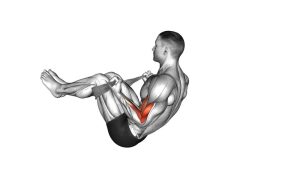
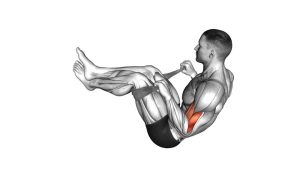
Execution (Step-by-Step)
- Brace and align: Keep your ribcage down, shoulders relaxed, and wrists straight. Maintain mild tension in the towel.
- Start the curl: Pull the towel handles upward toward your shoulders while your feet press downward to create resistance.
- Keep a hammer grip: Do not rotate the wrists. The palms should continue facing each other the whole time.
- Pin the elbows: Let the forearms move, but avoid letting the elbows flare wide or drift excessively.
- Reach the top with control: Curl until your hands come close to your upper chest or shoulders, depending on flexibility and towel length.
- Squeeze briefly: Pause for 1–2 seconds and contract the biceps and brachialis hard without shrugging the shoulders.
- Lower slowly: Extend the elbows under control while continuing to push with the feet so tension stays on the arms.
- Repeat smoothly: Move directly into the next rep without letting the towel go slack.
Pro Tips & Common Mistakes
- Use progressive leg pressure: The feet determine the load. Press too little and the curl becomes easy; press too hard and form may break down.
- Stay in a neutral grip: This hammer position shifts emphasis toward the brachialis and brachioradialis while still training the biceps.
- Keep the towel tight: Constant tension makes the rep far more effective than pulsing or relaxing between phases.
- Control the eccentric: The lowering phase is where a lot of muscle-building tension comes from, so do not rush it.
- Do not yank with the shoulders: Keep the upper arms quiet and avoid turning the movement into a row or shrug.
- Avoid wrist collapse: Bent wrists reduce force transfer and may irritate the forearms over time.
- Match both sides evenly: Keep resistance balanced through both feet so one arm does not dominate the movement.
FAQ
What muscles does the Lying Double Legs Hammer Curl with Towel work?
It mainly targets the brachialis, with strong assistance from the biceps brachii, brachioradialis, and other forearm flexors. The neutral grip is what gives it that hammer curl emphasis.
Is this a good substitute for dumbbell hammer curls?
Yes, especially when you do not have weights available. It will not feel exactly like a dumbbell curl, but it can still provide meaningful arm tension and a great pump when you keep the towel tight and use proper leg resistance.
How hard should I push with my feet?
Hard enough to make the last few reps challenging while still allowing strict form. Start moderate, then gradually increase foot pressure as you learn how to keep the elbows stable and the curl smooth.
Can beginners use this exercise?
Absolutely. It is beginner-friendly because resistance is self-controlled. New lifters can start with very light leg pressure and focus on mechanics before trying to make the movement harder.
Should I do this exercise at the beginning or end of an arm workout?
Either works. Use it early for focused self-resisted strength work, or place it later in the session as a high-tension finisher when you want extra biceps and forearm volume without more equipment.
Recommended Equipment
- Workout Towel — useful if you want a dedicated towel with a more comfortable grip for repeated home training
- Yoga Mat / Exercise Mat — adds comfort for the back, elbows, and head while performing floor-based curls
- Resistance Bands Set — a great next step if you want more arm-training variety after towel curls
- Door Anchor Band Kit — expands your home setup for curls, rows, and other upper-body accessories
- Forearm Grip Strengthener — helps build supporting grip endurance that can improve towel control during self-resisted curls
Tip: The towel curl works well on its own, but pairing it with a mat and a few simple home tools can make your upper-arm training much more versatile.