Band Cross-Chest Biceps Curl: Form, Muscles Worked, Sets, Tips & FAQ
Learn how to do the Band Cross-Chest Biceps Curl with proper form. Discover muscles worked, setup, execution steps, sets and reps by goal, common mistakes, FAQs, and recommended equipment.
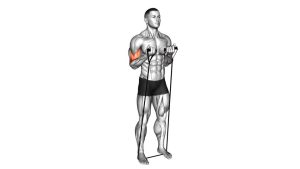
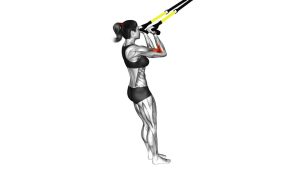
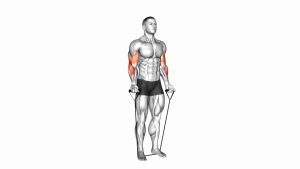
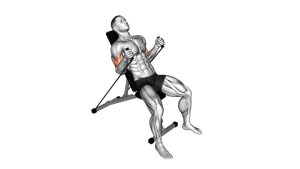
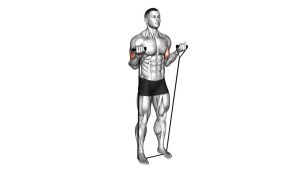
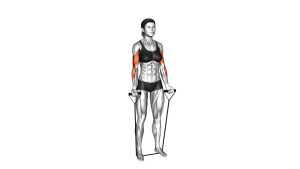
Band Cross-Chest Biceps Curl
This exercise works well for lifters who want a simple, joint-friendly biceps movement using minimal equipment. The band keeps tension on the arms from the start of the rep to the finish, and the cross-chest path can help you feel a stronger contraction at the top than some standard straight-line curls. Use a controlled range, avoid leaning too far back, and let the elbows guide the movement rather than the shoulders.
Quick Overview
| Body Part | Biceps |
|---|---|
| Primary Muscle | Biceps brachii |
| Secondary Muscle | Brachialis, brachioradialis, forearms, front deltoids (light stabilization) |
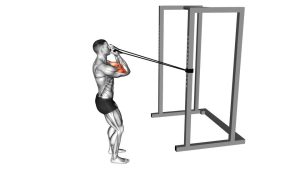
| Equipment | Resistance band with handles or a band setup that allows a cross-body curl path |
| Difficulty | Beginner to Intermediate |
Sets & Reps (By Goal)
- Muscle growth: 3–4 sets × 8–15 reps per side with controlled tempo and 45–75 seconds rest
- General arm training: 2–4 sets × 10–15 reps per side with smooth reps and moderate effort
- Endurance / light home workout: 2–3 sets × 15–20 reps per side with lighter band tension
- Warm-up / activation: 1–2 sets × 12–15 easy reps focusing on squeeze and control
Progression rule: Increase total reps first, then increase band tension. Keep the same clean path across the chest before making the band heavier.
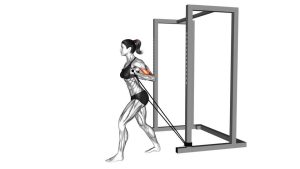
Setup / Starting Position
- Anchor the band securely: Set the resistance band so it creates tension from roughly chest level or slightly outside the body.
- Stand tall: Place your feet about hip- to shoulder-width apart with your core braced and chest up.
- Grip the handle firmly: Use a comfortable grip and allow the working arm to begin slightly extended in front of the body.
- Set the elbow position: Keep the elbow close to your side or only slightly in front of it so the shoulder does not take over.
- Start under tension: Let the band stretch enough that the biceps are already loaded before the curl begins.
Tip: A small staggered stance can help you stay balanced if the band pulls strongly from one side.
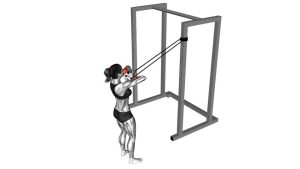
Execution (Step-by-Step)
- Brace and lock in your posture: Keep your ribs down, chest lifted, and shoulders relaxed.
- Begin the curl with the elbow: Bend the arm and pull the handle diagonally inward across the front of your torso.
- Keep the upper arm steady: Avoid turning the movement into a front raise or shoulder swing.
- Squeeze at the top: Bring the hand toward the upper chest area and pause briefly when the biceps are fully contracted.
- Lower with control: Return along the same cross-body path until the arm is nearly straight while keeping tension on the band.
- Repeat smoothly: Maintain the same path and tempo on every rep rather than rushing the lowering phase.
Pro Tips & Common Mistakes
- Keep tension from start to finish: Don’t let the band go slack at the bottom.
- Use a diagonal curl path: Pull across the chest instead of straight up if you want the intended movement pattern.
- Don’t swing the body: Excess lean-back turns the curl into a momentum-driven rep.
- Control the eccentric: The lowering phase is where a lot of training value comes from.
- Keep wrists neutral: Avoid excessive bending at the wrists to keep tension on the biceps instead of the joints.
- Match band tension to your goal: Too much resistance shortens range and usually makes form worse.
- Train both sides evenly: If performing one arm at a time, use the same rep quality and tempo on each side.
FAQ
What muscles does the Band Cross-Chest Biceps Curl work?
It mainly targets the biceps brachii. The brachialis, brachioradialis, and forearm muscles also help during the curl, while the shoulders and core stabilize your position.
Is this better than a regular band curl?
It is not automatically better, but it is different. The cross-chest path can create a stronger peak contraction and a slightly different feel compared with a straight-up curl. It works well as a variation in an arm program.
Should I train one arm at a time or both together?
Both options can work. One arm at a time usually makes it easier to control the path and focus on contraction, while bilateral versions can save time.
How heavy should the resistance band be?
Use a band that lets you complete the target reps with clean form and a full controlled squeeze. If you have to lean back or jerk the handle, the band is too strong for the way you are using it.
Can beginners use this exercise?
Yes. Beginners can use a lighter band and slower tempo to learn control. Start with moderate reps and focus on elbow flexion rather than speed.
Recommended Equipment
- Resistance Bands Set with Handles and Door Anchor — useful for adjustable tension, arm training, and home workouts
- Door Anchor for Resistance Bands — helps create a stable anchor point for better curl angles
- Replacement Resistance Band Handles — improves grip comfort during high-rep band curls
- Exercise Mat — adds comfort and traction for home training spaces
- Resistance Band Carry Bag / Storage Organizer — keeps your bands, handles, and anchors organized between workouts
Tip: For this exercise, the most useful setup is usually a resistance band kit that includes handles and a door anchor, because it gives you more options for band height and pulling angle.