Suspender Arm Curl to Ears: Form, Muscles Worked, Sets, Tips & FAQ
Learn how to do the Suspender Arm Curl to Ears with proper form. Discover muscles worked, setup, step-by-step execution, sets and reps by goal, common mistakes, FAQs, and recommended equipment.
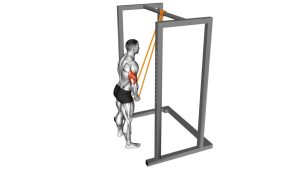
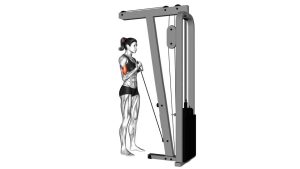
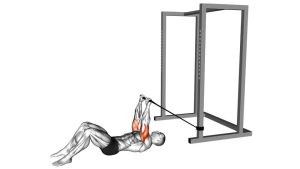
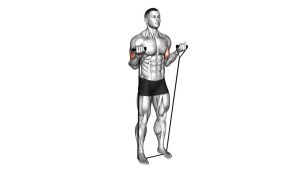
Suspender Arm Curl to Ears
This exercise works best when you focus on strict elbow flexion, a controlled tempo, and a smooth return to the start. Because the resistance band gets tighter as you curl upward, the top half of the rep becomes especially effective for building mind-muscle connection and finishing the biceps hard. The goal is not to throw the hands upward, but to move through a clean path with the elbows stable and the wrists neutral.
Quick Overview
| Body Part | Biceps |
|---|---|
| Primary Muscle | Biceps brachii |
| Secondary Muscle | Brachialis, brachioradialis, forearm flexors |
| Equipment | Resistance band or suspender-style band setup with handles |
| Difficulty | Beginner to Intermediate |
Sets & Reps (By Goal)
- Muscle building: 3–4 sets × 8–15 reps with controlled tempo and 45–75 seconds rest
- Endurance / toning: 2–4 sets × 12–20 reps with lighter band tension and shorter rest
- Warm-up / activation: 2–3 sets × 10–15 reps using an easy band and perfect form
- Finisher at the end of arm day: 2–3 sets × 12–18 reps with a hard squeeze at the top
Progression rule: First increase reps or improve control at the top. Then move to a thicker band or step farther onto the band to increase tension.
Setup / Starting Position
- Anchor the band securely: Stand on the band or use a stable low anchor so tension starts from below.
- Take the handles: Hold one handle in each hand with a comfortable grip. A neutral-to-supinated hand position works best for most lifters.
- Stand tall: Keep your chest up, ribs stacked, and core lightly braced. Avoid arching the lower back.
- Let the arms hang straight: Start with the hands by your sides and the elbows close to the torso.
- Set the shoulders: Keep them down and relaxed so the curl starts from the elbows, not the traps.
Tip: Choose a band tension that feels manageable from the bottom but still challenging near the top where the resistance increases the most.
Execution (Step-by-Step)
- Brace and stay tall: Before each rep, lock in a stable posture with the spine neutral and the elbows tucked near the sides.
- Begin the curl smoothly: Flex the elbows and bring the handles upward in a controlled arc.
- Keep the upper arms quiet: Let the forearms move while the elbows stay mostly fixed instead of drifting far forward.
- Curl high toward ear level: Continue until the hands approach the ears or upper shoulders, depending on your mobility and setup.
- Squeeze the biceps hard: Pause briefly at the top and focus on a strong contraction without shrugging the shoulders.
- Lower under control: Slowly extend the elbows and return to the start without letting the band pull you down.
- Repeat with the same path: Every rep should look nearly identical from bottom to top.
Pro Tips & Common Mistakes
- Use full control: The band should move because your biceps are working, not because you are swinging the body.
- Do not lean back: Excessive backward lean shifts tension away from the arms and turns the rep sloppy.
- Keep the wrists neutral: Avoid curling the wrists upward to fake extra range.
- Elbows stay close: A little natural movement is fine, but do not let the shoulders dominate the curl.
- Own the eccentric: The lowering phase is one of the biggest muscle-building benefits of band curls.
- Match the band to the goal: Lighter bands are better for high-rep quality work; thicker bands suit lower-rep overload.
- Stop before posture breaks: Once you lose alignment, the rep quality drops fast.
FAQ
What muscles does the Suspender Arm Curl to Ears work?
It mainly targets the biceps brachii. The brachialis, brachioradialis, and forearm muscles also help during the curl and grip.
Why curl to ear level instead of stopping lower?
Curling higher increases elbow flexion and can create a stronger peak contraction at the top, especially with a resistance band that gets tighter as it stretches.
Is this better than dumbbell curls?
Not necessarily better, just different. Bands provide increasing resistance as you lift, while dumbbells load the curl differently through the range of motion. Both can be effective.
Can beginners do this exercise?
Yes. Beginners can use a lighter band and focus on posture, elbow position, and smooth reps before increasing resistance.
How heavy should the band be?
Use a band that allows full control from bottom to top. If you need to swing, shrug, or rush the lowering phase, the band is too strong.
Recommended Equipment
- Resistance Bands Set with Handles — ideal for scalable biceps training, home workouts, and full upper-body band exercises
- Replacement Resistance Band Handles — useful if you want a more comfortable grip or a sturdier handle setup for curls
- Door Anchor for Resistance Bands — expands your band setup options and helps create more exercise angles at home
- Workout Gloves — can improve comfort and grip if the handles or band rub against your hands
- Full Resistance Band Training Kit — a practical option if you want bands, handles, and accessories together in one setup
Tip: For this exercise, prioritize smooth resistance, comfortable handles, and a setup that lets you keep tension without losing form near the top.