Standing Mid-Air Finger Bounces: Forearm Speed, Finger Endurance & Grip Control
Learn how to do Standing Mid-Air Finger Bounces to improve finger speed, forearm endurance, grip control, and hand coordination with proper form, sets, tips, FAQs, and equipment.
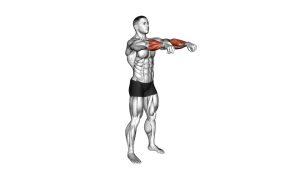
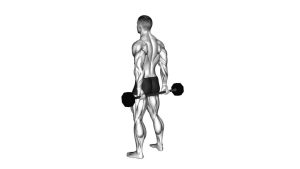
Standing Mid-Air Finger Bounces
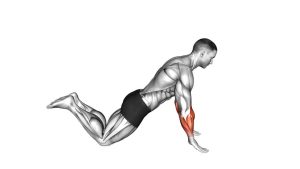
This movement looks simple, but it can quickly create a strong burn through the hands and forearms when performed with clean rhythm. Because the arms stay suspended in mid-air, your forearm muscles must repeatedly contract and relax while also stabilizing the wrist position. This makes the exercise useful for athletes, lifters, climbers, grapplers, musicians, desk workers, or anyone who wants better finger control and forearm endurance.
Quick Overview
| Body Part | Forearms |
|---|---|
| Primary Muscle | Forearm flexors and finger flexors |
| Secondary Muscle | Forearm extensors, intrinsic hand muscles, wrist stabilizers |
| Equipment | No equipment required |
| Difficulty | Beginner |
Sets & Reps (By Goal)
- Warm-up / activation: 1–2 sets × 15–25 seconds at an easy rhythm.
- Forearm endurance: 3–4 sets × 25–45 seconds with 30–60 seconds rest.
- Finger speed and coordination: 3–5 sets × 10–20 seconds using fast, crisp bounces.
- Grip conditioning finisher: 2–3 sets × 45–60 seconds after your main pulling or arm workout.
Progression rule: Add time before adding speed. Once you can keep the fingers moving smoothly for 45–60 seconds without wrist tension or shoulder shrugging, increase tempo slightly.
Setup / Starting Position
- Stand tall: Place your feet about hip-width apart with your ribs stacked over your pelvis.
- Raise the forearms: Bend your elbows and hold your forearms in front of your body, roughly around chest or upper-abdomen height.
- Set the wrists neutral: Avoid bending the wrists too far up, down, or sideways.
- Open the hands: Start with the fingers extended and slightly spread, not stiff or locked.
- Relax the shoulders: Keep your neck long, shoulders down, and elbows quiet.
The starting position should feel light and athletic. Your arms are active, but your upper body should not feel tense.
Execution (Step-by-Step)
- Begin with open fingers: Keep the palms facing generally forward or slightly inward depending on what feels natural.
- Quickly flex the fingers: Pull the fingers inward as if starting to make a fist, but do not squeeze hard.
- Immediately reopen the fingers: Snap the fingers back open with control, keeping the motion small and fast.
- Create a bouncing rhythm: Repeat the open-close action continuously, like rapid finger pulses in mid-air.
- Keep the wrists still: The fingers should move more than the wrists. Avoid flapping the hands up and down.
- Breathe normally: Do not hold your breath as the forearms begin to fatigue.
- Finish under control: When the set ends, open the hands, relax the arms, and shake out the fingers gently if needed.
Pro Tips & Common Mistakes
- Do not make a hard fist: This is a speed and endurance drill, not a maximum grip squeeze.
- Keep the movement small: Rapid, short finger bounces work better than large sloppy hand motions.
- Avoid wrist flapping: The wrist should stay neutral while the fingers do the work.
- Relax your shoulders: Shoulder shrugging wastes energy and reduces forearm isolation.
- Use smooth breathing: Exhale naturally and avoid bracing your face, jaw, or neck.
- Stop before form breaks: Once the fingers become slow, stiff, or uneven, end the set.
- Use it as a finisher: This drill works well after wrist curls, reverse wrist curls, curls, rows, pull-ups, or grip training.
FAQ
What muscles do Standing Mid-Air Finger Bounces work?
They mainly train the finger flexors and forearm flexors, while also involving the forearm extensors and small hand muscles that help control finger opening and closing.
Is this exercise good for grip strength?
It is better for grip endurance, finger speed, and control than maximum grip strength. For stronger crushing grip, combine it with grippers, farmer’s carries, dead hangs, and loaded holds.
Should my fingers fully close into a fist?
No. A full hard fist can slow the rhythm and create unnecessary joint stress. Use a quick partial close, then immediately reopen the fingers.
How long should each set last?
Most people should start with 15–30 seconds. Advanced users can build toward 45–60 seconds as long as the wrists stay neutral and the motion remains smooth.
Why do my forearms burn so fast?
The forearms contain many smaller muscles that fatigue quickly during repeated finger movement. The burn is normal, but sharp pain, numbness, or tingling is not.
Can I do this every day?
Yes, if you keep the intensity light and avoid excessive fatigue. For higher-volume training, use it 2–4 times per week and give your hands time to recover.
Recommended Equipment (Optional)
- Finger Resistance Bands — useful for training finger opening strength and balancing grip work.
- Adjustable Hand Grip Strengthener — helps build stronger crushing grip alongside finger endurance drills.
- Hand Therapy Putty — good for controlled finger flexion, extension, and rehab-style hand conditioning.
- Forearm Wrist Roller — excellent for progressive forearm strength and wrist endurance training.
- Stress Ball / Hand Exercise Ball — simple tool for light grip endurance, warm-ups, and hand recovery work.
Tip: These tools are optional. Standing Mid-Air Finger Bounces can be performed anywhere with no equipment, but grip tools can help you progress your hand and forearm training over time.