Kneeling Finger Press: Forearm Strength, Finger Control, Sets, Tips & FAQ
Learn the Kneeling Finger Press to build finger strength, forearm endurance, and wrist stability using a controlled kneeling bodyweight position.
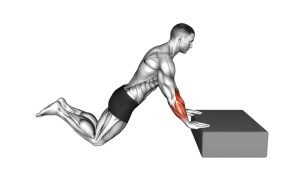
Kneeling Finger Press
This exercise is especially useful for athletes, calisthenics training, grip development, climbing-style hand strength, martial arts conditioning, and anyone who wants stronger hands and wrists. Because the fingers are loaded directly against the floor, the movement should be approached gradually. The knees reduce total bodyweight load, making the exercise safer and easier to control than a full plank or fingertip push-up variation.
In the video, the athlete holds a kneeling push-up-style position with the fingers spread and pressing into the floor. The elbows stay mostly straight, the shoulders remain stable, and the movement is small. The forearms work hard to keep the wrists from collapsing while the finger flexors maintain contact, pressure, and control.
Quick Overview
| Body Part | Forearms |
|---|---|
| Primary Muscle | Finger flexors and forearm flexor group |
| Secondary Muscle | Wrist stabilizers, palm muscles, triceps, anterior shoulders, and core stabilizers |
| Equipment | No equipment required; optional exercise mat or wrist support surface |
| Difficulty | Beginner to intermediate depending on finger and wrist strength |
Sets & Reps (By Goal)
- Beginner wrist and finger conditioning: 2–3 sets × 5–8 controlled presses or 10–15 second holds
- Forearm endurance: 3–4 sets × 8–12 slow reps or 20–30 second holds
- Grip strength development: 3–5 sets × 6–10 strong reps with 2–3 second pauses
- Warm-up before pulling or grip work: 1–2 sets × 6–10 light reps
- Skill progression toward fingertip push-ups: 3 sets × 10–20 second holds with perfect control
Progression rule: Increase hold time first, then increase reps, then shift slightly more bodyweight forward. Do not rush into full fingertip push-ups until the kneeling version feels stable and pain-free.
Setup / Starting Position
- Start on your knees: Kneel on a mat or comfortable floor surface with your hands placed in front of you.
- Place hands under shoulders: Keep the hands roughly shoulder-width apart, similar to a kneeling push-up setup.
- Spread the fingers: Open the fingers wide and press them into the floor to create a strong base.
- Keep wrists controlled: The wrists will be extended, but they should not collapse or feel jammed.
- Set the shoulders: Keep shoulders active and slightly pushed away from the floor without shrugging toward the ears.
- Brace the body: Keep the ribs controlled, hips stable, and spine neutral from head to hips.
- Shift weight gradually: Lean just enough forward to feel the fingers and forearms engage.
Tip: The more your shoulders move forward past your hands, the harder the drill becomes. Beginners should keep most of the weight supported by the knees.
Execution (Step-by-Step)
- Build your base: Place both hands firmly on the floor with the fingers spread and the palms lightly supported.
- Press through the fingers: Gently drive the fingertips and finger pads into the floor as if gripping the ground.
- Shift pressure forward: Move a small amount of bodyweight toward the hands without letting the wrists collapse.
- Hold tension: Maintain steady pressure through the fingers and forearms for the target time or rep count.
- Keep elbows mostly straight: Avoid turning the drill into a push-up. The elbows can stay soft but should not bend deeply.
- Control the shoulders: Keep the shoulders stable and slightly active, not shrugged or sinking downward.
- Return smoothly: Ease the pressure back toward the knees and reset before the next rep.
Pro Tips & Common Mistakes
Pro Tips
- Use the floor like a grip tool: Think about gripping the ground with your fingers instead of passively resting on them.
- Keep pressure even: Distribute force across all fingers, not only the index finger and thumb side.
- Start small: A tiny forward lean can create a strong forearm stimulus.
- Keep the elbows quiet: The goal is finger and wrist strength, not a kneeling push-up.
- Control breathing: Avoid holding your breath while loading the hands.
- Use a mat if needed: A slightly padded surface can reduce discomfort while learning.
Common Mistakes
- Dumping into the wrists: Letting the wrists collapse backward reduces control and may irritate the joint.
- Bending the elbows too much: This shifts focus away from the fingers and forearms.
- Loading too aggressively: Finger joints need gradual exposure, especially for beginners.
- Letting fingers curl or buckle: Keep the fingers active and strong without forcing painful positions.
- Shrugging the shoulders: Keep the neck relaxed and shoulders stable.
- Losing body tension: Sagging through the hips or ribs makes the position less controlled.
FAQ
What muscles does the Kneeling Finger Press work?
It primarily works the finger flexors and forearm flexor muscles. It also trains wrist stabilizers, palm muscles, triceps, shoulders, and core muscles because the body must stay supported and controlled.
Is the Kneeling Finger Press good for grip strength?
Yes. It builds grip-related strength by training the fingers to press, stabilize, and hold tension against the floor. It is especially useful as a bodyweight hand-strength drill.
Should my palms stay on the floor?
For most beginners, yes. Keep the palms lightly supported while emphasizing pressure through the fingers. As strength improves, you can gradually shift more load toward the fingers, but do not force the palms up if it causes pain or instability.
Is this the same as a fingertip push-up?
No. A fingertip push-up usually places much more bodyweight through the fingers and includes a larger elbow-bending motion. The Kneeling Finger Press is a safer progression because the knees reduce load and the movement stays smaller.
Why do my wrists feel tight during this exercise?
The wrists are extended during the drill, so tightness can happen if your wrist mobility or tolerance is limited. Reduce the forward lean, use a softer surface, warm up first, or shorten the hold time.
How often can I do Kneeling Finger Presses?
Start with 2–3 times per week. Because the fingers and wrists are smaller structures, they may need more recovery than larger muscle groups. Keep the effort controlled and avoid daily hard loading at first.
Who should avoid this exercise?
Avoid or modify it if you have finger injuries, wrist pain, carpal tunnel symptoms, recent hand trauma, severe joint irritation, or pain that worsens under pressure.
Recommended Equipment
- Exercise Mat — provides knee comfort and a slightly softer hand contact surface.
- Hand Grip Strengthener — helps build additional grip and finger flexor strength outside bodyweight work.
- Finger Extensor Bands — balances finger flexor training by strengthening the opposite opening motion.
- Wrist Wraps — optional light support for people who need extra wrist confidence during pressing drills.
- Forearm Wrist Roller — excellent accessory for building forearm endurance, wrist strength, and grip control.
Tip: Equipment is optional. The main requirement is controlled bodyweight pressure, clean hand placement, and gradual progression.