Assisted Lying Leg Raise With Lateral Throw-Down: Core Stability, Form, Sets & Tips
Learn how to perform the Assisted Lying Leg Raise With Lateral Throw-Down to build stronger abs, obliques, anti-rotation control, and lower-core stability with proper form.
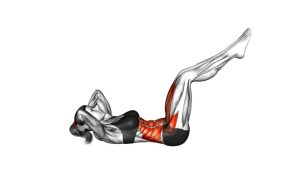
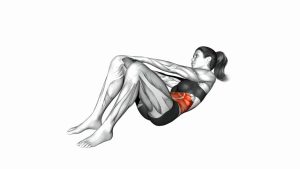
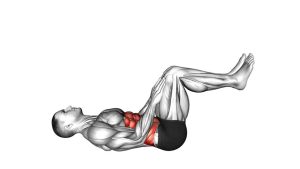
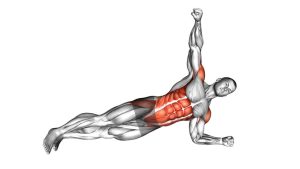
Assisted Lying Leg Raise With Lateral Throw-Down
This exercise is best used when the athlete already has strong basic leg raise control. The movement requires the rectus abdominis to stabilize the pelvis, the hip flexors to assist the leg raise, and the obliques to fight the lateral throw-down. Because the partner adds force from the side, the core must react quickly and stay braced through a diagonal lowering pattern. That makes this drill excellent for athletes, combat sports, gymnastics-style core training, and anyone who needs stronger anti-rotation control.
The key is not simply lifting the legs high. Instead, the most important part is maintaining control when the legs are pushed sideways. A good rep looks smooth, strong, and controlled. The legs stay together, the ribs stay down, the lower back stays stable, and the athlete resists twisting through the torso.
Quick Overview
| Body Part | Core |
|---|---|
| Primary Muscle | Rectus abdominis, especially lower abdominal control |
| Secondary Muscle | Obliques, transverse abdominis, hip flexors, deep core stabilizers |
| Equipment | Exercise mat or flat bench, plus a training partner |
| Difficulty | Advanced |
Sets & Reps (By Goal)
- Core strength: 3–4 sets × 6–10 controlled reps, resting 60–90 seconds between sets.
- Anti-rotation stability: 3 sets × 5–8 reps per side, using a slower throw-down and strict control.
- Athletic core conditioning: 3–5 sets × 8–12 reps, alternating sides each rep with moderate partner force.
- Eccentric abdominal control: 2–4 sets × 4–6 slow reps, taking 3–5 seconds to resist the descent.
- Partner core finisher: 2–3 sets × 10–15 total reps at the end of a workout, only if form remains clean.
Progression rule: First improve control, then increase range, then increase partner force. Never make the throw-down aggressive until the athlete can keep the pelvis stable and the lower back controlled.
Setup / Starting Position
- Lie flat on your back: Use a firm exercise mat or flat bench. Your head, upper back, and hips should stay supported.
- Grip a stable anchor: Hold the edge of a bench, a rack post, or another stable support behind your head. This helps prevent your upper body from sliding.
- Extend both legs: Keep your legs together with knees mostly straight. A slight bend is acceptable if your hamstrings or hips are tight.
- Brace your core: Pull your ribs down and lightly press your lower back toward the floor or bench. Avoid starting with an arched lower back.
- Position your partner: Your partner stands near your feet and prepares to guide or throw the legs laterally from the top position.
- Agree on force level: The partner should start with light pressure. The goal is challenge, not surprise or loss of control.
Execution (Step-by-Step)
- Start with your legs low: Keep both legs together and extended. They may hover slightly above the floor or bench, depending on your strength level.
- Raise your legs under control: Lift both legs upward by flexing at the hips while keeping your abs braced. Avoid swinging or using momentum.
- Reach the top position: Bring your legs close to vertical. Your pelvis may slightly posteriorly tilt, but your lower back should not aggressively arch or lose contact.
- Prepare for the throw-down: At the top, tighten your abs, squeeze your legs together, and keep your ribs down.
- Partner applies lateral force: Your partner pushes or throws your legs slightly to one side instead of straight down.
- Resist rotation: Fight to keep your hips and torso from twisting. Your obliques should work hard to control the sideways force.
- Control the descent: Lower your legs slowly through the diagonal path. Do not let them crash down or pull your lower back into extension.
- Return to center: Bring the legs back to the starting line with control, then reset your brace before the next rep.
- Alternate sides: For balanced oblique development, perform throw-downs to both the left and right sides.
Pro Tips & Common Mistakes
Pro Tips
- Brace before the throw: Do not wait until your legs are pushed. Lock your ribs and pelvis first.
- Keep the legs together: Squeezing the thighs together improves control and prevents energy leaks.
- Use a controlled partner throw: The throw should challenge your core, not overpower your body.
- Lower slower than you lift: The eccentric phase is where this exercise builds serious abdominal control.
- Think “resist twisting”: Your main job during the lateral throw-down is to prevent rotation through the trunk.
- Use shorter range if needed: If lowering near the floor causes back arching, stop the descent earlier.
Common Mistakes
- Letting the lower back arch: This shifts stress away from the abs and can irritate the lumbar spine.
- Using too much partner force: A violent throw turns the drill into uncontrolled momentum instead of strength training.
- Dropping the legs too fast: Fast, uncontrolled reps reduce core tension and increase injury risk.
- Twisting the hips: The obliques should resist rotation, not allow the pelvis to roll side to side.
- Bending the knees excessively: Some knee bend is fine, but too much turns the exercise into an easier tucked variation.
- Holding the breath too long: Brace firmly, but use controlled breathing so you do not lose tension or fatigue too quickly.
FAQ
What muscles does the Assisted Lying Leg Raise With Lateral Throw-Down work?
It mainly works the rectus abdominis, especially the lower abdominal region, while also heavily challenging the obliques, transverse abdominis, hip flexors, and deep core stabilizers. The lateral throw-down makes the obliques work harder because they must resist rotation.
Is this exercise good for lower abs?
Yes. The leg raise portion strongly challenges lower abdominal control because the abs must stabilize the pelvis as the legs move. However, the exercise is not only a lower-abs movement. The lateral throw-down also trains anti-rotation strength and oblique stability.
Do I need a partner for this exercise?
A partner is the most common way to perform it because they can apply the lateral throw-down. If you do not have a partner, you can perform regular lying leg raises, lying windshield wipers, or band-resisted leg raises as alternatives.
Should the partner throw my legs hard?
No. The partner should use controlled force. The goal is to challenge your core while still allowing you to control the descent. If your legs slam down, your hips twist, or your back arches, the force is too strong.
Is this exercise beginner-friendly?
No. This is better for intermediate to advanced trainees. Beginners should first master dead bugs, reverse crunches, bent-knee leg raises, and regular lying leg raises before adding lateral partner force.
Why does my lower back lift during the movement?
Your lower back usually lifts because your abs are losing pelvic control or your legs are lowering too far. Reduce the range of motion, bend your knees slightly, or regress to a simpler leg raise variation until your core can maintain position.
Can this exercise help athletes?
Yes. This exercise is useful for athletes because it trains the core to resist force from different angles. That can carry over to sports that require bracing, rotation control, kicking, sprinting, grappling, or changing direction.
Recommended Equipment
- Thick Exercise Mat — provides back and hip support during floor-based leg raise variations.
- Flat Weight Bench — useful for gripping behind the head and creating a stable setup.
- Ab Straps — helpful for progressing into hanging core exercises after mastering floor control.
- Resistance Bands Set — can be used for alternative anti-rotation and resisted leg raise drills.
- Medicine Ball — useful for additional partner core drills, rotational training, and athletic ab work.
Tip: Choose equipment that helps you maintain control. For this exercise, stability and safe positioning matter more than adding resistance.