Suspender Supine Plank: Form, Benefits, Sets, Tips & FAQ
Learn the Suspender Supine Plank for stronger core control, glutes, hamstrings, and suspension stability with safe setup, cues, tips, and FAQs.
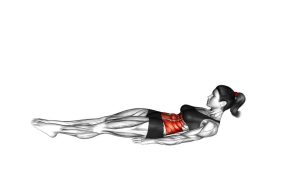
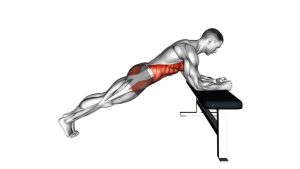
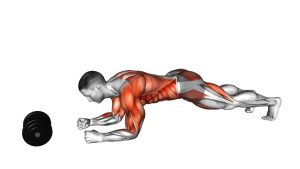
Suspender Supine Plank
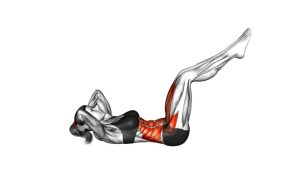
The Suspender Supine Plank is especially useful because it teaches the body to stabilize from the back side while the legs are suspended. Since the feet are elevated in straps, the hips, trunk, and shoulders must work together to prevent shaking, sagging, or twisting. Therefore, this exercise is more demanding than a basic floor supine plank, even though the movement looks simple.
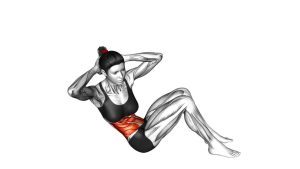
During the exercise, the athlete begins with the back close to the floor, elbows or forearms grounded, and heels placed securely inside the suspension handles. Then, the hips lift until the torso and legs form one long line. After a short hold, the hips lower slowly back toward the floor. Because the straps add instability, each repetition should feel deliberate and controlled.
Quick Overview
| Body Part | Core |
|---|---|
| Primary Muscle | Core stabilizers, especially transverse abdominis and rectus abdominis |
| Secondary Muscle | Glutes, hamstrings, lower back stabilizers, shoulders, and upper back |
| Equipment | Suspension trainer, TRX-style straps, exercise mat |
| Difficulty | Beginner to intermediate, depending on strap height and hold duration |
Sets & Reps (By Goal)
- Technique practice: 2–3 sets × 6–8 controlled reps with a 1–2 second hold at the top.
- Core stability: 3–4 sets × 8–12 reps with a 2–4 second hold and slow lowering phase.
- Glute and hamstring activation: 3 sets × 10–15 reps, focusing on hip extension and full-body alignment.
- Isometric strength: 3–5 sets × 15–30 second holds in the top plank position.
- Workout finisher: 2–3 rounds × 20–40 seconds, using smooth breathing and strict posture.
Progression rule: First increase hold time. Next, add more reps. After that, raise the difficulty by slowing the tempo or moving the body farther from the anchor point. However, never progress if the hips sag or the lower back arches.
Setup / Starting Position
- Set the straps low: Adjust the suspension trainer so the handles hang close to the floor. The heels should rest securely in the foot cradles or handles.
- Lie on your back: Position yourself supine with your legs extended toward the anchor point. Keep your body centered between the straps.
- Place the heels in the straps: Secure both heels evenly. Make sure the straps are the same length before starting.
- Set your upper body: Bend the elbows and place the forearms on the floor. Then, gently press through the elbows to stabilize the shoulders.
- Brace the core: Pull the ribs slightly down, tighten the abdominals, and prepare to lift the hips without overextending the spine.
- Keep the neck neutral: Look upward naturally. Avoid forcing the chin toward the chest or letting the head drop back.
Setup matters because the suspension straps can shift quickly. Therefore, take a moment to lock in your heel position and align your body before lifting.
Execution (Step-by-Step)
- Begin from the bottom: Start with your hips low and your heels supported in the straps. Keep your forearms grounded and your shoulders stable.
- Brace before lifting: Tighten your core first. Then, squeeze the glutes lightly so the movement starts from the hips, not the lower back.
- Lift the hips smoothly: Press through your heels and forearms while raising your hips away from the floor.
- Reach the plank line: Stop when your shoulders, hips, knees, and heels form one straight line. At this point, avoid pushing the hips too high.
- Hold with control: Pause briefly at the top. Breathe steadily while keeping the ribs down and the straps quiet.
- Lower slowly: Bring the hips back toward the floor with control. Do not collapse or drop suddenly.
- Reset and repeat: Touch down lightly or stop just above the floor. Then, repeat the next rep with the same smooth tempo.
Pro Tips & Common Mistakes
Pro Tips
- Move slowly: A slow lift and controlled descent make the exercise more effective than fast repetitions.
- Squeeze the glutes at the top: This helps the hips extend without overloading the lower back.
- Keep the straps quiet: Minimal swinging shows better control and stronger core stability.
- Use the forearms for support: Press gently through the elbows so the shoulders stay packed and steady.
- Breathe during the hold: Short, controlled breaths help you maintain tension without stiffening the neck.
- Start with shorter holds: Quality matters more than duration. Therefore, stop each set before your body line breaks.
Common Mistakes
- Letting the hips sag: This removes tension from the core and can stress the lower back.
- Overlifting the hips: Raising the hips too high turns the drill into a bridge instead of a plank.
- Using momentum: Swinging through the straps reduces control and increases injury risk.
- Arching the lower back: Keep the ribs down and brace before every lift.
- Shrugging the shoulders: Keep the shoulders away from the ears and press the forearms into the floor.
- Uneven strap length: If one strap is shorter, the pelvis may rotate during the movement.
FAQ
What muscles does the Suspender Supine Plank work?
The Suspender Supine Plank mainly trains the core stabilizers. However, it also works the glutes, hamstrings, lower back stabilizers, shoulders, and upper back. Because the heels are suspended, the body must resist unwanted movement while holding a straight line.
Is the Suspender Supine Plank good for beginners?
Yes, it can be beginner-friendly when performed with short holds and controlled reps. However, beginners should keep the straps stable, use a small range of motion, and avoid long holds at first. As control improves, the hold time can gradually increase.
Should I feel this exercise in my abs or hamstrings?
You may feel both. The abs brace the trunk, while the glutes and hamstrings help lift and hold the hips. However, if your lower back feels overloaded, reduce the height of the lift and focus on bracing before moving.
How high should I lift my hips?
Lift until your shoulders, hips, knees, and heels form a straight line. Do not drive the hips far above the torso. Instead, aim for a strong plank line with the ribs down and the glutes lightly squeezed.
Can I do this without a suspension trainer?
Yes. You can perform a floor supine plank or reverse plank without straps. Nevertheless, the suspended version adds instability, which increases the demand on your core and hip stabilizers.
Why do the straps swing during the movement?
Strap swinging usually happens when you lift too fast, lose core tension, or push unevenly through the heels. To fix it, slow down, keep both heels level, and pause briefly before lowering.
Recommended Equipment
- Suspension Trainer System — the main tool needed for suspended heel support and instability training.
- TRX-Style Suspension Straps — useful for home workouts, core drills, reverse planks, rows, and assisted movements.
- Thick Exercise Mat — protects the elbows, forearms, and back during supine floor-based exercises.
- Door Anchor for Suspension Trainer — allows safe setup when a wall mount or overhead anchor is not available.
- Foam Roller — helpful for warming up the upper back, hamstrings, and hips before core training.
Choose equipment that feels secure and stable. In addition, always inspect the straps, anchor, and foot cradles before starting suspension exercises.