Front Plank Toe Tap: Core Stability, Form, Sets, Tips & FAQ
Learn the Front Plank Toe Tap for core stability, hip control, and anti-rotation strength with step-by-step form, sets, tips, FAQs, and gear.
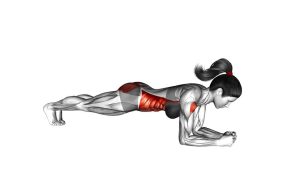
Front Plank Toe Tap
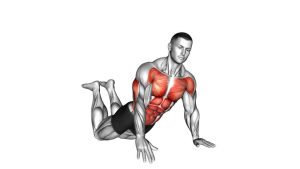
This movement trains the abs, obliques, deep core stabilizers, shoulders, and hip stabilizers at the same time. Because the leg moves sideways while the upper body stays planted, the core must work harder to prevent the hips from swaying. As a result, the Front Plank Toe Tap is useful for home workouts, warm-ups, beginner core training, and full-body stability sessions.
Quick Overview
| Body Part | Core |
|---|---|
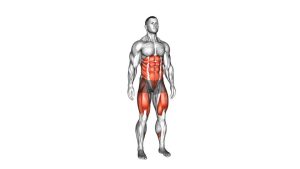
| Primary Muscle | Rectus abdominis, transverse abdominis, and obliques |
| Secondary Muscle | Shoulders, chest, hip abductors, glutes, lower back stabilizers |
| Equipment | No equipment required; optional exercise mat |
| Difficulty | Beginner to intermediate, depending on tempo and control |
Sets & Reps (By Goal)
- Beginner core control: 2–3 sets × 6–10 taps per side, slow tempo, 45–60 sec rest
- Core endurance: 3–4 sets × 10–16 taps per side, steady rhythm, 45–75 sec rest
- Anti-rotation strength: 3–4 sets × 8–12 taps per side, pause after each tap, 60–90 sec rest
- Warm-up activation: 1–2 sets × 6–8 taps per side, easy effort, controlled breathing
Progression rule: First improve body control. Then add more taps, slower tempo, longer pauses, or a wider tap range. However, do not progress if your hips rotate or your lower back drops.
Setup / Starting Position
- Start in a high plank: Place your hands on the floor directly under your shoulders.
- Extend your legs back: Keep your feet close together or hip-width apart, depending on your balance.
- Brace your core: Gently tighten your abs as if preparing to resist movement.
- Set your spine: Keep your head, ribs, hips, knees, and heels in one long line.
- Press through the floor: Push the floor away slightly so your shoulders stay active and stable.
- Keep your gaze down: Look slightly ahead of your hands without lifting your chin.
A wider hand position may feel easier at first. However, the shoulders should still remain stacked and controlled.
Execution (Step-by-Step)
- Begin in a strong plank: Hold your body straight and keep your abs tight before moving.
- Shift weight slightly: Transfer just enough weight into your planted foot and both hands to free one leg.
- Tap one foot outward: Move one foot to the side and lightly tap the floor with the toe.
- Control the hips: Keep your pelvis level and avoid twisting toward the tapping leg.
- Return to center: Bring the foot back to the starting position with control.
- Alternate sides: Repeat the same motion with the opposite foot.
- Continue smoothly: Maintain a steady rhythm while keeping the upper body quiet and stable.
Pro Tips & Common Mistakes
Pro Tips
- Move slower than you think: A slow tap builds better core control than a rushed tap.
- Keep the shoulders stacked: Your hands should stay under your shoulders throughout the set.
- Use small taps first: A short side tap is enough if your trunk stays stable.
- Breathe steadily: Exhale gently as the foot taps out, then inhale as it returns.
- Push the floor away: This helps prevent shoulder collapse and improves upper-body stability.
Common Mistakes
- Letting the hips sway: Excessive side-to-side movement reduces core tension.
- Sagging the lower back: If the pelvis drops, shorten the set or elevate your hands.
- Tapping too wide: A wide tap is not better if it causes rotation.
- Rushing the reps: Fast reps often turn the exercise into momentum instead of control.
- Holding the breath: Breath-holding may increase tension and reduce smooth movement.
FAQ
What muscles does the Front Plank Toe Tap work?
It mainly works the abs, obliques, and deep core stabilizers. Additionally, the shoulders, chest, glutes, hip abductors, and lower back stabilizers help keep the plank position steady.
Is the Front Plank Toe Tap good for beginners?
Yes, it can be beginner-friendly when the tapping range is small and the tempo is slow. However, beginners should focus on holding a stable plank first before adding many repetitions.
Should my hips move during plank toe taps?
A small amount of natural shifting can happen. Nevertheless, your goal is to keep the hips as level as possible and avoid twisting or rocking from side to side.
How can I make this exercise easier?
You can place your hands on a bench, step, or sturdy elevated surface. As a result, the plank angle becomes easier, and you can practice the toe tap pattern with better control.
How can I make the Front Plank Toe Tap harder?
Slow down each tap, pause with the foot out to the side, widen the tap slightly, or use a longer set. However, only increase difficulty when your spine and hips remain controlled.
Recommended Equipment (Optional)
- Exercise Mat — adds comfort and grip for hands and feet during plank work
- Non-Slip Yoga Mat — helps reduce sliding when alternating toe taps
- Push-Up Handles — optional support for users who prefer a neutral wrist position
- Mini Resistance Bands — useful for advanced hip-control progressions when placed above the knees or ankles
- Core Sliders — helpful for advanced sliding plank variations after mastering toe taps
Start with no equipment first. Then, add tools only when they improve comfort, grip, or progression without reducing form quality.