Lying Scissor Crunch: Form, Benefits, Sets, Tips & FAQ
Learn how to do the Lying Scissor Crunch with proper form. Build stronger abs, improve core control, and avoid common mistakes with this detailed guide.
Lying Scissor Crunch
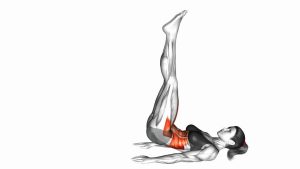
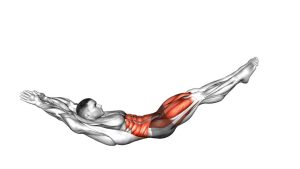
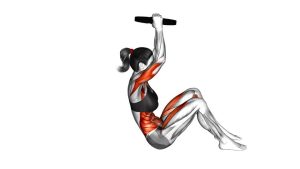
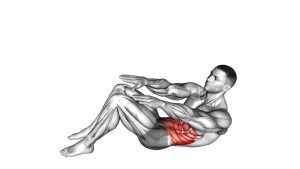
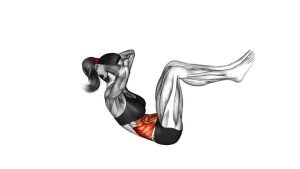
This exercise works best when the core stays braced from the first repetition to the last. In the video, the athlete lies on her back, lifts the legs slightly from the floor, raises the head and shoulders into a mild crunch, then alternates the legs in a scissor pattern. One leg lifts as the other lowers, and both legs remain controlled throughout the movement.
The Lying Scissor Crunch is useful for home workouts, ab circuits, core finishers, and bodyweight training sessions. Because the legs remain off the floor, the abs must resist lower-back arching while the hip flexors assist the alternating leg action. This makes the exercise more demanding than a simple crunch, especially when the tempo is slow.
Quick Overview
| Body Part | Abs |
|---|---|
| Primary Muscle | Rectus abdominis, especially the lower-ab region |
| Secondary Muscle | Hip flexors, obliques, transverse abdominis, and deep core stabilizers |
| Equipment | Bodyweight only; optional exercise mat |
| Difficulty | Beginner to intermediate, depending on leg height and tempo |
Sets & Reps (By Goal)
- Core control: 2–3 sets × 8–12 slow reps per side with 45–60 seconds rest.
- Ab endurance: 3–4 sets × 20–40 seconds with steady breathing and strict form.
- Lower-ab focus: 3 sets × 10–15 full scissor cycles with a slow lowering phase.
- Workout finisher: 2–3 rounds × 30–45 seconds after your main core exercises.
- Beginner option: 2 sets × 6–10 reps per side with the legs higher and knees slightly bent.
Progression rule: First improve control, then increase time under tension. Lowering the legs closer to the floor makes the exercise harder, but only do that if your lower back stays flat.
Setup / Starting Position
- Lie on your back: Use a mat if needed. Keep your body long, your legs extended, and your arms close to your sides.
- Brace your core: Gently press your lower back toward the floor. This creates a stable base before your legs begin moving.
- Lift the legs: Raise both legs a few inches from the floor. Keep them straight or slightly bent if your hamstrings are tight.
- Set the crunch position: Lift your head and shoulders slightly. Keep your chin gently tucked, not jammed into your chest.
- Relax the upper body: Avoid pulling through the neck. The abs should hold the crunch position, while the legs perform the scissor motion.
If your lower back arches before you start, raise your legs higher or bend your knees slightly. A smaller range is better than losing control.
Execution (Step-by-Step)
- Start with both legs lifted: Keep your lower back pressed down and your shoulders slightly off the floor.
- Lift one leg upward: Raise one leg while the opposite leg lowers toward the floor. Move from the hips, not the knees.
- Cross through the middle: Let the legs pass each other in a controlled scissor motion. Do not kick or swing.
- Switch sides: Lower the top leg as the bottom leg rises. Keep the movement balanced on both sides.
- Maintain constant tension: Keep both legs off the floor during the full set. Do not rest between reps.
- Breathe smoothly: Exhale during the effort phase and inhale as you transition. Avoid holding your breath.
- Finish with control: After the final rep, bring both legs back down slowly instead of dropping them to the floor.
Pro Tips & Common Mistakes
- Keep the lower back flat: This is the most important form rule. If your back arches, raise your legs higher.
- Move slowly: A slow scissor motion creates more abdominal tension than fast, uncontrolled kicking.
- Do not pull the neck: Keep your hands on the floor or lightly beside your body. Let the abs lift the shoulders.
- Avoid dropping the bottom leg too low: The lower leg should hover above the floor without forcing your spine to arch.
- Control the switch: The transition between legs should feel smooth, not jerky.
- Keep your legs active: Point or flex the feet naturally, keep the knees controlled, and avoid floppy leg movement.
- Do not rush for more reps: Quality matters more than speed. Slow reps build better control.
- Use a smaller range when tired: If your form starts to break, shorten the scissor range instead of forcing the set.
FAQ
What muscles does the Lying Scissor Crunch work?
The Lying Scissor Crunch mainly works the rectus abdominis. It also trains the lower-ab region, hip flexors, obliques, and deep core stabilizers because the body must stay braced while the legs move.
Is the Lying Scissor Crunch good for lower abs?
Yes. It is a strong lower-ab focused exercise because the abs must control pelvic position while the legs alternate. However, the lower abs work best when the lower back stays pressed into the floor.
Why does my lower back hurt during this exercise?
Lower-back discomfort usually happens when the legs drop too low or the core loses tension. Raise your legs higher, bend your knees slightly, slow down, and focus on pressing your lower back into the floor.
Should my shoulders stay lifted the whole time?
Yes, if you can do it without neck strain. A small shoulder lift increases abdominal tension. If your neck gets tired, lower your head and perform the scissor motion with strict core control.
Is this exercise beginner-friendly?
It can be beginner-friendly when modified. Beginners should keep the legs higher, bend the knees slightly, and perform fewer reps. Advanced users can lower the legs closer to the floor and slow the tempo.
How fast should I perform Lying Scissor Crunches?
Use a controlled tempo. Avoid fast fluttering or kicking. A steady pace keeps tension on the abs and reduces the chance of lower-back compensation.
Recommended Equipment
- Exercise Mat — provides floor comfort and helps protect the spine during lying core exercises.
- Thick Yoga Mat — useful for extra cushioning if your lower back or hips feel pressure on hard floors.
- Mini Resistance Bands — can be used later for advanced core and hip-flexor progressions.
- Adjustable Ankle Weights — optional advanced tool for increasing leg-load difficulty after mastering bodyweight form.
- Core Sliders — helpful for adding variety to floor-based core training and ab circuits.
Tip: Master the bodyweight version first. Add resistance only when your lower back stays flat, your breathing stays controlled, and your leg motion remains smooth.