Celebratory Hip Thrust: Form, Glute Activation, Sets & Tips
Learn the Celebratory Hip Thrust for glute activation, hip drive, coordination, and bodyweight lower-body control with form tips and FAQs.
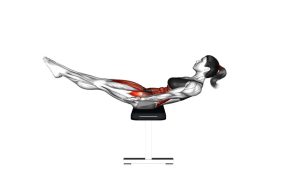
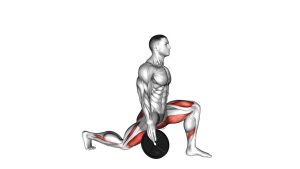
Celebratory Hip Thrust
This exercise works best when the movement comes from the hips and glutes, not from excessive lower-back arching. First, the knees soften slightly. Then, the hips drive forward with control. Finally, the body returns to a neutral standing position without collapsing or rushing.
Quick Overview
| Body Part | Glutes |
|---|---|
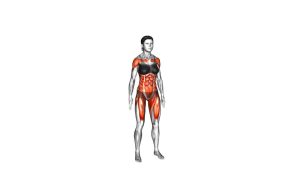
| Primary Muscle | Gluteus maximus |
| Secondary Muscle | Hamstrings, hip stabilizers, core, quads |
| Equipment | None |
| Difficulty | Beginner-friendly bodyweight movement |
Sets & Reps (By Goal)
- Glute activation: 2–3 sets × 10–15 reps with a smooth squeeze at the top.
- Warm-up and mobility: 1–3 sets × 12–20 controlled reps before lower-body training.
- Coordination practice: 2–4 sets × 8–12 reps using a steady rhythm and clean posture.
- Beginner conditioning: 2–3 sets × 20–30 seconds with light effort and relaxed breathing.
Progression rule: Add reps first. Then, increase tempo control or add a brief glute squeeze. Avoid making the movement larger if your lower back starts to take over.
Setup / Starting Position
- Stand tall: Place your feet about shoulder-width apart and keep your weight balanced.
- Relax the upper body: Keep your shoulders down, arms natural, and chest open.
- Brace lightly: Engage your core enough to stop the ribs from flaring during the thrust.
- Soften the knees: Use a small bend, not a deep squat.
- Find neutral hips: Start with the pelvis under control before driving forward.
Tip: Think of the movement as a short hip-extension drill. It should not become a squat, jump, or lower-back arch.
Execution (Step-by-Step)
- Start in a tall stance: Keep your feet planted and your torso facing forward.
- Create a small preload: Bend the knees slightly and let the hips shift back just a little.
- Drive the hips forward: Squeeze the glutes and move the pelvis forward in a short, controlled thrust.
- Reach the top position: Stand tall without leaning far backward or overextending the spine.
- Control the return: Let the hips come back to neutral while keeping the torso stable.
- Repeat smoothly: Maintain a steady rhythm, clean hip action, and relaxed breathing.
Pro Tips & Common Mistakes
- Use the glutes first: Drive from the hips instead of throwing the chest or shoulders backward.
- Keep the range small: A compact thrust is safer and usually more controlled.
- Avoid deep knee bending: This is not a squat, so the knees only soften slightly.
- Do not overarch: Keep the ribs down and avoid pushing the lower back into extension.
- Control the return: Do not bounce aggressively into the next rep.
- Stay balanced: Keep pressure through the full foot instead of rocking onto the toes.
- Breathe naturally: Exhale lightly as the hips drive forward, then inhale as you reset.
FAQ
What muscles does the Celebratory Hip Thrust work?
The main target is the gluteus maximus because the movement uses hip extension. Additionally, the hamstrings, hip stabilizers, quads, and core help control balance and posture.
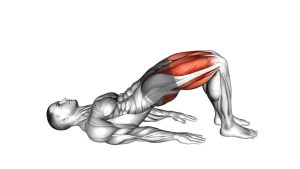
Is the Celebratory Hip Thrust the same as a bench hip thrust?
No. A bench hip thrust is usually loaded and performed with the upper back supported. In contrast, this version is a standing bodyweight hip-drive drill with a shorter range of motion.
Should I feel this in my lower back?
You may feel light trunk stabilization, but the lower back should not dominate. If it does, reduce the range, brace your core, and focus on squeezing the glutes instead of arching.
Can beginners do this exercise?
Yes. It is beginner-friendly because it uses no equipment and a small range of motion. However, beginners should move slowly at first and avoid exaggerated thrusting.
How can I make this exercise more effective?
Pause briefly at the top, keep the ribs down, and squeeze the glutes without leaning back. Also, pair it with glute bridges, bodyweight squats, or resistance-band walks for a stronger glute routine.
Recommended Equipment (Optional)
- Resistance Bands for Glutes — useful for adding light hip and glute activation work before or after this drill.
- Exercise Mat — helpful for pairing this movement with floor-based glute bridges and core work.
- Hip Circle Band — supports glute medius activation and lower-body warm-up routines.
- Adjustable Ankle Weights — optional tool for related glute and hip-extension exercises, not required for the basic version.
- Foam Roller for Legs and Hips — useful for warm-ups, recovery, and improving comfort before lower-body training.
Tip: This exercise does not require equipment. However, bands, mats, and mobility tools can help build a more complete glute-focused routine.