Crab Knee-to-Elbow: Core Stability, Oblique Strength, Form & Tips
Learn the Crab Knee-to-Elbow for core strength, oblique control, shoulder stability, and coordination with step-by-step form, sets, tips, FAQs, and equipment.
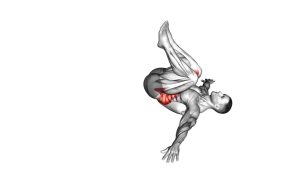
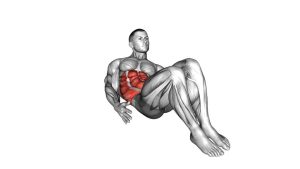
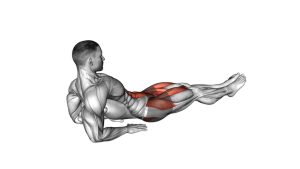
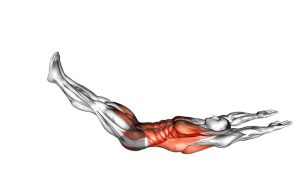
Crab Knee-to-Elbow
This exercise works best when the body stays controlled instead of rushed. Because the hands support bodyweight behind the torso, the shoulders and wrists must remain stable while the core rotates and flexes. Each rep should feel like a clean cross-body crunch from a strong crab base, not a collapsed hip dip or uncontrolled leg swing.
Quick Overview
| Body Part | Core |
|---|---|
| Primary Muscle | Obliques and rectus abdominis |
| Secondary Muscle | Hip flexors, glutes, shoulders, triceps, wrist stabilizers, and upper back |
| Equipment | No equipment required; optional exercise mat |
| Difficulty | Intermediate because it requires core control, shoulder stability, wrist tolerance, and balance |
Sets & Reps (By Goal)
- Core activation: 2 sets × 6–8 reps per side with slow control
- General strength: 3 sets × 8–12 reps per side with 45–75 seconds rest
- Conditioning finisher: 3–4 rounds × 20–30 seconds, alternating sides continuously
- Coordination practice: 2–3 sets × 5–8 reps per side using a pause at the top
- Advanced core endurance: 3–5 sets × 12–16 total alternating reps while keeping hips lifted
Progression rule: First improve hip height, balance, and clean knee-to-elbow contact. Then increase reps, time under tension, or tempo speed only if your shoulders and wrists stay comfortable.
Setup / Starting Position
- Sit on the floor: Bend both knees and place your feet flat about hip-width apart.
- Place your hands behind you: Keep palms on the floor with fingers angled slightly outward or toward your feet, depending on wrist comfort.
- Lift into a crab base: Press through your hands and feet, then lift your hips so your torso is supported off the floor.
- Open the chest: Keep the shoulders pulled back gently without shrugging toward the ears.
- Brace the core: Tighten your midsection enough to prevent the hips from dropping as one leg moves.
- Find balance: Keep your weight evenly distributed through both hands and the supporting foot before starting the first rep.
If your wrists feel limited, warm them up first or slightly rotate the fingers outward. Do not force a hand angle that creates joint discomfort.
Execution (Step-by-Step)
- Begin in the crab position: Keep both hands and both feet grounded with hips lifted and chest open.
- Lift one knee: Bring one knee up and inward toward the center of your body.
- Rotate slightly: Turn your torso just enough to bring the opposite elbow toward the lifted knee.
- Reach knee and elbow together: Crunch across the body until the knee and opposite elbow meet or come close.
- Pause briefly: Hold the top position for a short moment while keeping the hips from collapsing.
- Return with control: Place the foot back down and return the supporting arm to a stable position.
- Switch sides: Repeat the same pattern with the opposite knee and opposite elbow.
- Continue alternating: Move side to side with steady rhythm, clean balance, and controlled breathing.
Pro Tips & Common Mistakes
- Keep the hips active: Do not let the hips drop heavily toward the floor during the knee drive.
- Use a controlled cross-body crunch: The knee and opposite elbow should move toward each other with intention.
- Do not over-rotate: A small torso turn is enough. Excessive twisting can reduce control.
- Press through the floor: Keep the supporting hand strong so the shoulder does not collapse.
- Relax the neck: Keep the head neutral instead of throwing it forward during the crunch.
- Control the return: Place the foot down softly instead of dropping it back to the floor.
- Avoid rushing: Moving too fast often turns the exercise into swinging instead of core training.
- Modify when needed: Keep hips lower, reduce range, or perform slower single reps if balance is difficult.
- Watch wrist comfort: Adjust hand angle or use a mat if the floor creates pressure.
- Breathe steadily: Exhale as knee and elbow move together, then inhale as you return.
FAQ
What muscles does the Crab Knee-to-Elbow work?
The main muscles are the obliques and rectus abdominis. The movement also trains the hip flexors, glutes, shoulders, triceps, and wrist stabilizers because the body must stay supported in a crab position while the knee drives across the body.
Is the Crab Knee-to-Elbow good for abs?
Yes. It is especially useful for training the abs with rotation, coordination, and anti-collapse control. Unlike a basic crunch, it also challenges the shoulders and hips because the body stays lifted off the floor.
Is this exercise beginner-friendly?
It can be challenging for true beginners because it requires wrist strength, shoulder stability, and balance. Beginners can modify it by keeping the hips lower, moving slower, or performing alternating knee lifts without trying to touch the elbow at first.
Why do my hips drop during the movement?
Hip dropping usually means the glutes, core, or shoulder support are losing tension. Reduce the range, slow down, and focus on pressing through the grounded foot and both hands before lifting the knee.
Can I do Crab Knee-to-Elbow without equipment?
Yes. This is a no-equipment bodyweight exercise. An exercise mat can make it more comfortable for the hands, but no machine, cable, dumbbell, or resistance band is required.
How can I make the exercise harder?
You can increase the difficulty by holding the top contraction longer, lifting the hips higher, slowing the lowering phase, adding more reps, or performing the movement continuously for timed rounds.
Recommended Equipment (Optional)
- Exercise Mat — adds comfort and grip for hands, feet, and floor-based core exercises
- Wrist Support Wraps — helpful if your wrists need extra support during crab-position exercises
- Push-Up Handles — can reduce wrist extension for some users while supporting bodyweight movements
- Core Sliders — useful for related dynamic core drills and advanced bodyweight progressions
- Resistance Bands Set — useful for pairing this exercise with glute bridges, rows, and shoulder stability work
Tip: Equipment is optional. For this exercise, clean technique, stable hands, and controlled hip position matter more than adding extra resistance.