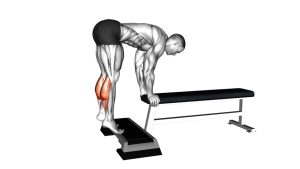
Lever Seated Calf Raise (Plate-Loaded): Form, Muscles & Tips
Learn the lever seated calf raise (plate-loaded) with proper foot placement, controlled ankle motion, sets by goal, common mistakes, and practical calf tips.
Lever Seated Calf Raise (Plate-Loaded)
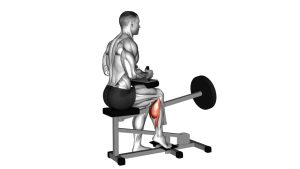
The Lever Seated Calf Raise is an effective way to develop stronger, more muscular calves using controlled resistance. Unlike standing calf raises, the seated position keeps the knees flexed, reducing the gastrocnemius muscle’s mechanical contribution and increasing the relative emphasis on the soleus. Furthermore, the machine provides a stable training environment, allowing you to concentrate on ankle movement without managing the balance demands of a standing exercise. As demonstrated in the exercise movement, both feet remain positioned on the raised platform while the heels travel upward and downward together. Therefore, the most important training priorities are proper foot placement, a comfortable range of motion, consistent knee positioning, and controlled tempo.
Quick Overview
| Body Part | Legs |
|---|---|
| Primary Muscle | Soleus (deep calf muscle) |
| Secondary Muscle | Gastrocnemius (medial and lateral heads), with assistance from tibialis posterior and other ankle plantarflexors |
| Equipment | Plate-loaded seated calf raise machine with thigh pads, foot platform, and weight plates |
| Difficulty | Beginner to Intermediate, depending on resistance, ankle mobility, and movement control |
Sets & Reps (By Goal)
- Strength: Perform 4–5 sets × 5–8 repetitions using a challenging but manageable resistance. Rest approximately 90–150 seconds between sets. Prioritize controlled lifting and avoid using momentum.
- Hypertrophy (Muscle Growth): Complete 3–4 sets × 10–15 repetitions with a controlled lowering phase. Additionally, pause briefly at the top and use a comfortable stretch at the bottom. Rest approximately 60–90 seconds.
- Muscular Endurance: Perform 2–3 sets × 15–25 repetitions using lighter resistance. Maintain a consistent movement rhythm and avoid shortening the range as fatigue increases. Rest approximately 30–60 seconds.
- Mobility and Movement Control: Complete 2–3 sets × 12–15 slow repetitions using minimal resistance. Focus on smooth ankle movement rather than maximizing weight. However, never force the heels below a comfortable position.
- Rehab-Style Strengthening: When appropriate and approved by a qualified professional, begin with 1–3 sets × 8–12 controlled repetitions using light resistance. Furthermore, increase the workload gradually according to comfort and tolerance.
Progression rule: First establish consistent repetitions with a comfortable range of motion. Next, increase repetitions or improve control before adding additional weight plates. Once the target repetitions feel manageable without bouncing or losing ankle alignment, increase resistance gradually. For muscle growth, both the lifting and lowering phases should remain controlled.
Setup / Starting Position
- Prepare the machine: Select a plate-loaded seated calf raise machine and check its adjustment system. Additionally, confirm that the lever, foot platform, and safety mechanism are functioning correctly.
- Load the weight plates: Place an appropriate amount of weight on the machine’s loading sleeve. Start with lighter resistance if you are learning the exercise. Secure the plates as required by the machine.
- Adjust the thigh pads: Sit on the machine and position the padded supports firmly over your lower thighs, just above the knees. The pads should provide secure contact without pressing directly into the kneecaps.
- Position both feet: Place the balls of your feet on the raised platform, approximately hip-width apart. Meanwhile, allow your heels to extend beyond the platform so they can move freely. Keep your toes pointing naturally forward or slightly outward.
- Establish a stable posture: Sit upright with your hips supported by the seat and your knees bent to approximately 90 degrees. Keep your back comfortably neutral, shoulders relaxed, and chest naturally lifted.
- Grip the handles: Hold the machine handles securely to stabilize your upper body. However, avoid pulling excessively with your arms or using your hands to assist the lifting movement.
- Prepare the starting position: Position your ankles within a comfortable range while maintaining contact between the thighs and pads. If the machine has a safety catch, follow its instructions before beginning. Your heels should be free to rise and lower without obstruction.
Execution (Step-by-Step)
- Set your body position: Begin seated upright with both thighs securely beneath the pads. Keep your knees bent and your forefeet firmly supported on the platform. Additionally, maintain a stable grip on the handles.
- Initiate the calf raise: Press downward through the balls of your feet while lifting both heels. This produces ankle plantarflexion, allowing the weighted lever to rise through the thighs. Meanwhile, keep your hips and knees relatively stationary.
- Continue the upward movement: Raise your heels smoothly until reaching a comfortable, strongly contracted position. Avoid rolling onto the outer edges of your feet or curling your toes excessively. Instead, maintain even pressure across the forefoot.
- Contract at the top: Briefly pause for approximately 1–2 seconds while maintaining tension in the calf muscles. However, do not force your ankles into an uncomfortable position or bounce to gain extra height.
- Begin the lowering phase: Slowly allow your heels to descend as your ankles move into dorsiflexion. Control the resistance throughout the movement rather than allowing the weight to fall. Aim for approximately 2–3 seconds during the descent.
- Reach the bottom position: Lower your heels into a comfortable calf stretch while keeping the balls of your feet in contact with the platform. Additionally, maintain stable knee alignment and avoid excessive stretching under heavy resistance.
- Repeat with consistent form: Raise your heels again without bouncing at the bottom. Continue for the prescribed repetitions while keeping your torso stable and breathing naturally. Finally, secure the machine’s safety mechanism before getting off, when applicable.
Pro Tips & Common Mistakes
- Prioritize the soleus: Keep your knees bent throughout the exercise. Because the gastrocnemius crosses the knee joint, this position places greater relative emphasis on the soleus.
- Use the balls of your feet: Position your forefeet securely on the platform while allowing the heels to move freely. Avoid balancing on only the tips of your toes.
- Control the lowering phase: Resist the downward movement instead of dropping the weight. Furthermore, a deliberate descent helps maintain tension and improves repetition consistency.
- Avoid bouncing at the bottom: Rapid rebounds can place unnecessary stress on the Achilles tendon. Instead, transition smoothly into the next repetition without using momentum.
- Maintain stable knee positioning: Keep your thighs firmly against the padded supports. If your knees repeatedly lift or shift, adjust the machine or reduce the weight.
- Do not overload the machine: Excessive resistance often reduces ankle movement and encourages compensations. Therefore, select a weight that allows controlled repetitions.
- Use a comfortable range of motion: Raise your heels as high as you can without discomfort, then lower into a manageable stretch. However, never force additional ankle movement through pain.
- Maintain balanced foot pressure: Distribute pressure across the balls of both feet. Avoid excessive ankle rolling inward or outward during the lifting and lowering phases.
- Keep your torso stable: Remain seated with a comfortably neutral spine. Additionally, avoid using shoulder movement, body rocking, or aggressive handle pulling to lift the lever.
- Combine seated and standing calf training: Seated calf raises emphasize the soleus, while straight-knee variations increase the gastrocnemius contribution. Consequently, combining both patterns can provide more complete calf development.
FAQ
What muscles does the Lever Seated Calf Raise work?
The Lever Seated Calf Raise primarily targets the soleus, a deep calf muscle responsible for ankle plantarflexion. The gastrocnemius also contributes, although its mechanical contribution is reduced when the knees remain bent. Additionally, smaller lower-leg muscles assist with ankle and foot stability.
Is the plate-loaded seated calf raise good for beginners?
Yes. The seated position and machine support can make this exercise accessible to beginners. However, correct machine adjustment and manageable resistance are essential. Start with lighter plates, maintain steady ankle movement, and gradually increase resistance once you can complete every repetition without bouncing or compensating.
What is the difference between seated and standing calf raises?
Both exercises train ankle plantarflexion, but knee position changes their muscular emphasis. Seated calf raises keep the knees bent, thereby emphasizing the soleus. In contrast, standing calf raises use relatively straight knees, allowing greater gastrocnemius contribution. Therefore, using both variations can support balanced calf development.
Why should I lower my heels during seated calf raises?
Lowering the heels allows the ankles to move into dorsiflexion and places the calf muscles under tension in a lengthened position. Additionally, controlling this phase helps prevent unnecessary bouncing. However, the depth should remain comfortable, especially when using challenging resistance or managing limited ankle mobility.
How much weight should I use for the Lever Seated Calf Raise?
Choose a resistance that allows you to complete your target repetitions with consistent technique. For example, beginners can start with minimal loading while learning the ankle movement. Once you can raise and lower your heels without momentum, gradually add weight. Nevertheless, controlled range and ankle comfort should always take priority over heavier plates.
Recommended Equipment
- Plate-Loaded Seated Calf Raise Machine — provides the seated lever mechanism, thigh supports, and foot platform needed for controlled weighted calf raises
- Olympic Weight Plates — allow progressive resistance adjustments when used with a compatible plate-loaded calf raise machine
- Olympic Weight Plate Collars — help secure weight plates on compatible loading sleeves when collars are required by the machine
- Resistance Bands Set — useful for lighter calf activation, ankle control exercises, and supplementary lower-leg training
- Calf Stretch Slant Board — supports separate calf stretching and ankle mobility work as part of a balanced training routine
Tip: Choose a stable seated calf raise machine with comfortable thigh pads and a secure foot platform. Additionally, check weight plate and collar compatibility before purchasing accessories. For best results, prioritize correct machine setup, progressive resistance, and controlled repetitions rather than adding excessive weight too quickly.