Seated Shoulder 90 Degrees Internal Rotation: Form, Sets, Tips & FAQ
Learn how to perform the Seated Shoulder 90 Degrees Internal Rotation with proper form. Improve rotator cuff control, shoulder stability, and internal rotation strength with step-by-step instructions, sets by goal, tips, FAQs, and recommended equipment.
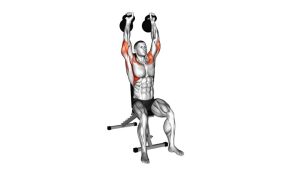
Seated Shoulder 90 Degrees Internal Rotation
This exercise is all about precision, posture, and smooth range of motion. The goal is not to force a deep stretch or use momentum, but to rotate through the shoulder joint with the upper arms staying level. When done correctly, you should feel controlled work around the front and inner side of the shoulder, especially in the muscles responsible for internal rotation and stabilization.
Quick Overview
| Body Part | Shoulders |
|---|---|
| Primary Muscle | Subscapularis |
| Secondary Muscle | Anterior deltoid, pectoralis major, latissimus dorsi, rotator cuff stabilizers |
| Equipment | None, or very light dumbbell / resistance band for progression |
| Difficulty | Beginner to Intermediate |
Sets & Reps (By Goal)
- Warm-up / activation: 2–3 sets × 10–15 reps with slow control and light effort
- Shoulder stability / corrective work: 2–4 sets × 8–12 reps with a 1–2 second pause in the end range
- Rehab-style motor control: 2–3 sets × 6–10 reps using a small pain-free range and very strict form
- Light strengthening: 3 sets × 10–12 reps using a very light band or dumbbell if technique stays clean
Progression rule: Increase control and range before adding resistance. If the elbows drop or the traps take over, the load is too much.
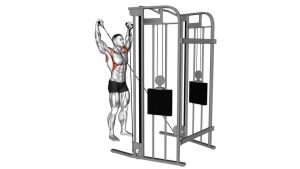
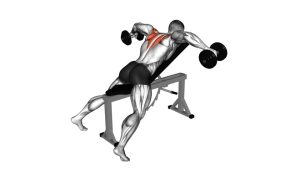
Setup / Starting Position
- Sit tall on a bench or chair: Keep your spine neutral, chest lifted, and feet planted firmly on the floor.
- Raise your arms to shoulder height: Your upper arms should be out to the sides at about 90 degrees.
- Bend the elbows to 90 degrees: Form an “L” shape with each arm so the forearms start upright or slightly forward.
- Set the shoulders: Keep the shoulder blades stable and avoid shrugging toward the ears.
- Brace lightly through the core: This helps you rotate through the shoulder joint without arching the lower back.
Tip: Think “elbows stay level, forearms rotate.” The upper arm position should remain steady throughout the set.
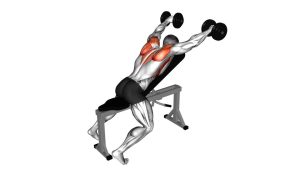
Execution (Step-by-Step)
- Start from the 90/90 position: Keep your elbows in line with your shoulders and your forearms upright.
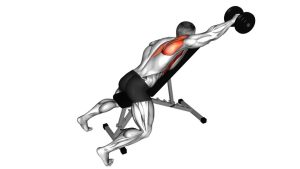
- Rotate inward at the shoulder: Slowly move the forearms downward toward the floor while keeping the elbows fixed in place.
- Stay controlled through the range: Only go as low as you can without shoulder pinching, rib flare, or elbow drop.
- Pause briefly: Hold the bottom position for 1 second to reinforce shoulder control.
- Return smoothly: Rotate the forearms back to the starting position without swinging or using momentum.
- Repeat evenly: Each rep should look identical, with clean posture and consistent speed.
Pro Tips & Common Mistakes
- Keep the elbows level: Dropping them turns the drill into a different movement and reduces the intended shoulder stimulus.
- Use a slow tempo: Internal rotation drills work best when performed under control rather than rushed.
- Do not force mobility: Only work through a range you can control without pain or joint pinching.
- Avoid shrugging: If the upper traps take over, reduce the range or resistance.
- Keep the ribs down: Excessive lower-back arching is a common compensation when shoulder mobility is limited.
- Start unloaded: Master the pattern first, then progress to a light band or very small dumbbell if needed.
- Pair it wisely: This drill fits well with external rotation work, scapular stability drills, and light shoulder mobility routines.
FAQ
What muscle does seated shoulder 90 degrees internal rotation target most?
The main target is the subscapularis, which is the primary internal rotator of the shoulder. Supporting muscles such as the anterior deltoid, pectoralis major, and other stabilizers also contribute.
Should I use weight for this exercise?
Most people should begin with no weight at all. This exercise is often more effective as a control drill first. Once the pattern is clean, you can add a very light band or light dumbbell if it does not change your form.
Why do my shoulders shrug during the movement?
Shrugging usually means you are using too much range, too much resistance, or not controlling the shoulder blades well enough. Reduce the range and focus on keeping the neck relaxed and the elbows steady.
Is this exercise good for shoulder rehab?
It can be useful in rehab or prehab settings because it improves rotator cuff control and internal rotation awareness. However, anyone with a current shoulder injury should follow guidance from a qualified professional.
Where should I feel this exercise?
You should feel controlled muscular effort around the front and inner side of the shoulder. You should not feel sharp pain, unstable shifting, or aggressive pinching in the joint.
Recommended Equipment (Optional)
- Light Resistance Bands Set — ideal for progressing internal rotation control with very manageable resistance
- 1–2 lb Light Dumbbells — useful for advanced progression once bodyweight form is clean and pain-free
- Adjustable Exercise Bench — provides a stable seated setup for focused shoulder control work
- Foam Roller — helpful for pairing with thoracic mobility work to improve shoulder positioning
- Mobility Massage Ball — useful for soft-tissue prep around the chest and upper back before shoulder drills
Tip: For most people, a light band is the best first progression because it adds resistance without forcing awkward positioning.