Dumbbell Seated Shoulder Press (Parallel Grip): Form, Sets, Tips & FAQ
Learn how to do the Dumbbell Seated Shoulder Press with a parallel grip for stronger, more stable shoulders. Includes form tips, setup, sets by goal, mistakes to avoid, FAQs, and recommended equipment.
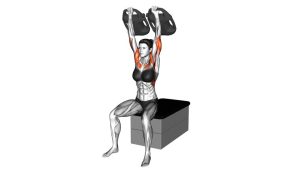
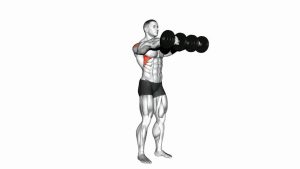
Dumbbell Seated Shoulder Press (Parallel Grip)
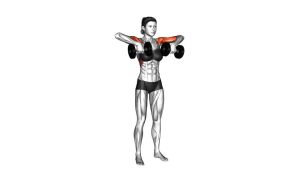
This variation is ideal for lifters who want to train overhead strength without relying on excessive torso movement. Because the bench supports your back, the shoulders do more of the work and the lower body contributes less. As shown in the movement, the dumbbells begin around shoulder level, travel upward on a smooth vertical path, and return under control to keep tension on the delts throughout the set.
Quick Overview
| Body Part | Shoulders |
|---|---|
| Primary Muscle | Anterior deltoids and lateral deltoids |
| Secondary Muscle | Triceps, upper chest, upper traps, and core stabilizers |
| Equipment | Dumbbells and an upright bench with back support |
| Difficulty | Beginner to Intermediate |
Sets & Reps (By Goal)
- Muscle growth: 3–4 sets × 8–12 reps with 60–90 seconds of rest
- Strength focus: 4–5 sets × 4–8 reps with 90–150 seconds of rest
- Technique practice: 2–3 sets × 10–15 reps with light-to-moderate load and strict control
- Shoulder accessory work: 2–4 sets × 8–10 reps after compound presses or chest work
Progression rule: Add reps before adding weight. Once you can complete all prescribed reps with clean form and no torso compensation, increase the load slightly.
Setup / Starting Position
- Set the bench upright: Use a seated bench with solid back support so your torso stays tall and stable.
- Plant your feet: Keep both feet flat on the floor to create balance and full-body tension.
- Bring the dumbbells to shoulder level: Hold one dumbbell in each hand with a neutral grip, palms facing inward.
- Align the joints: Keep your wrists stacked over your elbows and position the elbows slightly in front of the body.
- Brace your trunk: Tighten the core gently, keep the chest tall, and avoid flaring the ribs.
Tip: Before the first rep, squeeze the handles firmly and keep your head neutral against the bench rather than jutting the chin forward.
Execution (Step-by-Step)
- Start from shoulder height: Pause briefly with the dumbbells under control and your shoulders packed down.
- Press upward smoothly: Drive the dumbbells overhead in a controlled line while keeping the palms facing each other.
- Finish over the shoulders: At the top, your arms should be nearly straight with the dumbbells balanced above the shoulder line.
- Avoid crashing at lockout: Reach the top without aggressively snapping the elbows or shrugging excessively.
- Lower under control: Bring the dumbbells back down to shoulder level slowly, maintaining tension and posture throughout.
- Repeat consistently: Every rep should look the same, with no bouncing, twisting, or leaning backward to cheat the weight up.
Pro Tips & Common Mistakes
- Keep a neutral wrist: Letting the wrists bend backward reduces pressing efficiency and can irritate the joint.
- Press through the elbows: Think about driving the elbows up under the dumbbells instead of just moving the hands.
- Do not overarch: A small natural arch is normal, but turning the rep into a standing-style incline press shifts tension away from the delts.
- Control the bottom position: Lowering too fast makes the shoulders unstable and usually shortens the effective range.
- Use a load you can stabilize: If the dumbbells wobble badly or force asymmetrical pressing, the weight is too heavy.
- Don’t slam the dumbbells together: Touching or crashing them overhead reduces control and breaks rhythm.
- Match both sides: Keep the left and right dumbbells moving together to avoid uneven shoulder loading.
FAQ
What muscles does the Dumbbell Seated Shoulder Press work?
The main targets are the anterior deltoids and lateral deltoids. The triceps assist with elbow extension, while the upper chest and stabilizing muscles help support the press.
Why use a parallel grip for the seated shoulder press?
A parallel grip often feels more natural on the shoulders because it allows the elbows and wrists to track in a joint-friendly position. Many lifters find it easier to control than a fully pronated dumbbell press.
How low should I bring the dumbbells?
Lower them until they reach about shoulder level or slightly below if your mobility allows it comfortably. You do not need to force an extra-deep bottom position if it causes shoulder discomfort.
Is this better for shoulder growth or strength?
It works well for both. Moderate reps are excellent for hypertrophy, while lower rep ranges with heavier dumbbells can develop pressing strength. The key is maintaining strict control rather than turning the movement into a momentum-driven press.
Should beginners use this exercise?
Yes. Beginners can benefit from the seated setup because it improves stability and makes it easier to learn good pressing mechanics. Start light, control the lowering phase, and focus on consistent rep quality.
Recommended Equipment
- Adjustable Dumbbells — ideal for progressive overload without needing a full dumbbell rack
- Adjustable Weight Bench — essential for setting a stable upright seated pressing position
- Weightlifting Gloves — can improve grip comfort during higher-volume pressing sessions
- Bench Support Pad or Seat Cushion — helpful for improving seated comfort and posture on harder benches
- Resistance Bands Set — useful for warm-ups, shoulder activation drills, and extra delt volume
Tip: A good bench and a manageable pair of dumbbells matter more than heavy loading. Stable equipment makes it easier to press with clean mechanics.