Dumbbell Seated Reverse Arnold Press: Form, Muscles Worked, Sets & Tips
Learn the Dumbbell Seated Reverse Arnold Press with proper form, setup, step-by-step execution, muscles worked, sets and reps by goal, common mistakes, FAQs, and useful equipment recommendations.
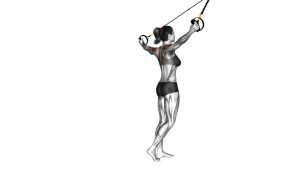
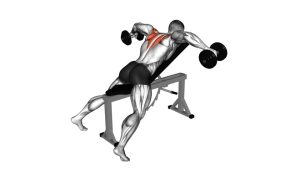
Dumbbell Seated Reverse Arnold Press
This exercise works best when you stay deliberate and avoid rushing the rotation. The seated position makes it easier to keep your torso upright and direct more work into the shoulders instead of turning the movement into a full-body push. You should feel the delts working hard, especially through the transition from the bottom position into the press. Keep the path smooth and avoid letting the dumbbells drift into an uncontrolled arc.
Quick Overview
| Body Part | Shoulders |
|---|---|
| Primary Muscle | Deltoids (front and side delts) |
| Secondary Muscle | Rear delts, triceps, rotator cuff stabilizers, upper traps |
| Equipment | Dumbbells and an upright bench with back support |
| Difficulty | Intermediate (coordination, control, and shoulder mobility required) |
Sets & Reps (By Goal)
- Muscle growth: 3–4 sets × 8–12 reps, 60–90 sec rest
- Shoulder strength: 4–5 sets × 5–8 reps, 90–150 sec rest
- Technique and control: 2–4 sets × 8–10 reps, slow tempo, 60–75 sec rest
- Accessory work after heavy presses: 2–3 sets × 10–15 reps, moderate load, 45–75 sec rest
Progression rule: Add reps before adding load. Only increase weight when you can rotate, press, and lower the dumbbells without torso sway, shoulder shrugging, or loss of control at the bottom.
Setup / Starting Position
- Set the bench upright: Sit tall with your back supported and both feet flat on the floor.
- Pick up the dumbbells safely: Bring them to shoulder level under control rather than swinging them wildly into position.
- Start with elbows bent: Keep the dumbbells around shoulder height with the elbows under or slightly in front of the wrists.
- Brace the torso: Keep your ribs down, core tight, and neck neutral against the back pad without forcing your head back.
- Prepare for rotation: Begin with a reverse-style shoulder position so the press includes a smooth turning motion as the dumbbells travel upward.
Tip: A stable seat and moderate weight make this exercise much cleaner. If you have to rock backward to start each rep, the dumbbells are probably too heavy.
Execution (Step-by-Step)
- Lock in posture: Sit tall, keep the chest gently up, and brace your midsection before the first press.
- Start the press smoothly: Drive the dumbbells upward while rotating the arms through the movement in a controlled, natural path.
- Keep elbows tracking well: Don’t let them flare too aggressively or collapse inward as you move through the press.
- Finish overhead: Bring the dumbbells above shoulder level until the arms are nearly straight without slamming into lockout.
- Lower with control: Reverse the motion slowly, rotating back into the start position and keeping tension in the shoulders.
- Reset between reps: Re-establish posture before starting the next rep instead of bouncing immediately into another press.
Pro Tips & Common Mistakes
- Use control, not momentum: The rotation should look smooth and intentional, not rushed.
- Stay seated tall: Avoid excessive arching through the lower back just to get the dumbbells overhead.
- Don’t overload too early: This variation usually works better with slightly lighter dumbbells than a standard seated shoulder press.
- Keep shoulders down and stable: Don’t shrug excessively at the top of the rep.
- Lower slowly: The eccentric phase is where you build more control and keep the shoulders honest.
- Match both arms: One arm should not rotate faster or press higher than the other.
- Avoid cutting the range short: Partial reps often turn this into an awkward half-press instead of a full controlled shoulder movement.
FAQ
What muscles does the Dumbbell Seated Reverse Arnold Press work?
It mainly trains the deltoids, especially the front and side delts, while the triceps and smaller shoulder stabilizers assist during the press and rotation.
Is this better than a regular seated dumbbell press?
Not necessarily better for everyone, but it can be a useful variation if you want a different pressing pattern, more shoulder coordination, and a slightly higher control demand than a standard seated press.
How heavy should I go?
Start lighter than you would for a normal seated shoulder press. The rotation adds complexity, so clean mechanics matter more than chasing the heaviest dumbbells possible.
Can beginners do this exercise?
Most beginners should first learn a standard dumbbell shoulder press and basic shoulder control. Once pressing mechanics feel solid, this variation becomes much easier to perform correctly.
Should I use this for strength or hypertrophy?
It works well for both, but many lifters get the most value from it as a hypertrophy or accessory shoulder movement performed with controlled reps and moderate loads.
Recommended Equipment
- Adjustable Dumbbells — ideal for progressing load gradually while keeping shoulder training efficient at home
- Adjustable Weight Bench — gives you the upright seated position and back support needed for cleaner pressing mechanics
- Resistance Bands Set — useful for shoulder warm-ups, activation drills, and extra delt volume without heavy joint stress
- Door Anchor for Resistance Bands — helpful for banded shoulder prep, face pulls, and external rotation work between pressing sessions
- Wrist Wraps — optional support if wrist position becomes uncomfortable during pressing sets
Tip: Prioritize stable equipment and manageable loads. A good bench and controllable dumbbells matter more here than pushing maximum weight.