Barbell Seated Behind-the-Head Military Press: Form, Muscles Worked, Sets, Tips & FAQ
Learn how to perform the Barbell Seated Behind-the-Head Military Press with proper form. Discover muscles worked, setup, step-by-step execution, sets and reps by goal, common mistakes, FAQs, and recommended equipment.
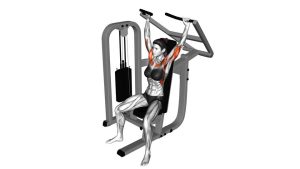
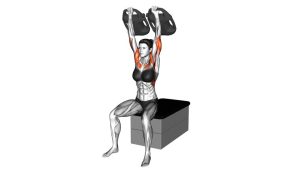
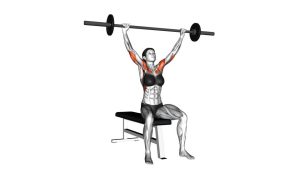
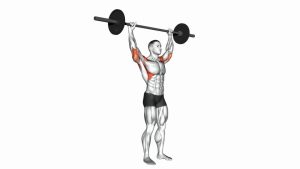
Barbell Seated Behind-the-Head Military Press
This exercise is best used by lifters who already have good shoulder mobility, healthy pressing mechanics, and experience with overhead barbell work. The seated position helps isolate the upper body, but the behind-the-head path increases the need for control and joint awareness. Use a smooth tempo, moderate load, and a range of motion you can own without neck strain, shoulder pinching, or excessive back arching.
Quick Overview
| Body Part | Shoulders |
|---|---|
| Primary Muscle | Deltoids (anterior deltoid and lateral deltoid) |
| Secondary Muscle | Triceps, upper traps, rotator cuff stabilizers, upper chest (light assistance) |
| Equipment | Barbell, weight plates, flat or upright bench, barbell collars |
| Difficulty | Intermediate to Advanced |
Sets & Reps (By Goal)
- Strength: 4–5 sets × 4–6 reps with 2–3 minutes rest
- Muscle growth: 3–4 sets × 6–10 reps with 60–90 seconds rest
- Technique practice: 2–4 sets × 8–12 reps with light-to-moderate weight and perfect control
- Shoulder accessory work: 2–3 sets × 10–12 reps after primary presses
Progression rule: Increase load only when you can press through the full intended range without losing posture, flaring the ribs excessively, or forcing the bar path.
Setup / Starting Position
- Set the bench: Sit on a sturdy bench with upright back support if available. Plant both feet flat on the floor.
- Grip the bar: Take a grip slightly wider than shoulder-width so the forearms can stay reasonably stacked under the bar.
- Rack position: Position the bar behind the head at about ear level or slightly lower, depending on your shoulder mobility.
- Brace your torso: Lift the chest gently, keep the core tight, and maintain a neutral head position without jutting the chin forward.
- Set the shoulders: Keep the shoulders active and stable, but do not shrug aggressively before the press begins.
Tip: If the starting position feels cramped or painful, your shoulder mobility may not currently support this variation safely.
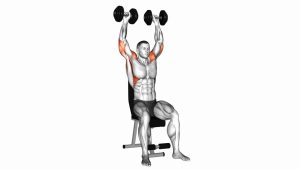
Execution (Step-by-Step)
- Start from the bottom: Hold the bar behind the head with elbows below the wrists and the torso upright.
- Press upward: Drive the bar vertically overhead in a controlled path while extending the elbows.
- Move the head naturally: Keep the neck neutral and allow enough space for the bar to travel without forcing the head forward.
- Finish overhead: Bring the bar to a stable top position with the arms nearly straight and shoulders engaged.
- Lower with control: Bring the bar back down behind the head slowly to the same starting position.
- Repeat smoothly: Each rep should look controlled and consistent, without bouncing or rushing the bottom range.
Pro Tips & Common Mistakes
- Use a conservative load: This is not the best exercise to max out on. Clean mechanics matter more than heavy weight.
- Respect mobility limits: Only lower the bar as far as you can without shoulder pain or compensating through the neck.
- Keep the torso upright: Avoid turning the movement into a steep incline press by leaning back too far.
- Do not slam the bottom: Lower the bar under control instead of dropping it behind the head.
- Keep wrists stacked: Avoid excessive wrist bending that can reduce pressing efficiency and increase discomfort.
- Brace the core: Even while seated, the torso should stay tight to support a stable overhead press.
- Watch elbow position: Elbows should help support the bar path, not flare so far back that the shoulders feel jammed.
- Know when to swap it out: If standard overhead presses feel better and produce similar results, they are often the more practical choice.
FAQ
What muscles does the seated behind-the-head military press work?
It mainly targets the deltoids, especially the front and side heads, while the triceps, upper traps, and rotator cuff muscles assist with pressing and stabilization.
Is the behind-the-head press safe?
It can be safe for some experienced lifters with good shoulder mobility and pain-free overhead mechanics, but it is not a universal fit. Many people do better with front-loaded shoulder press variations.
Why do this exercise seated instead of standing?
The seated position reduces lower-body drive and makes it easier to focus on strict shoulder pressing. It also helps isolate the upper body more than a standing press.
How low should I lower the bar?
Lower it only as far as you can maintain a strong, pain-free shoulder position. For some lifters, that is just below ear level. Forcing a deeper range is not necessary if it compromises joint comfort.
Is this exercise good for beginners?
Usually no. Beginners are generally better off learning standard seated or standing overhead pressing patterns before attempting behind-the-head variations.
Recommended Equipment
- Adjustable Weight Bench — useful for a stable seated pressing setup with back support
- Olympic Barbell — the primary tool for loaded seated behind-the-head pressing
- Bumper Plates — practical for progressive loading and controlled barbell training
- Wrist Wraps — can help improve wrist support during heavier pressing sets
- Barbell Collars — keep the plates secure and stable during pressing work
Choose equipment that improves stability and control first. For this exercise, safe setup quality matters more than adding load quickly.