Resistance Band Overhead Shoulder Press: Form, Muscles Worked, Sets, Tips & FAQ
Learn how to perform the Resistance Band Overhead Shoulder Press with proper form. Discover muscles worked, setup, execution, sets and reps by goal, common mistakes, FAQs, and recommended equipment.
Resistance Band Overhead Shoulder Press
This movement is excellent for lifters who want a shoulder-building exercise that is portable, joint-friendly, and easy to scale. It works well in home workouts, warm-ups, hypertrophy sessions, and general strength routines. The goal is to press overhead with control while keeping the body stable and avoiding excessive leaning or lower-back arching.
Quick Overview
| Body Part | Shoulders |
|---|---|
| Primary Muscle | Anterior deltoids and lateral deltoids |
| Secondary Muscle | Triceps, upper chest, trapezius, serratus anterior, and core stabilizers |
| Equipment | Resistance band or band set with handles |
| Difficulty | Beginner to Intermediate |
Sets & Reps (By Goal)
- Muscle building: 3–4 sets × 8–15 reps, 60–90 sec rest
- General strength: 4–5 sets × 6–10 reps, 75–120 sec rest
- Shoulder endurance: 2–4 sets × 15–25 reps, 30–60 sec rest
- Warm-up / activation: 1–3 sets × 10–15 reps with light band tension
- Home full-body sessions: 3 sets × 10–15 reps paired with rows, squats, or push-ups
Progression rule: First increase reps with perfect control, then move to a thicker band or add a slower tempo. Avoid progressing by leaning back or shortening the lockout.
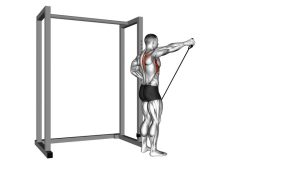
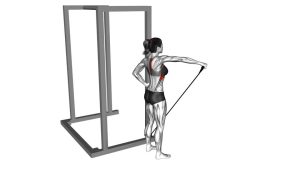
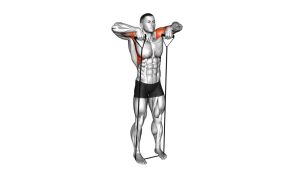
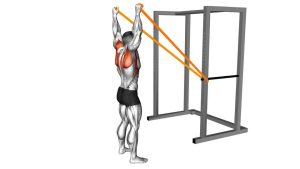
Setup / Starting Position
- Stand on the band: Place both feet on the resistance band about shoulder-width apart for a stable base.
- Set hand position: Bring the handles or ends of the band to shoulder height with elbows bent under or slightly in front of the wrists.
- Brace the torso: Tighten your abs, squeeze your glutes lightly, and keep your ribs stacked over your hips.
- Align the upper body: Chest tall, chin neutral, shoulders down and back without over-squeezing.
- Choose your stance: Narrow stance for more challenge, wider stance for more stability and often more resistance.
Tip: Make sure both sides of the band are even before you start. Uneven band length can make one arm work harder than the other.
Execution (Step-by-Step)
- Start from shoulder level: Hold the band at the shoulders with wrists stacked and forearms vertical or close to vertical.
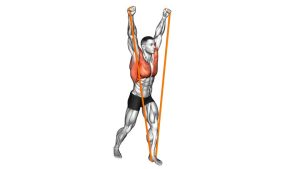
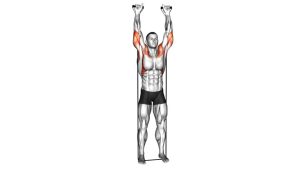
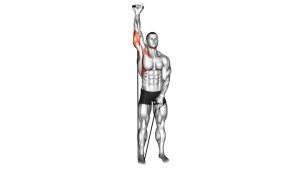
- Press overhead: Drive the hands upward in a controlled line until your arms are extended overhead.
- Keep the core locked: Do not arch your lower back or push your head excessively forward to finish the rep.
- Reach a controlled lockout: At the top, arms are straight but not violently snapped into extension.
- Lower slowly: Bring the handles back down to shoulder level under control, keeping tension on the band.
- Repeat smoothly: Use a steady tempo and keep each rep consistent from start to finish.
Pro Tips & Common Mistakes
- Brace before you press: A tight midsection protects the lower back and improves pressing power.
- Press slightly in front of the face, then finish overhead: This usually feels smoother on the shoulders than pressing straight out in front.
- Keep wrists neutral: Avoid letting them fold backward under tension.
- Control the eccentric: Lowering slowly improves shoulder stimulus and keeps the band from pulling you out of position.
- Do not overarch: Excessive lean-back shifts stress away from the shoulders and into the lower back.
- Do not shrug early: Let the shoulders elevate naturally near the top rather than starting the rep with tension in the traps.
- Use the right band: Too-light bands reduce challenge; too-heavy bands usually lead to cheating and poor lockout mechanics.
- Stay symmetrical: Keep both hands moving at the same speed so one side does not dominate.
FAQ
What muscles does the resistance band overhead shoulder press work?
It mainly targets the front delts and side delts, while the triceps, upper chest, and core stabilizers assist throughout the movement.
Is this exercise good for beginners?
Yes. It is beginner-friendly because resistance bands are easy to scale, portable, and often more forgiving on the joints than heavy free weights. Beginners should start with a lighter band and focus on posture and control before increasing tension.
Why does the top of the rep feel harder?
Resistance bands become more challenging as they stretch. That means tension usually increases throughout the press, which makes the upper half and lockout portion feel harder than the bottom.
Should I use handles or hold the band directly?
Either works. Handles are often more comfortable and help keep the wrists neutral, while holding the band directly can be fine if the grip feels secure.
What if I feel this more in my lower back than my shoulders?
That usually means you are leaning back too much or using too much resistance. Reduce band tension, brace harder, squeeze your glutes lightly, and keep your ribs down during the press.
Can I use this instead of dumbbell shoulder presses?
Yes, especially for home training, travel workouts, or shoulder-friendly pressing. Bands do not perfectly replace all free-weight pressing, but they are highly effective for strength, hypertrophy, and endurance when progressed properly.
Recommended Equipment
- Resistance Band Set with Handles — the main tool for performing overhead presses with adjustable tension
- Resistance Band Door Anchor — expands your band setup for rows, chest presses, face pulls, and accessory shoulder work
- Exercise Mat — useful for comfort, traction, and home workout space setup
- Replacement Resistance Band Handles — improves grip comfort and helps maintain a more natural wrist position during pressing
- Full Resistance Band Training Kit — a practical all-in-one setup for home lifters who want more exercise variety
Tip: Choose a band setup that lets you complete full, controlled reps without turning the overhead press into a leaning back partial movement.