Sitting Incline Press Step-Out on a Padded Stool: Form, Sets, Tips & FAQ
Learn how to perform the Sitting Incline Press Step-Out on a Padded Stool with proper form. Discover muscles worked, setup, step-by-step execution, sets by goal, common mistakes, FAQs, and optional equipment.
Sitting Incline Press Step-Out on a Padded Stool
This movement works best when performed with a slow, deliberate rhythm. The pressing motion should feel clean and controlled through the shoulders, while the leg action stays smooth instead of turning into a fast kick. Because the exercise combines upper-body pressing with lower-body movement, it is useful for improving coordination, posture awareness, and light functional strength.
Quick Overview
| Body Part | Front Shoulders |
|---|---|
| Primary Muscle | Anterior deltoids |
| Secondary Muscle | Triceps, quadriceps, hip flexors, upper chest, core stabilizers |
| Equipment | Padded stool or box; optional light dumbbells or ankle weights |
| Difficulty | Beginner |
Sets & Reps (By Goal)
- Warm-up / movement prep: 2–3 sets × 8–10 reps per side (slow tempo, 30–45 sec rest)
- Coordination and control: 2–4 sets × 10–12 reps per side (controlled pace, 45–60 sec rest)
- Muscular endurance: 3–4 sets × 12–15 reps per side (light resistance, 45–75 sec rest)
- Beginner rehab-style practice: 1–3 sets × 6–8 reps per side (bodyweight only, easy effort)
Progression rule: First improve control, posture, and range quality. Then add reps, slow down the tempo, or introduce very light resistance such as small dumbbells or ankle weights.
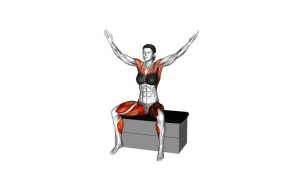
Setup / Starting Position
- Sit tall on the padded stool: Place both feet flat on the ground and sit near the middle of the surface so you feel stable.
- Set your torso upright: Keep your chest lifted, ribs stacked, and core gently braced without arching the lower back.
- Bring the arms into press position: Raise the elbows to about shoulder level with the hands ready to press upward in an incline-style path.
- Prepare the legs: Start with both knees bent and feet grounded before stepping or extending one leg forward.
- Stay balanced: Keep the head neutral and shoulders relaxed before beginning the first rep.
Tip: If balance feels shaky, shorten the leg extension and slow the press. Control is more important than range.
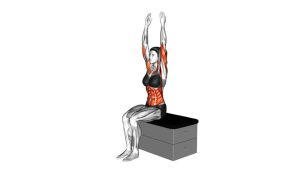
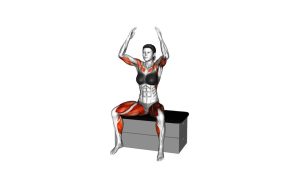
Execution (Step-by-Step)
- Start from the seated press position: Sit upright with both feet down and elbows bent.
- Press upward: Drive the hands upward in a smooth incline-style pressing path while keeping the shoulders down and away from the ears.
- Extend one leg forward: As the arms press, step one leg out or extend it forward under control.
- Pause briefly at the top: Reach a comfortable overhead position without locking out aggressively or leaning backward.
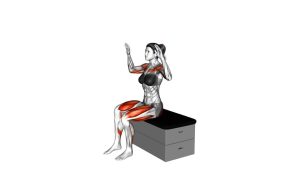
- Return with control: Lower the arms and bring the leg back to the start position in one smooth motion.
- Alternate sides: Repeat on the opposite leg while maintaining the same upright posture and tempo.
Pro Tips & Common Mistakes
- Press in a natural arc: Let the hands travel slightly forward rather than forcing a perfectly vertical path.
- Keep the torso tall: Avoid leaning back as the arms go overhead.
- Move the leg with control: Think “extend” rather than “kick.”
- Do not shrug: Keep the neck relaxed and shoulders from creeping upward.
- Use light resistance only: This movement is best for control and coordination, not heavy loading.
- Match both sides: Make each rep look the same on the right and left for better movement quality.
- Common mistake: Rushing the return phase and dropping the arms or foot too quickly.
FAQ
What muscles does the Sitting Incline Press Step-Out on a Padded Stool work?
It primarily targets the anterior deltoids. Secondary muscles include the triceps, quadriceps, hip flexors, and core stabilizers.
Is this a strength exercise or a coordination exercise?
It is mostly a coordination and control exercise. It can build light muscular endurance, but it is especially useful for teaching posture, rhythm, and upper-lower body timing.
Can beginners do this movement?
Yes. It is beginner-friendly when performed slowly and without extra load. Start with bodyweight only before adding any dumbbells or ankle weights.
Should I alternate legs every rep?
Yes, alternating legs each rep is the most practical approach for balanced coordination and even fatigue from side to side.
What should I avoid during this exercise?
Avoid leaning back, shrugging the shoulders, kicking the leg quickly, and using too much resistance. The movement should stay controlled from start to finish.
Recommended Equipment (Optional)
- Exercise Step Platform — useful as a stable elevated surface for seated setup and controlled body-positioning
- Light Dumbbells — helpful for progressing the pressing portion once bodyweight control is solid
- Resistance Bands Set — a practical alternative for adding light pressing resistance or pairing with shoulder warm-ups
- Adjustable Ankle Weights — useful for gently increasing the challenge of the leg step-out or extension
- Balance Pad / Foam Cushion — optional for comfort, support, and controlled seated positioning during mobility-based sessions
Tip: Keep resistance light. This exercise is usually most effective when it emphasizes posture, control, and smooth coordination rather than heavy loading.