Sitting Shoulder Press and Hip Abduction on a Padded Stool: Form, Sets, Tips & FAQ
Learn how to do the Sitting Shoulder Press and Hip Abduction on a Padded Stool with proper form. Includes muscles worked, setup, step-by-step execution, sets by goal, common mistakes, FAQs, and recommended equipment.
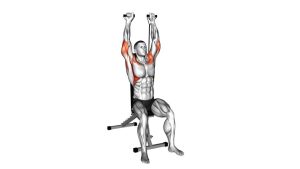
Sitting Shoulder Press and Hip Abduction on a Padded Stool
This exercise works best when you keep both halves of the movement synchronized. As the arms press upward, the knees move outward into hip abduction. As the arms return, the knees come back in under control. You should feel the shoulders working through the press, the outer hips and glutes helping move and stabilize the legs, and the core keeping the torso tall and steady.
Quick Overview
| Body Part | Shoulders |
|---|---|
| Primary Muscle | Deltoids (especially front and side delts) |
| Secondary Muscle | Gluteus medius/minimus, triceps, core stabilizers |
| Equipment | Padded stool or bench; optional light dumbbells or mini loop band |
| Difficulty | Beginner (light coordination challenge with low-impact joint demand) |
Sets & Reps (By Goal)
- Movement practice / coordination: 2–3 sets × 8–10 reps, slow tempo, 30–45 sec rest
- Muscular endurance: 2–4 sets × 10–15 reps, controlled rhythm, 30–60 sec rest
- Warm-up activation: 1–2 sets × 8–12 reps before upper-body or lower-body training
- Light conditioning circuit: 2–3 rounds × 12–20 reps at easy-to-moderate effort
Progression rule: First improve timing, posture, and range control. Then add reps, a mini band around the thighs, or very light dumbbells if form stays clean.
Setup / Starting Position
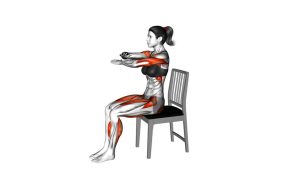
- Sit tall on a padded stool or bench: Place your feet flat on the floor and sit near the middle of the seat so you feel stable.
- Set your upper body: Bring your arms into a shoulder-press start position with elbows bent and hands near shoulder level.
- Set your lower body: Start with the knees and feet comfortably aligned under you, close enough to move outward smoothly.
- Brace lightly: Keep your ribs stacked over your hips and tighten your core just enough to avoid leaning back.
- Keep the head neutral: Eyes forward, shoulders relaxed, chest open.
Tip: If you are learning the pattern, practice the arm press and the hip abduction separately first, then combine them.
Execution (Step-by-Step)
- Start upright: Sit tall with your arms ready to press and your feet planted evenly on the floor.
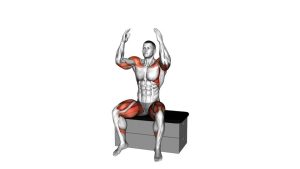
- Press upward: Drive the arms overhead in a smooth vertical path without shrugging the shoulders toward the ears.
- Open the knees outward: At the same time, move the knees apart in a controlled hip abduction motion while keeping the feet grounded.
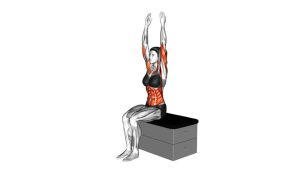
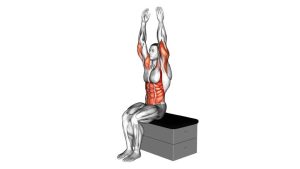
- Reach the top position: Arms finish overhead and legs are open just enough to feel the glutes engage without shifting your weight.
- Return with control: Lower the arms back to shoulder level while bringing the knees inward to the starting position.
- Repeat smoothly: Keep the movement coordinated, tall, and steady for every rep.
Pro Tips & Common Mistakes
- Stay tall on the stool: Avoid leaning back during the press or collapsing through the torso.
- Press in a vertical line: Hands should travel upward over the shoulders rather than drifting too far forward.
- Move the knees apart with control: Don’t snap the legs open or let the feet slide around excessively.
- Keep the core engaged: A light brace helps prevent lower-back arching.
- Don’t shrug: Let the shoulders work without lifting them toward the ears.
- Use a smaller range if needed: A clean half-range rep is better than a sloppy full-range rep.
- Match the tempo: The arms and legs should start and finish together.
FAQ
What muscles does this exercise work most?
The main work comes from the shoulders, especially the deltoids, while the outer hips and glutes assist through the abduction portion. The core also helps keep the body stable and upright.
Is this a strength exercise or a coordination exercise?
It is mostly a coordination and muscular endurance drill unless you add light resistance. It is especially useful for low-impact training, warm-ups, and movement control.
Can beginners do this exercise?
Yes. It is beginner-friendly because it is seated and low impact. Start without weights and focus on clean timing before adding resistance.
Should I use dumbbells or a resistance band?
You can, but they are optional. Light dumbbells increase the shoulder challenge, while a mini loop band around the thighs increases the glute and hip-abduction demand.
What should I avoid during this exercise?
Avoid arching the lower back, pressing too fast, shrugging the shoulders, or letting the knees cave in abruptly on the return. Control matters more than speed.
Recommended Equipment (Optional)
- Mini Resistance Bands — great for adding extra tension to the hip abduction portion
- Adjustable Dumbbells — useful if you want to turn the shoulder press into a loaded version
- Workout Bench — a stable padded seat can make setup more comfortable and repeatable
- Balance Cushion — can be used for seated posture and stability drills outside of this movement
- Mini Loop Bands Set — a simple option if you want different resistance levels for progressive training
Tip: Start with bodyweight only. Add equipment only after you can keep the movement synchronized and stable.