Handstand Hold on Wall: Form, Benefits, Sets, Tips & FAQ
Learn how to perform the Handstand Hold on Wall with proper form to build shoulder strength, overhead stability, and body control. Includes setup, execution, sets by goal, mistakes, FAQs, and recommended equipment.
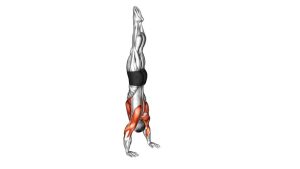
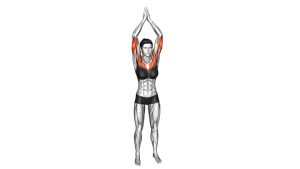
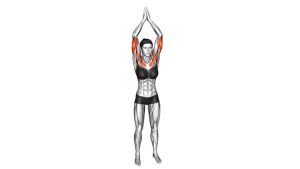
Handstand Hold on Wall
This exercise develops shoulder endurance, body awareness, and confidence in inverted positions. It can be used as a beginner-to-intermediate handstand progression, a shoulder stability drill, or a foundation for more advanced skills like handstand push-ups and freestanding handstands. The best reps feel controlled and active, with the athlete pushing tall through the shoulders instead of hanging passively into the joints.
Quick Overview
| Body Part | Shoulders |
|---|---|
| Primary Muscle | Anterior deltoids |
| Secondary Muscle | Lateral deltoids, upper traps, serratus anterior, triceps, core, and wrist stabilizers |
| Equipment | Wall and bodyweight only |
| Difficulty | Intermediate (beginner-friendly when scaled with shorter holds and wall support) |
Sets & Reps (By Goal)
- Skill practice: 3–5 sets × 15–30 sec holds, 45–90 sec rest
- Shoulder endurance: 3–4 sets × 20–45 sec holds, 60–90 sec rest
- Beginner wall inversion work: 3–5 sets × 10–20 sec holds, as much rest as needed
- Handstand push-up preparation: 4–5 sets × 20–40 sec holds with strong shoulder elevation
Progression rule: Add hold time first, then improve body alignment, then reduce wall reliance. Do not increase duration if your lower back arches heavily or your shoulders collapse.
Setup / Starting Position
- Face the floor near a wall: Place your hands about shoulder-width apart on the floor, fingers spread for balance and grip.
- Measure your distance: Set your hands far enough from the wall that you can stack vertically without excessive arching.
- Kick or walk up: Bring your feet to the wall and climb or kick into a stable handstand position.
- Lock the elbows: Keep the arms straight and actively push through the floor.
- Stack your body: Aim to line up wrists, shoulders, hips, and ankles while keeping the ribs down and core tight.
Tip: If you are new to inversion work, start with shorter holds and focus on a solid shoulder position before chasing longer time.
Execution (Step-by-Step)
- Establish the handstand: Get both feet lightly onto the wall and find a controlled vertical position.
- Push tall through the shoulders: Elevate the shoulders by actively pressing the floor away, not sinking into the upper back.
- Brace the core: Squeeze the abs and glutes to keep the body long and reduce lower-back arch.
- Keep the arms straight: Maintain locked elbows and steady pressure through the palms and fingertips.
- Hold with control: Stay still while making only small wrist and shoulder adjustments to balance.
- Come down safely: Lower one foot at a time or walk back down under control rather than dropping out fast.
Pro Tips & Common Mistakes
- Push the floor away: Active shoulders create a stronger and safer handstand hold.
- Keep your gaze neutral: Look slightly between the hands, not far forward or back.
- Use the fingertips: Subtle pressure changes help balance and reduce wobbling.
- Don’t lean heavily into the wall: The wall should assist balance, not carry your full position.
- Avoid over-arching: Tighten the core and glutes to prevent the lower back from flaring.
- Do not shrug passively: Shoulders should be elevated actively, not jammed into the neck.
- Build wrist tolerance gradually: Short, clean holds are better than forcing long sets with poor support.
FAQ
What muscles does the handstand hold on wall work?
It primarily targets the front delts and shoulder stabilizers, while also training the upper traps, serratus anterior, triceps, core, and wrist stabilizers.
Is this a good beginner handstand exercise?
Yes, the wall makes it one of the best beginner-friendly ways to learn inversion control, shoulder stacking, and body tension before attempting a freestanding handstand.
How long should I hold a wall handstand?
Beginners can start with 10–20 seconds. As control improves, work toward 20–45 second holds with good alignment and steady breathing.
Why do my wrists get tired first?
That is common. The wrists support bodyweight in an extended position, so they often fatigue early. Improve hand placement, spread the fingers, and build volume gradually.
Should my feet press hard into the wall?
No. Light wall contact is usually better. The goal is to use the wall for guidance and balance, not to rest heavily into it.
Recommended Equipment (Optional)
- Handstand Parallettes / Push-Up Bars — useful for wrist-friendly handstand practice and stronger pressing support
- Yoga Mat or Exercise Mat — adds grip and floor comfort during kick-ups, holds, and hand placement drills
- Wrist Wraps — helpful for added support during longer inverted holds or higher training volume
- Yoga Blocks / Handstand Blocks — useful for handstand drills, shoulder elevation work, and mobility preparation
- Resistance Bands Set — great for shoulder warm-ups, activation work, and accessory stability training
Tip: Choose tools that improve position and control, not just difficulty. Better setup usually leads to better handstand quality.