Assisted Triceps Dip (Kneeling): Proper Form, Sets, Tips & FAQ
Learn how to perform the Assisted Triceps Dip (Kneeling) with proper form to build stronger triceps, chest, and pressing control. Includes setup, step-by-step execution, sets by goal, common mistakes, FAQs, and recommended equipment.
Assisted Triceps Dip (Kneeling)
This exercise is one of the best ways to learn dipping mechanics if full bodyweight dips are still too hard. The machine assistance lets you focus on clean elbow extension, controlled range of motion, and upper-body stability without losing form. It works well for strength building, hypertrophy, and as a progression step toward unassisted dips.
Quick Overview
| Body Part | Triceps |
|---|---|
| Primary Muscle | Triceps brachii |
| Secondary Muscle | Lower chest (pectoralis major), anterior deltoids, scapular stabilizers |
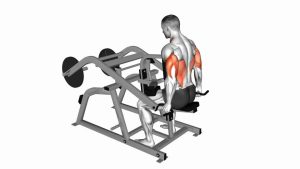
| Equipment | Assisted dip machine with kneeling pad |
| Difficulty | Beginner to intermediate |
Sets & Reps (By Goal)
- Technique practice: 2–3 sets × 6–10 reps with slow, controlled tempo
- Muscle growth: 3–4 sets × 8–15 reps with 60–90 sec rest
- Strength progression: 4–5 sets × 5–8 reps with heavier effective load and 90–120 sec rest
- Dip progression work: 3–4 sets × 6–10 reps while gradually reducing machine assistance
Progression rule: First improve control, full lockout, and stable depth. Then reduce assistance gradually over time rather than rushing to heavier loading.
Setup / Starting Position
- Select the assistance level: Choose enough assistance to complete clean reps without collapsing at the bottom.
- Kneel on the pad: Place both knees securely on the assistance platform and grip the dip handles firmly.
- Set your upper body: Keep the chest lifted, shoulders down, and neck neutral.
- Start at the top: Arms fully extended or close to lockout, elbows pointing generally backward, torso slightly leaned forward naturally.
- Brace lightly: Keep the core engaged so your body stays controlled throughout the rep.
Tip: A slight forward lean is normal, but avoid excessive folding at the torso if you want to keep more emphasis on the triceps.
Execution (Step-by-Step)
- Begin the descent: Bend your elbows and lower your body in a smooth, controlled motion.
- Keep the elbows tracking back: Avoid letting them flare too wide as you descend.
- Lower to a comfortable depth: Go down until your upper arms are around parallel to the floor or slightly deeper if your shoulders remain comfortable.
- Pause briefly: Maintain tension at the bottom without bouncing or dropping into the shoulders.
- Press back up: Drive through the handles and extend your elbows until you return to the top position.
- Finish strong: Reach a controlled lockout without shrugging the shoulders upward.
Pro Tips & Common Mistakes
- Use the machine to learn control: Don’t rush to the lightest assistance setting if your form breaks down.
- Keep shoulders depressed: Avoid shrugging at the top or collapsing at the bottom.
- Control the eccentric: A slow lowering phase improves stability and muscle tension.
- Don’t dive too deep too soon: Only use a deeper range if your shoulders tolerate it well.
- Lock out with the triceps: Finish the rep by extending the elbows, not by swinging or bouncing.
- Avoid momentum: The kneeling pad should assist the movement, but you should still stay in control of your body path.
- Watch elbow flare: Moderate flare is normal, but excessive flare can reduce stability and overload the shoulders.
FAQ
What muscles does the Assisted Triceps Dip (Kneeling) work?
The main target is the triceps. It also trains the lower chest, front delts, and shoulder stabilizers.
Is this exercise good for beginners?
Yes. It is one of the best beginner dip variations because the machine assistance helps you practice proper dip mechanics with better control and less bodyweight demand.
How deep should I go on assisted dips?
Lower until you feel a strong stretch and good control without shoulder pain or joint pinching. For many lifters, upper arms around parallel is a solid starting point.
How do I make this exercise harder over time?
Reduce the machine assistance gradually, improve pause control at the bottom, and increase reps or sets while maintaining smooth, stable technique.
Should I lean forward or stay upright?
A slight forward lean is natural on dips. Staying more upright usually increases triceps emphasis, while a larger forward lean tends to involve the chest more.
Recommended Equipment (Optional)
- Dip Belt — useful later when progressing from assisted dips to weighted dips
- Pull-Up / Dip Assistance Bands — a practical tool for assisted dip practice outside the machine
- Parallel Dip Bars — useful for home dip progressions, support holds, and bodyweight pressing work
- Power Tower / Dip Station — a strong home-gym option for dips, support holds, and upper-body bodyweight training
- Elbow Sleeves — can add comfort and warmth during pressing and dip-focused sessions
Tip: Start with the machine for technique, then use assistance bands or dip bars as you progress toward full bodyweight dips.