Lever Triceps Dip (Plate-Loaded): Proper Form, Sets, Muscles Worked & FAQ
Learn how to perform the Lever Triceps Dip (plate-loaded) with proper form. Discover muscles worked, setup, execution steps, sets by goal, common mistakes, FAQs, and recommended equipment.
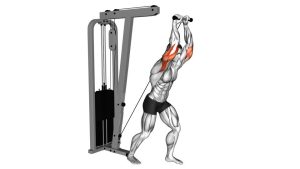
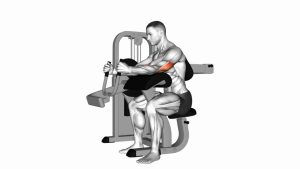
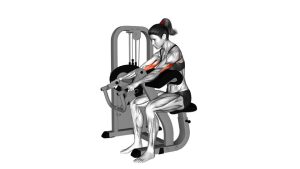
Lever Triceps Dip (Plate-Loaded)
This exercise is most effective when performed with a smooth tempo and strict elbow-driven mechanics. The machine path helps reduce unnecessary body sway, making it easier to keep tension on the triceps brachii throughout the rep. You should feel the workload mainly in the back of the upper arms, not in the neck or lower back.
Quick Overview
| Body Part | Triceps |
|---|---|
| Primary Muscle | Triceps brachii |
| Secondary Muscle | Anterior deltoids, lower chest, forearms, core stabilizers |
| Equipment | Plate-loaded lever dip machine |
| Difficulty | Beginner to Intermediate |
Sets & Reps (By Goal)
- Muscle growth: 3–4 sets × 8–15 reps with controlled tempo and a full squeeze at lockout
- Strength focus: 4–5 sets × 5–8 reps with heavier loading and 90–120 seconds rest
- Technique practice: 2–3 sets × 10–12 reps using a moderate load and slow eccentric
- Accessory after pressing work: 2–4 sets × 12–15 reps for higher-volume triceps fatigue
Progression rule: Add reps first while maintaining clean lockout and steady control. Increase load only when you can complete all sets without shoulder irritation or bouncing through the bottom.
Setup / Starting Position
- Load the machine: Add plates evenly on both sides and select a weight you can control through the full range.
- Sit and grip the handles: Take a firm neutral grip on the machine handles with your wrists straight.
- Set posture: Sit tall with your chest up, shoulders down, and core lightly braced.
- Position the arms: Keep your elbows close to your sides rather than flaring them outward.
- Start from the bottom: Begin with elbows bent and the handles near torso level, ready to press.
Tip: A stable torso and stacked posture help keep the movement focused on elbow extension instead of turning it into a chest-dominant dip.
Execution (Step-by-Step)
- Brace and stay tall: Keep your chest proud, neck neutral, and shoulders from shrugging upward.
- Drive the handles down: Press through the handles by extending your elbows, not by throwing your body into the motion.
- Keep elbows tucked: Let the upper arms stay close to your torso as the machine arms move through their arc.
- Reach near full extension: Finish the rep with a strong triceps contraction without violently locking the elbows.
- Lower under control: Bend the elbows slowly and return to the starting position without letting the weight crash back.
Pro Tips & Common Mistakes
- Prioritize elbow extension: Think about straightening the arms rather than pushing with your chest.
- Control the eccentric: Lowering slowly increases triceps tension and improves joint control.
- Do not bounce at the bottom: Rebounding out of the stretch reduces muscular tension and may irritate the shoulders.
- Keep shoulders packed: Avoid shrugging or letting the neck tense up during heavy reps.
- Do not overload too soon: The guided machine path can tempt lifters to use more weight than they can actually control.
- Use full but comfortable range: Go deep enough to stretch the triceps, but stop short of painful shoulder extension.
- Lock out with intent, not aggression: Squeeze the triceps at the top without snapping into the joints.
FAQ
What muscles does the Lever Triceps Dip work most?
The main target is the triceps brachii. The shoulders, lower chest, forearms, and core also assist with stabilization depending on machine setup and body position.
Is this better than bodyweight dips for triceps isolation?
For strict triceps isolation, many lifters find the machine version easier to control because it provides a fixed path and better stability. Bodyweight dips usually demand more coordination and often involve more chest and shoulder contribution.
Should I go all the way down on every rep?
Use the deepest range you can control without shoulder pain or collapsing posture. A full stretch is useful, but not at the expense of joint comfort or stable mechanics.
Can beginners use the plate-loaded lever dip machine?
Yes. It can be a good beginner-friendly triceps machine because the path is guided and balance demands are low. Start light and learn proper elbow tracking before adding more load.
Where should I place this exercise in my workout?
It works well after compound pressing movements like bench press or shoulder press, or as a main triceps movement in an upper-body or arms-focused session.
Recommended Equipment
- Weightlifting Grips — helpful for maintaining a firm handle connection during higher-rep machine work
- Elbow Sleeves for Weightlifting — useful for warmth, joint comfort, and support during heavy triceps sessions
- Fractional Weight Plates — ideal for making small plate-loaded progressions over time
- Gym Log Book — makes it easier to track sets, reps, and progressive overload on machine work
- Liquid Chalk for Gym Training — improves grip security if your hands slip on machine handles during hard sets
Tip: Small load jumps, controlled tempo, and consistent tracking are often more effective for triceps growth than simply piling on more plates.