Cable Tuck Reverse Crunch: Form, Benefits, Sets, Tips & FAQ
Learn how to do the Cable Tuck Reverse Crunch with proper form. Build stronger abs with cable resistance, step-by-step execution, sets by goal, common mistakes, FAQs, and equipment tips.
Cable Tuck Reverse Crunch
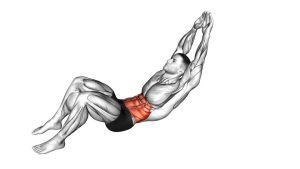
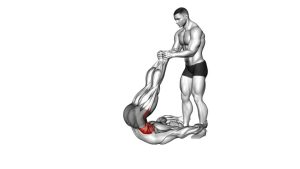
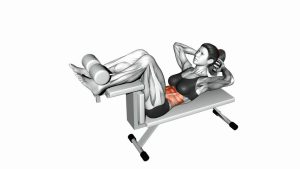
The movement shown in the video starts with the athlete lying on their back near a low cable pulley. The feet or ankles are attached to the cable, and the legs begin extended forward under tension. From there, the athlete pulls the knees inward, curls the pelvis upward, pauses briefly at the top, then slowly extends the legs back out while resisting the cable. The most important detail is that the movement comes from the abs curling the pelvis, not from swinging the legs or using the hip flexors aggressively.
Because the cable creates constant resistance, this exercise is more demanding than a basic reverse crunch. It rewards slow tempo, clean control, and a strong posterior pelvic tilt at the top. When done correctly, you should feel the abs working hard through the tuck and even more during the slow return.
Quick Overview
| Body Part | Abs |
|---|---|
| Primary Muscle | Rectus abdominis, especially the lower abdominal region |
| Secondary Muscle | Hip flexors, obliques, transverse abdominis, deep core stabilizers |
| Equipment | Cable machine, ankle straps, bench or exercise mat |
| Difficulty | Intermediate because it requires cable control, pelvic curling, and strong core stability |
Sets & Reps (By Goal)
- Core strength: 3–4 sets × 8–12 reps with a controlled 2–3 second lowering phase.
- Muscle building / hypertrophy: 3–5 sets × 10–15 reps using moderate cable resistance and a strong top squeeze.
- Lower-ab control: 2–4 sets × 8–10 slow reps with a 1–2 second pause at the tucked position.
- Core finisher: 2–3 sets × 12–20 reps with lighter weight and constant tension.
- Beginner progression: Start with bodyweight reverse crunches first, then use very light cable resistance for 2–3 sets × 8–10 reps.
Progression rule: Add control before adding weight. If you cannot curl the hips at the top, or if your lower back arches during the return, the cable load is too heavy.
Setup / Starting Position
- Set the cable low: Attach ankle straps or a secure foot attachment to the lowest pulley on the cable machine.
- Position your body: Lie on your back on a bench or mat with your feet facing the cable machine. Move far enough away to create light cable tension at the start.
- Secure the attachment: Place the ankle straps around both ankles, or secure the feet depending on the attachment used.
- Stabilize your upper body: Hold the sides of the bench, a stable handle, or place your arms down by your sides for balance.
- Start with the legs extended: Keep the legs slightly above the floor or bench line so the cable stays under tension.
- Brace your core: Lightly pull your ribs down and keep your lower back controlled before starting the first rep.
Your starting position should feel stable. The cable should pull the legs away from your body, but not so strongly that it forces your lower back to arch before the rep begins.
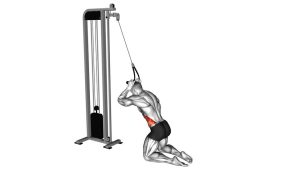
Execution (Step-by-Step)
- Brace before moving: Tighten your abs and keep your upper body steady against the bench or floor.
- Begin the tuck: Bend your knees and pull them toward your chest while keeping the motion smooth and controlled.
- Curl the pelvis upward: As the knees come in, lift your tailbone slightly by using your abs. This is the key reverse-crunch action.
- Pause at the top: Hold the tucked position briefly and squeeze your abs without kicking or swinging.
- Control the return: Slowly extend your legs back out while resisting the cable. Do not let the weight stack pull you quickly.
- Reset under tension: Return to the starting angle without fully relaxing your abs, then begin the next rep.
Pro Tips & Common Mistakes
Pro Tips
- Use a light-to-moderate weight: This exercise becomes better when you can control every inch of the movement.
- Focus on pelvic curl: The top of the rep should include a small hip lift, not just a knee tuck.
- Slow down the eccentric: The return phase is where the cable adds major value. Fight the cable instead of dropping your legs.
- Keep the upper body quiet: Your shoulders, arms, and head should not jerk or lift during the rep.
- Exhale as you tuck: Breathing out helps you pull the ribs down and tighten the abs.
- Keep tension between reps: Avoid letting the weight stack fully rest unless you are finished with the set.
Common Mistakes
- Using too much weight: Heavy cable resistance often turns the movement into a swing and removes tension from the abs.
- Only moving the legs: If the hips do not curl upward, the lower abs are not getting the full reverse-crunch stimulus.
- Letting the lower back arch: This usually happens when the legs extend too far or the cable load is too heavy.
- Rushing the lowering phase: Letting the cable yank your legs back reduces control and increases lower-back stress.
- Pulling with momentum: The rep should look smooth, not like a fast leg swing.
- Holding your breath too long: Brace firmly, but keep breathing controlled throughout the set.
FAQ
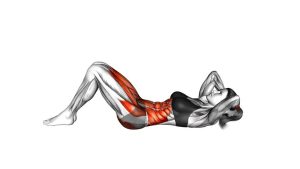
What muscles does the Cable Tuck Reverse Crunch work?
The main target is the rectus abdominis, especially the lower abdominal region during the pelvic curl. The hip flexors assist with the knee tuck, while the obliques and deep core muscles help stabilize your pelvis and trunk.
Is the Cable Tuck Reverse Crunch good for lower abs?
Yes. While you cannot fully isolate only the “lower abs,” this exercise strongly emphasizes the lower portion of the abdominal movement because the pelvis curls upward against cable resistance.
Should I use heavy weight on this exercise?
No, not at first. Use a weight that allows smooth reps, a controlled top curl, and a slow return. If your legs swing or your lower back arches, the weight is too heavy.
Why do I feel this more in my hip flexors than my abs?
You may be pulling the knees in without curling the pelvis. Focus on lifting the tailbone slightly at the top and exhaling as you tuck. Also reduce the weight and slow the movement down.
Can beginners do the Cable Tuck Reverse Crunch?
Beginners can try it with very light resistance, but it is better to master bodyweight reverse crunches first. Once you can control the pelvic curl without swinging, adding cable resistance becomes more useful.
Should my lower back lift off the bench?
A small lift of the pelvis at the top is normal and desired. However, your lower back should not violently arch or slam down. The lift should come from your abs curling the hips, not from momentum.
How is this different from a regular reverse crunch?
A regular reverse crunch uses bodyweight only. The cable version adds constant resistance, especially as your legs extend away from the body. This makes the eccentric phase harder and increases overall abdominal tension.
Recommended Equipment
- Cable Machine Ankle Straps — essential for attaching your ankles securely to the low pulley during cable reverse crunch variations.
- Adjustable Weight Bench — gives you a stable surface and better upper-body support while performing the exercise.
- Cable Machine / Home Gym Pulley System — useful if you want to train cable abs exercises at home with adjustable resistance.
- Thick Exercise Mat — supports your back and hips if you perform the exercise from the floor instead of a bench.
- Cable Attachment Set / Ab Straps — helpful for expanding cable core exercises and improving comfort during different ab variations.
Choose secure attachments and start with light weight. For this exercise, control matters more than load. A smooth cable path and comfortable ankle setup will make the movement safer and more effective.