L-Sit on Floor: Form, Benefits, Sets, Tips & FAQ
Learn how to do the L-Sit on Floor to build stronger abs, hip flexors, and core stability. Includes setup, step-by-step execution, sets by goal, common mistakes, FAQs, and recommended equipment.
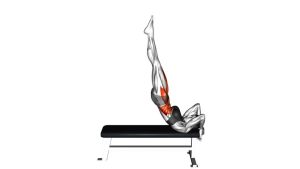
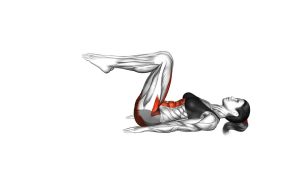
L-Sit on Floor
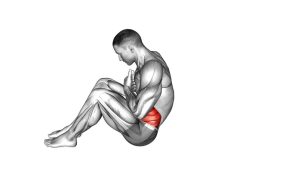
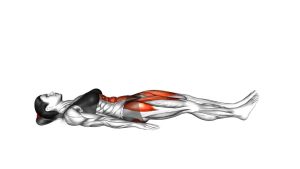
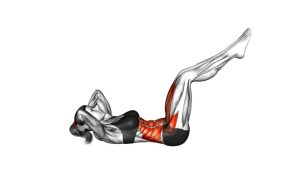
This exercise is excellent for building core control, compressed strength, and hip flexor endurance. Because the body is supported by the hands and the legs are held forward, the abs must work hard to keep the torso stable while the hip flexors keep the thighs lifted.
In the video, the movement is performed as a controlled floor-based L-sit variation. The athlete sits on the floor, keeps the torso upright, places the hands beside the hips, and uses the core to maintain a compact seated hold. The movement is small, strict, and focused on tension rather than speed.
Quick Overview
| Body Part | Core |
|---|---|
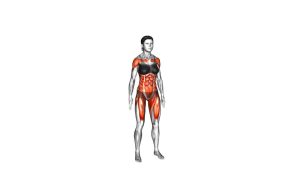
| Primary Muscle | Rectus abdominis, hip flexors |
| Secondary Muscle | Obliques, transverse abdominis, quadriceps, shoulders, triceps, forearms |
| Equipment | Bodyweight only; optional yoga mat, parallettes, push-up bars, or wrist support |
| Difficulty | Beginner to intermediate, depending on knee position and hold duration |
Sets & Reps (By Goal)
- Beginner core control: 3–4 sets × 8–15 second holds
- Strength building: 4–5 sets × 15–25 second holds
- Core endurance: 3–5 sets × 25–40 second holds
- Skill progression: 5–8 short sets × 5–12 second high-quality holds
- Warm-up activation: 2–3 sets × 8–12 second holds
Progression rule: First increase hold quality, then hold duration. Only move to longer holds when you can keep the chest lifted, knees locked or controlled, and lower back from collapsing.
Setup / Starting Position
- Sit on the floor: Extend both legs straight in front of you with your heels on the ground.
- Place your hands beside your hips: Fingers can point forward, slightly outward, or wherever your wrists feel most comfortable.
- Lift your chest: Sit tall with a long spine and avoid rounding your upper back before starting.
- Brace your core: Tighten your abs as if preparing for a punch to the stomach.
- Lock the legs: Squeeze the quads and point or flex the toes to create tension through the legs.
- Press into the floor: Push your palms down to create shoulder stability and help lift the hips or lighten the legs.
If the full straight-leg position is too difficult, start with knees bent and heels lightly touching the floor. Gradually work toward lifting the heels and straightening the legs.
Execution (Step-by-Step)
- Set your posture: Sit tall with your legs in front, hands planted beside your hips, shoulders down, and chest lifted.
- Brace before lifting: Tighten your abs, squeeze your thighs, and press your hands firmly into the floor.
- Lift or lighten the legs: Try to raise your heels slightly off the floor while keeping the knees straight. If needed, keep the heels down and focus on maximal core tension.
- Hold the L position: Keep the torso upright, legs extended, abs tight, and shoulders away from the ears.
- Breathe under tension: Take small controlled breaths without losing your brace.
- Lower with control: Gently release the hold, bring the heels down, and reset before the next repetition or hold.
Pro Tips & Common Mistakes
Pro Tips
- Push the floor away: Strong hand pressure helps stabilize the shoulders and core.
- Think “chest tall”: A lifted chest helps prevent the spine from collapsing backward.
- Squeeze your quads: Straight, active legs make the exercise cleaner and more effective.
- Start with tuck holds: Bent-knee L-sits are excellent for learning the position safely.
- Use parallettes if needed: Handles give more clearance and reduce wrist stress.
- Keep reps short and strict: Five perfect seconds are better than twenty sloppy seconds.
Common Mistakes
- Rounding the lower back: This reduces core tension and makes the hold less effective.
- Shrugging the shoulders: Keep shoulders down and stable instead of jammed near the ears.
- Bending the knees unintentionally: If using straight legs, lock the quads and keep the knees firm.
- Holding your breath: Maintain short, controlled breaths during the hold.
- Forcing the full version too early: Use bent-knee progressions if the straight-leg hold breaks form.
- Leaning too far back: Stay tall and controlled instead of turning it into a seated crunch.
FAQ
What muscles does the L-Sit on Floor work?
The L-Sit on Floor primarily works the abs and hip flexors. It also trains the obliques, deep core muscles, quadriceps, shoulders, triceps, and forearms because the whole body must stay tense and stable during the hold.
Is the L-Sit on Floor good for waist training?
Yes. It is a strong waist and core stability exercise because the abs and obliques must resist collapse while the legs stay extended. It will not “spot reduce” fat, but it can improve core strength, posture, and abdominal control.
Why can’t I lift my legs off the floor?
This usually comes from limited compression strength, weak hip flexors, tight hamstrings, or not enough pressing strength through the arms. Start with bent knees, short holds, or use parallettes to create more floor clearance.
Should beginners do the full straight-leg version?
Beginners can try it, but most people should start with an easier variation such as a tuck L-sit, one-leg L-sit, or heels-light floor hold. Progress only when you can keep your torso tall and your core tight.
How long should I hold an L-Sit on Floor?
Start with 8–15 seconds per set. As strength improves, build toward 20–40 seconds while keeping clean form. Quality matters more than duration.
Can I do the L-Sit on Floor every day?
You can practice low-volume L-sit progressions often, but intense holds may need recovery. For most people, 3–5 sessions per week is enough to improve strength without overloading the hips or wrists.
What is the easiest L-sit variation?
The easiest variation is a tuck L-sit, where the knees stay bent and close to the chest. This reduces the lever length and makes it easier to keep the hips and legs lifted.
Recommended Equipment
- Parallettes Bars — increase floor clearance and make L-sit holds easier to progress.
- Push-Up Bars — useful budget alternative for reducing wrist extension during floor holds.
- Exercise / Yoga Mat — provides comfort and grip for floor-based core training.
- Calisthenics Wrist Wraps — supports the wrists during pressing-based bodyweight holds.
- Resistance Bands Set — helpful for assisted core compression drills and mobility work.
Choose equipment that improves comfort and control without replacing proper technique. Parallettes are especially useful if your hands, wrists, or hip clearance limit your L-sit progress.