Dumbbell Decline One-Arm Hammer Press: Form, Sets, Tips & FAQ
Learn the Dumbbell Decline One-Arm Hammer Press for lower chest, triceps, and unilateral pressing strength. Includes setup, execution, sets by goal, mistakes, FAQs, and equipment.
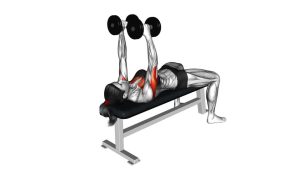
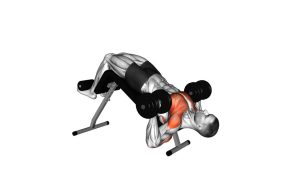
Dumbbell Decline One-Arm Hammer Press
This movement is useful when you want a chest press that feels more shoulder-friendly than a wide-grip press. The hammer grip keeps the palm facing inward, which can reduce excessive shoulder flare and help the elbow track closer to the body. In addition, the one-arm setup exposes strength differences between sides and forces your trunk to resist twisting.
However, it should not be treated like a maximum-load power press. Since the decline angle and single-arm loading create extra stability demands, the best results come from a controlled tempo, clean elbow path, and strong full-body bracing. Therefore, choose a dumbbell you can press without rolling your shoulder forward or rotating your torso.
Quick Overview
| Body Part | Chest |
|---|---|
| Primary Muscle | Lower chest fibers of the pectoralis major |
| Secondary Muscle | Triceps, anterior deltoid, serratus anterior, core stabilizers, obliques |
| Equipment | One dumbbell and a decline bench |
| Difficulty | Intermediate because the decline angle and single-arm load require strong control |
Sets & Reps (By Goal)
- Muscle growth: 3–4 sets × 8–12 reps per side with a controlled 2–3 second lowering phase.
- Strength focus: 4–5 sets × 5–8 reps per side using heavier weight while keeping strict form.
- Chest activation: 2–3 sets × 10–15 reps per side with moderate weight and a strong squeeze at the top.
- Unilateral balance: 3 sets × 8–10 reps per side, starting with the weaker side first.
- Finisher: 2 sets × 12–15 reps per side using lighter weight and slow tempo.
Progression rule: Add reps before increasing weight. Once both sides can complete every rep without torso rotation, shoulder rolling, or wrist collapse, increase the dumbbell slightly.
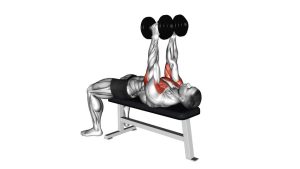
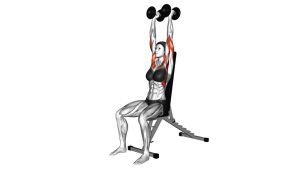
Setup / Starting Position
- Set the bench: Adjust the bench to a comfortable decline angle and secure your feet under the pads.
- Pick up the dumbbell safely: Hold one dumbbell with a neutral grip, meaning your palm faces inward.
- Lie back with control: Keep the dumbbell close to your torso as you settle into the decline position.
- Stack your joints: Position the wrist above the elbow and keep the elbow slightly tucked instead of flared wide.
- Brace your body: Tighten your core, keep your ribs controlled, and press your upper back into the bench.
- Set the non-working arm: Place the free hand across your torso, on your hip, or lightly on the bench for balance.
- Start near the lower chest: The dumbbell should begin beside the lower chest or upper-ab line, not near the neck.
Setup matters because the decline position can make the body feel less stable. Before you begin the first rep, make sure your feet, hips, upper back, and shoulder are locked into a strong base.
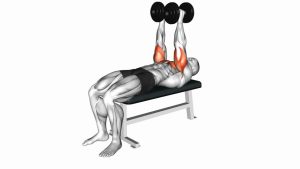
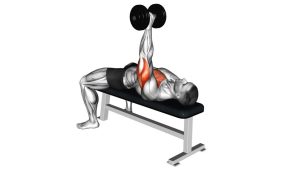
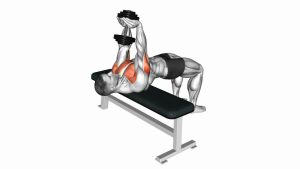
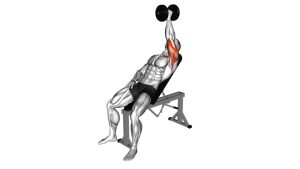
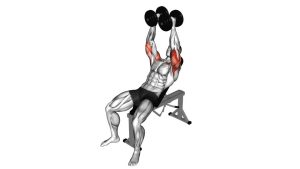
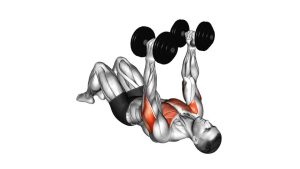
Execution (Step-by-Step)
- Begin from the bottom position: Hold the dumbbell near your lower chest with your palm facing inward. Keep your wrist straight and your elbow under control.
- Brace before pressing: Pull your ribs down slightly, tighten your core, and prevent your torso from twisting toward the working arm.
- Press upward smoothly: Drive the dumbbell up while keeping the elbow slightly tucked and the shoulder packed.
- Follow a natural arc: Let the dumbbell travel upward and slightly inward toward the midline, but do not force it across your body.
- Finish with control: Extend the arm near the top without aggressively locking the elbow or shrugging the shoulder.
- Squeeze briefly: Pause for a moment while keeping the chest engaged and the dumbbell stable.
- Lower slowly: Bring the dumbbell back down along the same path until your elbow reaches a comfortable depth.
- Repeat clean reps: Maintain the same tempo, range, and torso position for every repetition before switching sides.
Pro Tips & Common Mistakes
Pro Tips
- Use a neutral wrist: Keep the knuckles stacked over the wrist so force transfers cleanly into the dumbbell.
- Start with your weaker side: Match the stronger side to the same reps to correct left-right strength gaps.
- Control the bottom range: Lower until you feel a chest stretch, but avoid letting the shoulder roll forward.
- Press with your elbow under the dumbbell: This keeps the press strong and reduces unnecessary shoulder stress.
- Keep the rib cage quiet: Do not over-arch or flare your ribs just to move heavier weight.
- Use a slower eccentric: A controlled lowering phase improves tension and makes the exercise safer.
Common Mistakes
- Going too heavy: Heavy loading often causes torso rotation, poor depth, and shoulder instability.
- Flaring the elbow wide: Excessive flare can shift stress toward the shoulder instead of the lower chest.
- Dropping too low: Lowering beyond your shoulder’s comfortable range can create joint irritation.
- Bending the wrist back: A collapsed wrist weakens the press and may irritate the joint.
- Pressing toward the face: The dumbbell should stay closer to the lower-chest line, not drift toward the neck.
- Rushing the switch: Sit up carefully or use both hands to control the dumbbell before changing sides.
FAQ
What does the Dumbbell Decline One-Arm Hammer Press work?
It primarily works the lower chest. It also trains the triceps, front deltoid, and core stabilizers because your body must resist rotation while one arm presses.
Is the neutral grip better for shoulders?
For many lifters, the neutral grip feels more comfortable because it allows the elbow to stay slightly tucked. However, comfort depends on your shoulder structure, bench angle, range of motion, and load selection.
Should I touch the dumbbell to my chest?
Not always. Lower the dumbbell until you reach a strong, comfortable stretch without shoulder discomfort. If touching the chest causes your shoulder to roll forward, stop slightly higher.
Can beginners do this exercise?
Beginners can learn it with light weight, but a regular two-arm dumbbell press or machine chest press is usually easier first. The one-arm decline version requires more balance, coordination, and core control.
How is this different from a regular decline dumbbell press?
The regular decline dumbbell press uses both arms at the same time. This version uses one arm, so it increases unilateral control, reveals strength imbalances, and makes the core work harder to prevent rotation.
Should I lock out at the top?
You can finish near full extension, but avoid snapping the elbow or losing shoulder position. A controlled top position is better than a hard lockout with joint stress.
Recommended Equipment
- Adjustable Dumbbells — ideal for progressing one-arm presses without needing a full dumbbell rack.
- Decline Weight Bench — provides the correct body angle for lower-chest pressing variations.
- Weightlifting Wrist Wraps — helpful for keeping the wrist stacked during heavier pressing sets.
- Exercise Mat — useful for floor setup, warm-ups, mobility drills, and home gym protection.
- Weightlifting Gloves — improves grip comfort when holding heavier dumbbells in a neutral position.
Tip: The most important equipment is a stable decline bench and a dumbbell you can control. Add supportive accessories only if they improve comfort, grip, or safety without hiding poor technique.