Front Plank with Leg Lift: Core Stability, Glute Strength & Form Guide
Learn the Front Plank with Leg Lift for stronger abs, glutes, shoulders, and anti-rotation control. Includes setup, steps, tips, FAQs, and equipment.
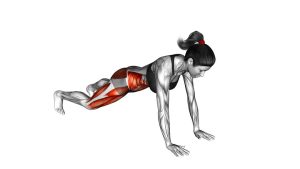
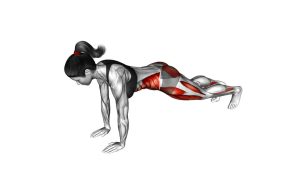
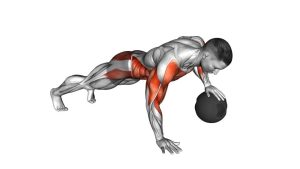
Front Plank with Leg Lift
This exercise is excellent for building real-world core strength because it teaches your abs to stabilize your spine while your hips move. During each rep, your abdominal muscles work to prevent your lower back from sagging, while your glutes lift the leg without twisting the pelvis. Your shoulders also stay active because they must support your bodyweight and keep your upper body steady.
The best version of the Front Plank with Leg Lift is slow, clean, and controlled. You should feel tension through your abs, glutes, shoulders, and thighs. You should not feel sharp pressure in your lower back. If your hips rotate, your leg swings, or your lower back arches, reduce the height of the lift and focus on better control.
Quick Overview
| Body Part | Core |
|---|---|
| Primary Muscle | Rectus abdominis, transverse abdominis, and deep core stabilizers |
| Secondary Muscle | Glutes, hip extensors, obliques, shoulders, chest, triceps, and quadriceps |
| Equipment | No equipment required; optional exercise mat |
| Difficulty | Beginner to Intermediate |
Sets & Reps (By Goal)
- Core stability: 3–4 sets × 8–12 controlled reps per side
- Glute activation: 2–3 sets × 10–15 reps per side with a short squeeze at the top
- Beginner control: 2–3 sets × 5–8 reps per side with slow tempo
- Endurance training: 3 sets × 30–45 seconds alternating legs
- Warm-up use: 1–2 sets × 6–10 reps per side before lower-body or core training
Progression rule: First improve control, then increase reps. After your hips stay square and your spine stays neutral, you can progress by slowing the tempo, adding a pause at the top, narrowing your foot stance, or using ankle weights.
Setup / Starting Position
- Start in a high plank: Place your hands on the floor directly under your shoulders. Keep your arms straight and strong.
- Set your feet: Position your feet about hip-width apart. A slightly wider stance makes the movement easier and more stable.
- Brace your core: Tighten your abs as if you are preparing for a light punch to the stomach.
- Align your body: Keep a straight line from your head to your heels. Do not let your hips sag or rise too high.
- Set your shoulders: Push the floor away gently. Keep your shoulder blades stable without collapsing into your upper back.
- Keep your neck neutral: Look slightly down and forward. Avoid dropping your head or craning your neck upward.
Tip: Before lifting the leg, hold the plank for a few seconds. If you cannot keep a stable plank position, practice the basic front plank first.
Execution (Step-by-Step)
- Begin in a strong plank: Press your hands into the floor, brace your abs, and keep your ribs pulled down.
- Shift minimally: Keep your weight balanced through both hands. Avoid leaning too far into one shoulder before lifting.
- Lift one leg: Squeeze the glute of the working leg and raise that leg slowly off the floor.
- Stop near hip height: Lift only until your leg is roughly in line with your torso. Do not over-lift or arch your lower back.
- Keep your hips square: Imagine both hip bones pointing straight down toward the floor.
- Pause briefly: Hold the top position for 1–2 seconds while breathing steadily.
- Lower with control: Bring the foot back to the floor slowly. Do not drop it or let your hips bounce.
- Repeat on the other side: Alternate legs while keeping the same plank alignment from rep to rep.
Pro Tips & Common Mistakes
Pro Tips
- Lift from the glute: Think about squeezing the butt cheek, not kicking the leg up with momentum.
- Keep the ribs down: This helps prevent lower-back arching during the leg lift.
- Move slowly: A slow rep trains stability better than a fast, swinging rep.
- Use a wider stance if needed: Wider feet make the exercise easier and reduce unwanted hip rotation.
- Push the floor away: Keep your shoulders active so your chest does not sink between your arms.
- Control your breathing: Exhale gently as you lift, then inhale as you lower.
Common Mistakes
- Lifting the leg too high: This often causes the lower back to arch and reduces core control.
- Rotating the hips: Turning the pelvis makes the movement easier but removes the anti-rotation challenge.
- Sagging the lower back: This can place unnecessary stress on the lumbar spine.
- Rushing the reps: Fast reps usually rely on momentum instead of strength.
- Letting the shoulders collapse: Keep your upper back strong and stable throughout the set.
- Holding the breath: Breathing helps you maintain tension without excessive stiffness.
FAQ
What muscles does the Front Plank with Leg Lift work?
The Front Plank with Leg Lift mainly works the abs and deep core stabilizers. It also trains the glutes, obliques, shoulders, triceps, chest, hip stabilizers, and quadriceps. The core works hard to stop the body from rotating while the leg lifts.
Is the Front Plank with Leg Lift good for beginners?
Yes, but beginners should first be able to hold a strong basic plank. If the full version feels too hard, keep the feet wider, lift the leg only slightly, or perform the movement from an incline with the hands on a bench.
How high should I lift my leg?
Lift your leg only to about hip height or slightly lower. A higher lift is not always better. If lifting higher causes your lower back to arch or your hips to rotate, reduce the range of motion.
Why do I feel this exercise in my lower back?
You may be lifting the leg too high, losing core tension, or letting your hips sag. Brace your abs, squeeze your glute, and keep the lift smaller. If discomfort continues, stop and use an easier plank variation.
Should I alternate legs or finish one side first?
Both methods work. Alternating legs is better for general core stability and rhythm. Finishing one side first can create more glute fatigue on that side, but it may be harder to keep the plank stable.
Can I use this exercise in a home workout?
Yes. The Front Plank with Leg Lift is perfect for home workouts because it requires no equipment. You only need enough floor space and, optionally, an exercise mat for comfort.
Recommended Equipment
- Exercise Mat — provides wrist, knee, and floor comfort during plank variations.
- Wrist Support Wraps — useful if your wrists feel sensitive during high plank exercises.
- Adjustable Ankle Weights — adds resistance once your plank leg lift form is strong and stable.
- Mini Resistance Bands — can be used around the thighs for extra glute activation in advanced variations.
- Push-Up Handles — help keep the wrists more neutral during high plank positions.
Tip: Equipment is optional. Master the bodyweight version first. Add resistance only when your hips stay square and your spine stays neutral.