Elbow Flexor Stretch: Safe Form, Benefits, Tips & FAQ
Learn the Elbow Flexor Stretch to improve biceps, brachialis, and upper-arm flexibility. Includes setup, execution cues, sets by goal, mistakes, FAQs, and recommended equipment.
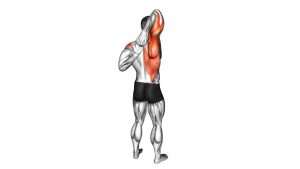
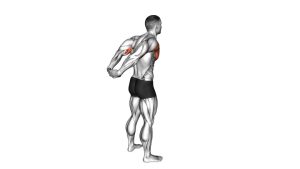
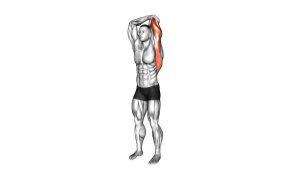
Elbow Flexor Stretch
This stretch is useful after arm training, pulling workouts, curls, climbing, gripping work, or long periods of desk posture. In addition, it can help restore comfortable elbow extension and reduce the tight, shortened feeling that often builds up in the front of the upper arm. However, the goal is not to force the elbow straight aggressively. Instead, use a gentle setup, open the chest, and let the stretch build gradually.
Quick Overview
| Body Part | Arms |
|---|---|
| Primary Muscle | Biceps brachii / elbow flexors |
| Secondary Muscle | Brachialis, brachioradialis, anterior shoulder, forearm flexors |
| Equipment | None; optional wall, bench, door frame, or stretching strap |
| Difficulty | Beginner |
Sets & Reps (By Goal)
- General flexibility: 2–3 sets × 20–30 seconds per side
- Post-workout cooldown: 1–2 sets × 20–40 seconds per side
- Desk or posture reset: 1–2 sets × 15–25 seconds per side
- Mobility improvement: 3–4 sets × 30–45 seconds per side
- Light warm-up preparation: 1–2 sets × 10–15 seconds per side with very low intensity
Progression rule: First, improve relaxation and breathing. Then, increase hold time. Finally, add a slightly deeper arm position only if the stretch remains smooth and symptom-free.
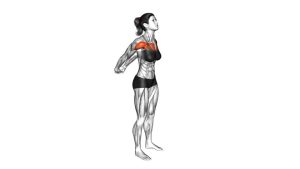
Setup / Starting Position
- Stand tall: Begin in an upright position with your ribs stacked over your pelvis, your neck neutral, and your shoulders relaxed.
- Move the arm behind you: Extend one arm slightly behind the torso. Keep the elbow straight but not aggressively locked.
- Position the hand: Place the palm, fingers, or back of the hand against a wall, bench, or stable surface if you need support. Otherwise, keep the arm extended behind you.
- Open the chest: Gently draw the shoulder back without shrugging. As a result, the front of the upper arm begins to lengthen.
- Set the stretch intensity: Adjust your body position until you feel a mild to moderate stretch through the biceps and front of the upper arm.
Keep the shoulder down and the elbow long. If the stretch goes into the front of the shoulder too strongly, reduce the arm angle and move more slowly.
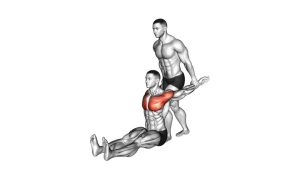
Execution (Step-by-Step)
- Start with a tall posture: Brace lightly through the midsection and keep your chest open. Avoid leaning your head forward.
- Straighten the elbow: Lengthen the arm until you feel the front of the upper arm begin to stretch. Do not force the joint into a hard lockout.
- Turn slightly away if needed: Rotate your torso a small amount away from the stretching arm to increase tension through the biceps.
- Lean forward gently: If more stretch is needed, shift the body forward while the arm remains behind you. The stretch should increase gradually.
- Breathe into the hold: Maintain the position for the target time while relaxing the jaw, neck, and shoulder.
- Release slowly: Step back toward the arm or reduce the lean before returning the arm to neutral. This prevents sudden tension through the elbow and shoulder.
- Repeat on the other side: Match the same position, breathing, and hold time for balanced mobility.
Pro Tips & Common Mistakes
- Keep the elbow long: The biceps stretches better when the elbow stays extended. However, avoid forcing a painful lockout.
- Use small position changes: A tiny torso turn or forward lean can create a strong stretch, so there is no need to push aggressively.
- Relax the shoulder: Do not shrug. Instead, keep the shoulder blade gently down and back.
- Avoid bouncing: Ballistic movement can irritate the elbow or shoulder. Therefore, hold the stretch steadily and breathe.
- Do not chase pain: Stronger is not always better. A mild to moderate stretch is usually more productive than an intense one.
- Keep the wrist comfortable: If wrist extension feels uncomfortable, change the hand angle or use a strap instead of pressing the palm flat.
- Control your ribcage: Avoid over-arching the lower back to fake more range. Instead, move from the shoulder and torso gradually.
- Use after curls and pulling work: This stretch pairs well with biceps curls, chin-ups, rows, dead hangs, and grip-heavy training.
FAQ
What muscles does the Elbow Flexor Stretch target?
It mainly targets the biceps brachii and other elbow flexors. In addition, it may stretch the brachialis, brachioradialis, anterior shoulder, and forearm tissues depending on your arm and wrist position.
Where should I feel this stretch?
You should feel it through the front of the upper arm, especially near the biceps. Some gentle tension near the front shoulder may also occur. However, sharp elbow pain, shoulder pinching, or tingling down the arm is not normal.
Should my elbow be completely straight?
The elbow should be straight enough to lengthen the biceps, but it should not be forced into a painful lockout. If your elbow feels irritated, soften the position slightly and reduce the intensity.
Is this stretch good after biceps curls?
Yes. It can be a useful cooldown after curls, rows, pull-ups, chin-ups, or grip-heavy training. For best results, keep the hold controlled and avoid stretching aggressively while the muscle is fatigued.
Can beginners do the Elbow Flexor Stretch?
Yes. This is beginner-friendly when performed gently. Start with a smaller arm angle, shorter hold, and light intensity. Then, gradually increase the stretch as your range improves.
Why do I feel this in my shoulder?
Because the biceps crosses the shoulder joint, shoulder extension can create tension near the front of the shoulder. If it feels like a mild stretch, that may be fine. However, if it feels pinchy or sharp, reduce the arm position and avoid forcing the range.
How often should I do this stretch?
You can perform it 3–6 times per week, especially after upper-body training or during mobility sessions. If your arms feel sensitive or sore afterward, reduce the hold time and stretch intensity.
Recommended Equipment
- Stretching Strap — useful for assisted arm positioning when shoulder range is limited
- Yoga Mat — provides a comfortable surface for mobility sessions and cooldown work
- Massage Ball — helpful for releasing tight forearms, biceps area, and upper-arm tension
- Foam Roller — useful for chest, shoulder, and upper-back mobility before stretching
- Resistance Bands Set — ideal for pairing this stretch with light shoulder activation and posture drills
Tip: Equipment is optional. Nevertheless, a strap or stable surface can make the stretch easier to control, especially if your shoulders or wrists feel restricted.