Lever Seated Bent-Over Rear Delt Fly: Form, Muscles Worked, Sets, Tips & FAQ
Learn how to perform the Lever Seated Bent-Over Rear Delt Fly with proper form. Discover muscles worked, setup, execution steps, sets and reps by goal, common mistakes, FAQs, and recommended equipment.
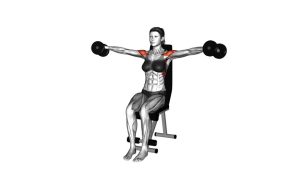
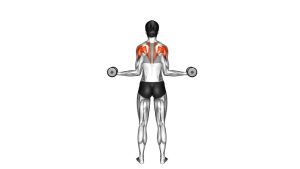
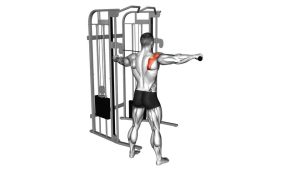
Lever Seated Bent-Over Rear Delt Fly
This exercise is especially useful for lifters who want to improve rear shoulder development, create more balanced shoulder training, and support better upper-body posture. Compared with dumbbell reverse flies, the lever machine helps control the path of motion and makes it easier to keep tension on the rear delts throughout the set. The goal is not to swing the handles up, but to open the arms smoothly while keeping the torso fixed and the traps quiet.
Quick Overview
| Body Part | Rear Shoulders |
|---|---|
| Primary Muscle | Posterior deltoids (rear delts) |
| Secondary Muscle | Rhomboids, middle trapezius, external rotator stabilizers |
| Equipment | Lever rear delt / reverse fly machine |
| Difficulty | Beginner to Intermediate |
Sets & Reps (By Goal)
- Muscle growth: 3–4 sets × 10–15 reps with controlled tempo and 45–75 seconds rest
- Shoulder definition / pump: 2–4 sets × 12–20 reps with light-to-moderate load and short rest
- Strength foundation: 3–4 sets × 8–10 reps with strict form and 60–90 seconds rest
- Warm-up / activation: 2–3 sets × 12–15 reps using light resistance before rows or pressing
Progression rule: Increase reps before increasing load. Once you can complete all target reps with clean shoulder motion and no shrugging, add a small amount of resistance.
Setup / Starting Position
- Adjust the machine: Set the seat or body position so your arms can move freely and the handles align naturally with your shoulder line.
- Sit and hinge forward: Take your seat and lean forward into the bent-over position required by the machine design.
- Plant your feet firmly: Keep both feet flat for balance and full-body stability.
- Grab the handles with control: Use a neutral or machine-fixed grip and keep a slight bend in the elbows.
- Brace your torso: Keep your chest steady, spine neutral, and neck relaxed before starting the first rep.
Tip: Before moving the weight, let the shoulders settle down and back slightly. This helps reduce upper-trap dominance.
Execution (Step-by-Step)
- Start from the stretched position: Let the handles come inward under control without collapsing your torso.
- Lead with the elbows: Drive the upper arms out to the sides in a wide arc rather than pulling with the hands.
- Keep the elbow bend consistent: Do not turn the rep into a row by bending the elbows more as you lift.
- Raise until the rear delts fully contract: Stop when your upper arms are roughly in line with your torso or when you feel maximum rear-delt tension without shrugging.
- Pause briefly: Hold the top for a short squeeze while keeping the neck relaxed.
- Lower slowly: Return to the starting position under control and maintain tension throughout the eccentric phase.
Pro Tips & Common Mistakes
- Lead with the elbows: Think about spreading the arms apart, not yanking the handles.
- Use a moderate range: Lift high enough to contract the rear delts, but avoid forcing extra range by shrugging.
- Control the eccentric: The lowering phase is valuable for hypertrophy, so resist the weight on the way down.
- Keep the torso fixed: Avoid rocking your body to create momentum.
- Do not overload too early: Rear delts respond well to clean reps, moderate loads, and consistent volume.
- Avoid turning it into a row: Too much elbow flexion shifts tension away from the rear delts and toward the upper back.
- Watch neck position: Keep your head neutral and avoid craning up during the lift.
FAQ
What muscles does the Lever Seated Bent-Over Rear Delt Fly work?
It primarily targets the rear deltoids. Secondary muscles include the rhomboids, middle traps, and small shoulder stabilizers that help control the movement.
Is this better than dumbbell rear delt flies?
It can be easier to perform with strict form because the machine guides the path and reduces the need for full-body stabilization. Dumbbells offer more freedom, while the lever machine often makes it easier to keep constant tension on the rear delts.
How heavy should I go?
Use a load that lets you move smoothly without swinging, shrugging, or losing your bent-over position. For most people, rear delt work is more productive with moderate loads and precise reps than with maximal weight.
Should I feel this more in my upper back or rear shoulders?
You may feel both, but the main sensation should come from the rear shoulders. If your traps dominate or it feels mostly like a row, reduce the load and focus on leading with the elbows.
Where should I place this exercise in my workout?
It works well on shoulder day, pull day, or as an accessory after rows and pulldowns. It can also be used early in a session as a rear-delt activation movement.
Recommended Equipment
- Lifting Straps — helpful for reducing grip fatigue during machine, row, and pulling accessories
- Adjustable Weight Bench — useful for rear-delt training alternatives such as chest-supported reverse fly variations
- Foam Roller — useful for upper-back and shoulder mobility before or after training
- Rear Delt / Reverse Fly Machine — a home-gym option for directly training the same movement pattern
- Resistance Bands Set — great for rear-delt warm-ups, pull-aparts, and shoulder activation work
Tip: Accessories should support better training quality, not replace proper technique. Prioritize smooth reps, smart loading, and consistent rear-delt volume.