Plank Feet Tap: Core Stability Form, Benefits, Sets, Tips & FAQ
Learn the Plank Feet Tap for stronger abs, obliques, glutes, and anti-rotation control with proper form, sets, mistakes, FAQs, and gear.
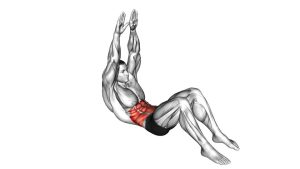
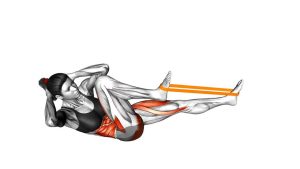
Plank Feet Tap
This exercise works best when the plank stays solid while the legs move. Therefore, brace your abs before each tap, press your forearms into the floor, and avoid letting your hips swing from side to side. In addition, keep the movement smooth rather than explosive, because the main benefit comes from resisting rotation while one foot leaves the center line.
Quick Overview
| Body Part | Core |
|---|---|
| Primary Muscle | Abs, especially the rectus abdominis and deep core stabilizers |
| Secondary Muscle | Obliques, glutes, hip abductors, quadriceps, shoulders, and upper back stabilizers |
| Equipment | No equipment required; optional exercise mat for elbow comfort |
| Difficulty | Beginner to Intermediate, depending on plank control and tap speed |
Sets & Reps (By Goal)
- Core control: 2–3 sets × 8–12 taps per side with slow, steady movement.
- Muscular endurance: 3–4 sets × 20–40 total taps while keeping the hips level.
- Beginner technique: 2 sets × 6–8 taps per side with longer pauses between reps.
- Conditioning finisher: 3 rounds × 30–45 seconds, resting 30–60 seconds between rounds.
Progression rule: First increase control, then increase total taps, and only then widen the foot tap. However, never sacrifice a stable plank just to make the movement look bigger.
Setup / Starting Position
- Start on your forearms: Place your elbows under your shoulders and keep your forearms flat on the floor.
- Extend your legs back: Set both feet behind you with your body forming a straight line from head to heels.
- Brace your core: Tighten your abs gently as if preparing for a light punch to the stomach.
- Set your hips: Keep the pelvis level and avoid lifting the hips too high or letting them sag downward.
- Keep your neck neutral: Look slightly down so your head stays aligned with your spine.
Tip: If your elbows feel uncomfortable, use a training mat or folded towel. As a result, you can focus more on core control and less on pressure at the forearms.
Execution (Step-by-Step)
- Hold a strong forearm plank: Press the forearms down, brace the abs, and keep the shoulders steady.
- Tap one foot outward: Move one foot laterally to the side while the opposite foot stays planted.
- Control the hips: Resist rotation and keep your pelvis as level as possible during the tap.
- Return to center: Bring the moving foot back beside the other foot without rushing.
- Switch sides: Tap the opposite foot outward, then return it to center with the same control.
- Repeat smoothly: Continue alternating sides while maintaining a long, stable plank line.
Pro Tips & Common Mistakes
- Keep the taps small: A moderate side tap usually trains control better than an exaggerated wide step.
- Do not bounce: Move each foot with control rather than hopping or jerking the legs outward.
- Brace before the foot moves: This helps prevent the hips from rotating as one leg leaves the center line.
- Avoid shoulder collapse: Push the floor away through your forearms and keep your chest supported.
- Do not let the lower back sag: If your back arches, shorten the set or widen your base slightly.
- Use steady breathing: Exhale during each tap and inhale as the foot returns to center.
- Control both directions: The return to center matters as much as the outward tap.
FAQ
What muscles does the Plank Feet Tap work?
The Plank Feet Tap mainly works the abs and deep core stabilizers. In addition, the obliques, glutes, hip abductors, quadriceps, shoulders, and upper back help stabilize the body during each alternating tap.
Is the Plank Feet Tap good for beginners?
Yes, it can be beginner-friendly when performed slowly with a small tap range. However, beginners should first master a regular forearm plank before adding alternating foot movement.
Should my hips move during the exercise?
A small amount of movement may happen, but your goal is to keep the hips as level as possible. If the hips swing side to side, reduce the tap distance and slow down the tempo.
Is this better than a regular plank?
It is not necessarily better, but it is more dynamic. While a regular plank builds static endurance, the Plank Feet Tap challenges anti-rotation control because one leg moves while the rest of the body stays stable.
How can I make the Plank Feet Tap harder?
You can slow the tempo, increase total reps, pause after each tap, or slightly widen the tap distance. However, progress only when your hips remain controlled and your lower back stays neutral.
Recommended Equipment (Optional)
- Exercise Mat — adds comfort under the elbows and improves floor support during forearm plank work
- Non-Slip Yoga Mat — helps keep the forearms and feet from sliding during controlled lateral taps
- Core Sliders — useful for advanced plank variations and smooth foot movement progressions
- Mini Resistance Bands — can increase glute and hip-abductor challenge once basic form is controlled
- Workout Towel — provides extra elbow padding and helps keep your training area dry
Tip: Equipment is optional for this exercise. Nevertheless, a supportive mat can make the position more comfortable, especially during longer core sets.