Standing Side Bend Bent Arm: Form, Benefits, Sets, Tips & FAQ
Learn the Standing Side Bend Bent Arm exercise for oblique control, core mobility, and side-body strength with safe form, sets, tips, FAQs, and gear.
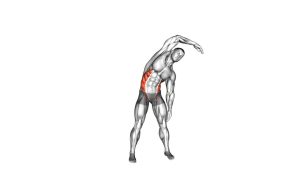
Standing Side Bend (Bent Arm)
This movement is useful for building awareness in the obliques, improving side-body mobility, and practicing core control without equipment. Moreover, the bent-arm position helps keep the upper body open while giving the torso a clear direction during the side bend. Because the exercise is low-impact, it works well as part of a warm-up, mobility routine, beginner core session, or home workout.
Quick Overview
| Body Part | Core |
|---|---|
| Primary Muscle | Obliques |
| Secondary Muscle | Quadratus lumborum, intercostals, spinal stabilizers |
| Equipment | None |
| Difficulty | Beginner |
Sets & Reps (By Goal)
- Mobility warm-up: 1–2 sets × 8–12 reps per side with a slow, easy tempo.
- Core activation: 2–3 sets × 10–15 reps per side while keeping the hips stable.
- Beginner control: 2–3 sets × 6–10 reps per side with a brief pause at the bottom.
- Desk-break reset: 1–2 sets × 6–8 reps per side to restore side-body movement.
Progression rule: First, improve control and range. Then, add reps slowly. Finally, progress only when you can bend sideways without twisting, bouncing, or shifting the hips excessively.
Setup / Starting Position
- Stand tall: Place your feet about hip-width apart and keep your weight balanced through both feet.
- Set the arm position: Bend one arm and place the hand behind or near the head, with the elbow pointing outward.
- Relax the opposite arm: Let the other arm hang naturally down the side of your body.
- Stack the body: Keep the ribs, pelvis, and head aligned before you begin.
- Prepare the core: Gently brace your midsection so the movement stays controlled instead of loose or rushed.
The setup should feel tall and open. Also, avoid pulling on the head with the bent arm, because the arm is only there to support the position.
Execution (Step-by-Step)
- Start from neutral: Stand upright with your chest open, shoulders relaxed, and gaze forward.
- Bend sideways: Slowly move your torso toward the side of the relaxed arm.
- Keep the movement lateral: Bend through the side of the waist without rotating your chest forward or backward.
- Control the bottom position: Pause briefly when you feel a comfortable side-body stretch and oblique engagement.
- Return smoothly: Use your core to lift your torso back to the starting position.
- Repeat with rhythm: Continue for the target reps, then switch sides if training both sides.
Pro Tips & Common Mistakes
- Move slowly: A controlled tempo helps the obliques work better and prevents momentum from taking over.
- Keep the hips quiet: Small natural movement is fine, but excessive hip shifting reduces core focus.
- Avoid twisting: Your chest should not rotate toward the floor or ceiling during the bend.
- Do not pull the head: The bent arm should stay light, because the neck should remain relaxed.
- Stay tall between reps: Return fully to neutral before starting the next repetition.
- Use comfortable range: More depth is not always better. Instead, prioritize clean alignment and smooth control.
- Breathe naturally: Exhale gently as you bend, then inhale as you return upright.
FAQ
What muscles does the Standing Side Bend (Bent Arm) work?
It mainly works the obliques. Additionally, it involves the quadratus lumborum, intercostals, and deep spinal stabilizers to control the side-bending motion.
Is the Standing Side Bend good for beginners?
Yes. Since it uses bodyweight only and has a simple standing setup, it is beginner-friendly. However, beginners should use a small range at first and focus on smooth control.
Should I feel this exercise in my lower back?
You may feel light work along the side of the lower back, especially near the quadratus lumborum. Nevertheless, sharp pain, pinching, or discomfort in the spine is not the goal and should be avoided.
Should I add weight to this exercise?
Start without weight. After your form is consistent, you may progress to light resistance, but only if you can keep the movement strictly lateral and controlled.
How is this different from a regular standing side bend?
The bent-arm position changes the upper-body setup and helps create a more open side-body line. As a result, it can make the movement feel more controlled and focused through the waist.
Recommended Equipment (Optional)
- Exercise Mat — useful for warm-ups, stretching, and floor-based core work after standing drills
- Resistance Bands Set — helpful for adding upper-body and core activation to home workouts
- Light Dumbbells Set — optional progression for loaded side bends after mastering bodyweight form
- Core Sliders — useful for adding variety to oblique and stability training
- Foam Roller — helpful for gentle warm-up, recovery, and mobility work around the trunk and hips
Tip: Equipment is optional for this exercise. However, simple tools can support a more complete core routine when paired with controlled bodyweight side bends.