Suspender Crunch: Form, Core Benefits, Sets, Tips & FAQ
Learn the Suspender Crunch for stronger abs, better core control, and stable plank strength with setup, steps, mistakes, FAQs, and gear.
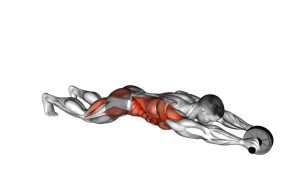
Suspender Crunch
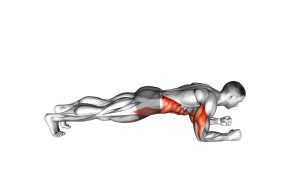
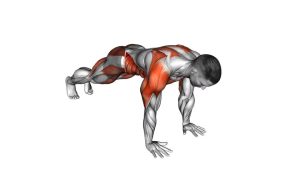
The Suspender Crunch is excellent for building stronger abs, improving body control, and training the core to resist unwanted hip dropping. Although it looks simple, the suspension straps add instability, so the exercise demands constant tension from the rectus abdominis, obliques, hip flexors, shoulders, and deep stabilizers. As a result, it works well for athletes, home workouts, suspension training programs, and anyone who wants a harder alternative to basic floor crunches.
For best results, keep the movement strict. First, establish a solid suspended plank. Then, pull your knees toward your chest without letting the lower back sag. Finally, extend the legs back with control instead of letting the straps swing. This controlled rhythm makes the exercise more effective and much safer.
Quick Overview
| Body Part | Abs |
|---|---|
| Primary Muscle | Rectus abdominis |
| Secondary Muscle | Obliques, transverse abdominis, hip flexors, shoulders, chest, serratus anterior |
| Equipment | Suspension trainer / suspender straps |
| Difficulty | Intermediate |
Sets & Reps (By Goal)
- Core control: 2–3 sets of 6–10 slow reps, resting 60–90 seconds between sets.
- Muscle endurance: 3–4 sets of 10–15 reps with a smooth, steady tempo.
- Strength and stability: 4 sets of 6–8 controlled reps with a 1–2 second squeeze at the top.
- Workout finisher: 2–3 rounds of 20–30 seconds, keeping every rep clean and controlled.
Progression rule: Add reps only when your hips stay level, your shoulders remain stacked, and the straps do not swing aggressively. Once form is consistent, progress by slowing the lowering phase or adding a longer top contraction.
Setup / Starting Position
- Set the straps low: Adjust the suspension trainer so the foot cradles hang a few inches above the floor.
- Place your feet in the straps: Kneel down first, then secure both feet evenly in the foot cradles.
- Move into a plank: Place your hands on the floor under your shoulders and extend your legs behind you.
- Stack the shoulders: Keep your wrists, elbows, and shoulders aligned so the upper body feels strong and stable.
- Brace the core: Tighten your abs before moving. Your body should form a straight line from head to heels.
- Set your neck neutral: Look slightly down at the floor so your head does not hang or lift too high.
If the setup feels unstable, start with a basic suspended plank hold before adding the crunch. This helps your body learn the balance demand first.
Execution (Step-by-Step)
- Start in a strong plank: Press the floor away, brace your abs, and keep your hips in line with your shoulders.
- Begin the crunch: Slowly bend your knees and pull them toward your chest.
- Round slightly through the abs: Allow a small controlled spinal flexion as your knees come forward, but do not collapse your shoulders.
- Squeeze at the top: Pause briefly when the knees are close to the chest and contract your abs hard.
- Return with control: Extend your legs back until your body reaches a straight plank again.
- Reset before the next rep: Stop the straps from swinging, re-brace your core, and repeat with the same controlled form.
Pro Tips & Common Mistakes
Pro Tips
- Press the floor away: This keeps the shoulders stable and prevents your chest from sinking.
- Brace before each rep: A strong brace protects the lower back and makes the crunch more powerful.
- Move slowly: A slower tempo reduces strap swing and increases abdominal tension.
- Keep the hips controlled: Let the hips flex, but do not allow them to drop below the plank line during the return.
- Use a short pause: Holding the top position for one second improves core engagement.
Common Mistakes
- Letting the lower back sag: This shifts stress away from the abs and may irritate the lower back.
- Using momentum: Swinging the straps makes the exercise easier but less effective.
- Pulling the knees too fast: Fast reps often cause shoulder shifting and poor control.
- Moving the hands too far forward: This makes the plank weaker and places more strain on the shoulders.
- Holding the breath: Breathe steadily so your brace stays strong without unnecessary tension.
FAQ
What muscles does the Suspender Crunch work?
The Suspender Crunch mainly works the rectus abdominis, which helps create the crunching action. In addition, the obliques, transverse abdominis, hip flexors, shoulders, chest, and serratus anterior help stabilize your body during the suspended plank.
Is the Suspender Crunch good for abs?
Yes. It is a strong abs exercise because it combines spinal flexion, hip flexion, and anti-extension control. Therefore, your core must work during both the knee-tuck phase and the return to plank.
Is this exercise beginner-friendly?
It is usually better for intermediate trainees. Beginners should first master regular planks, mountain climbers, dead bugs, and basic suspended plank holds. After that, they can progress to the Suspender Crunch with shorter ranges of motion.
Why do my straps swing during the movement?
Strap swing usually happens when reps are too fast or when the return phase is uncontrolled. To fix it, slow down, pause briefly in the plank position, and keep your knees moving in a smooth straight path.
Should I round my back during the Suspender Crunch?
A slight controlled rounding at the top is normal because the abs are crunching the torso. However, you should not collapse through the shoulders or lose control of your lower back during the return phase.
Can I do Suspender Crunches every day?
You can practice light core work often, but intense Suspender Crunch sessions should usually be done 2–4 times per week. This allows your abs, hip flexors, and shoulders enough time to recover.
Recommended Equipment
- Suspension Trainer Straps — the main tool needed for Suspender Crunches, suspended planks, rows, and bodyweight training.
- TRX-Style Suspension Trainer Kit — useful for home gyms because it usually includes handles, foot cradles, and an anchor system.
- Door Anchor for Suspension Trainer — helpful if you want to set up the exercise indoors without a wall-mounted anchor.
- Non-Slip Exercise Mat — protects the hands and knees during setup while improving comfort on hard floors.
- Push-Up Handles — optional handles that may reduce wrist stress while keeping the upper body stable.
Choose equipment that feels secure, stable, and appropriate for your training space. Also, always check the anchor point before starting suspended exercises.