Crunch Leg Raise: Benefits, Form, Sets, Tips & FAQ
Learn how to do the Crunch Leg Raise with proper form. Build stronger abs with step-by-step technique, sets by goal, common mistakes, FAQs, and recommended equipment.
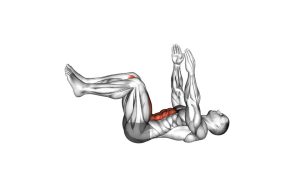
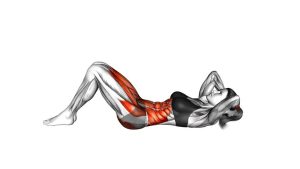
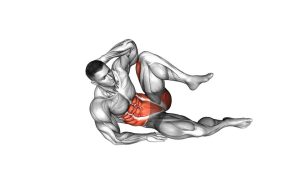
Crunch Leg Raise
The Crunch Leg Raise is especially useful for people who want a stronger midsection without using gym machines. Because the legs move while the upper body crunches, the exercise challenges both the upper and lower portions of the abs. It also teaches the body to keep the pelvis stable while the legs move, which is important for better core control during other exercises.
This exercise works best when performed with patience. The legs should rise under control, the shoulders should lift only enough to shorten the abs, and the lower back should avoid excessive arching. If the movement feels mostly in the hip flexors or lower back, reduce the range of motion and slow the tempo.
Quick Overview
| Body Part | Core |
|---|---|
| Primary Muscle | Rectus abdominis, especially upper and lower abdominal fibers |
| Secondary Muscle | Hip flexors, obliques, transverse abdominis, deep core stabilizers |
| Equipment | No equipment required; optional exercise mat for comfort |
| Difficulty | Beginner to intermediate, depending on leg height and tempo |
Sets & Reps (By Goal)
- Beginner core control: 2–3 sets of 8–10 reps with slow, clean movement.
- Muscle endurance: 3–4 sets of 12–18 reps with short rest periods.
- Ab strength and tension: 3–4 sets of 8–12 reps using a 2-second pause at the top.
- Home workout finisher: 2–3 rounds of 15–20 controlled reps after your main workout.
- Core circuit training: 30–45 seconds of continuous reps, focusing on quality over speed.
Progression rule: First improve control, then increase reps, then increase time under tension. Do not progress by swinging the legs faster or dropping them closer to the floor if your lower back arches.
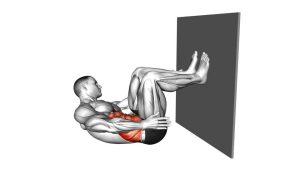
Setup / Starting Position
- Lie on your back: Start on a mat with your body straight and your spine supported by the floor.
- Position your arms: Place your hands lightly behind your head, across your chest, or beside your body depending on comfort and control.
- Set your legs: Extend your legs or keep a slight bend in the knees. A small knee bend makes the exercise easier.
- Brace your core: Gently pull your ribs down and press your lower back toward the floor before the first rep.
- Relax the neck: Keep your chin slightly tucked and avoid pulling the head forward with your hands.
- Prepare the movement: Let the legs hover lightly above the floor only if you can keep your lower back controlled.
If you are new to this movement, start with bent knees and a smaller leg raise. This reduces hip-flexor dominance and helps you feel the abs more clearly.
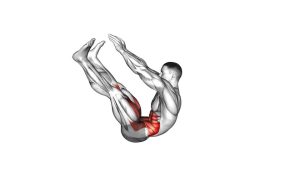
Execution (Step-by-Step)
- Brace before moving: Exhale lightly, tighten your abs, and make sure your lower back stays close to the floor.
- Begin the leg raise: Lift both legs upward together in a smooth path. Avoid kicking or throwing the legs.
- Start the crunch: As the legs rise, curl your shoulders off the floor by shortening your abs. Keep the movement small and controlled.
- Reach the top position: Bring your legs toward a near-vertical position while your shoulder blades lift slightly from the floor.
- Squeeze the abs: Pause briefly at the top and focus on pulling the ribs and pelvis closer together.
- Lower with control: Slowly lower your upper back and legs toward the floor while resisting gravity.
- Maintain tension: Stop before the feet fully rest if you can keep good form. If your back arches, reset between reps.
- Repeat cleanly: Move into the next rep without bouncing, rushing, or losing abdominal tension.
Pro Tips & Common Mistakes
Pro Tips
- Exhale during the crunch: Breathing out helps the ribs move down and improves abdominal contraction.
- Use a small crunch: You do not need to sit all the way up. Lift only the shoulders and upper back.
- Control the lowering phase: The descent is where many people lose tension. Lower slowly for better results.
- Keep the pelvis stable: Think about gently rolling the pelvis back as the legs rise.
- Bend the knees if needed: A bent-knee version is still effective and often safer for beginners.
- Pause at the top: A short hold improves mind-muscle connection and reduces momentum.
Common Mistakes
- Arching the lower back: This reduces abdominal tension and may irritate the low back.
- Pulling on the neck: The hands should support lightly, not yank the head upward.
- Swinging the legs: Momentum makes the exercise easier but less effective.
- Dropping the feet too fast: A fast descent removes tension from the abs.
- Going too low too soon: Lowering the legs close to the floor is harder and should only be done with strong control.
- Holding the breath: Controlled breathing helps keep the core active and the movement smooth.
FAQ
What muscles does the Crunch Leg Raise work?
The Crunch Leg Raise mainly works the rectus abdominis, which is the main front abdominal muscle. It also involves the hip flexors, obliques, and deep core stabilizers to control the legs and pelvis.
Is the Crunch Leg Raise good for lower abs?
Yes. While the abs work as one connected muscle group, the leg raise portion increases demand near the lower abdominal region because the pelvis must stay controlled as the legs move.
Should my feet touch the floor between reps?
Beginners can lightly reset the feet if needed. For more tension, keep the feet hovering above the floor, but only if your lower back stays controlled.
Why do I feel this exercise in my hip flexors?
Some hip-flexor involvement is normal because the legs are moving. However, if the hip flexors dominate, bend your knees, reduce the range of motion, and focus on keeping the lower back pressed down.
Can beginners do the Crunch Leg Raise?
Yes, but beginners should use a smaller range of motion and keep the knees slightly bent. Quality is more important than how low the legs go.
How can I make the exercise harder?
Slow the lowering phase, add a pause at the top, keep the legs straighter, or stop the feet just above the floor without resting. Do not add difficulty if your lower back arches.
Recommended Equipment (Optional)
- Exercise Mat — adds comfort for your spine, hips, and shoulders during floor-based ab training.
- Thick Yoga Mat — useful if you need extra cushioning for repeated crunch and leg raise workouts.
- Ankle Weights — can increase difficulty for advanced users, but should only be used after mastering bodyweight form.
- Ab Workout Mat — supports repeated core training sessions and helps reduce discomfort on hard floors.
- Resistance Bands Set — useful for pairing this exercise with full core circuits, anti-rotation work, and hip stability drills.
Tip: Equipment is optional. For this exercise, clean bodyweight control is more important than added resistance. Only add load when every rep stays smooth and your lower back remains stable.