Suspender Side Bend: Form, Benefits, Sets, Tips & FAQ
Learn the Suspender Side Bend to train your obliques, improve core control, and build lateral stability with step-by-step form and tips.
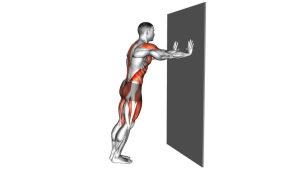
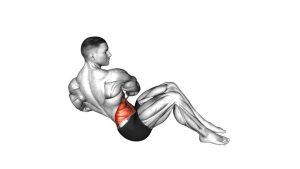
Suspender Side Bend
This exercise works best when the body moves as one connected unit. The arms hold the suspension handles, but they should not dominate the movement. Instead, the obliques guide the torso into the side bend and help pull the body back to the starting position. As a result, the exercise trains the side waist, improves trunk control, and builds awareness of how the ribs, hips, and shoulders line up during movement.
Although the Suspender Side Bend looks simple, it requires patience. A clean repetition should feel smooth, steady, and controlled from start to finish. Therefore, avoid dropping into the bottom position or pulling aggressively with the arms. Keep the straps tight, the feet grounded, and the core active during every rep.
Quick Overview
| Body Part | Obliques |
|---|---|
| Primary Muscle | Obliques |
| Secondary Muscle | Rectus abdominis, transverse abdominis, quadratus lumborum, shoulder stabilizers |
| Equipment | Suspension trainer / suspender straps / TRX-style straps |
| Difficulty | Beginner to Intermediate |
Sets & Reps (By Goal)
- Core activation: 2–3 sets × 8–10 reps per side with a slow, controlled tempo.
- Oblique strength: 3–4 sets × 10–12 reps per side with a full but clean range.
- Core endurance: 2–3 sets × 12–15 reps per side while keeping constant strap tension.
- Beginner control: 2 sets × 6–8 reps per side using a short range of motion.
- Warm-up or accessory work: 1–2 sets × 8–12 reps per side after general mobility work.
Progression rule: First improve control, tempo, and range of motion. After that, step the feet farther from the anchor point or increase the body lean slightly. However, never progress by losing posture or pulling harder with the arms.
Setup / Starting Position
- Set the straps: Attach the suspension trainer securely above you and adjust the handles to a comfortable height.
- Stand sideways to the anchor: Position your body so one side faces the anchor point while both hands hold the handles.
- Create strap tension: Step away until the straps are tight and your body forms a slight diagonal line.
- Place the feet firmly: Keep the feet about hip-width apart. Stagger them slightly if you need more balance.
- Stack the body: Keep the ribs down, hips under control, shoulders relaxed, and spine long.
- Extend the arms: Hold the handles with both hands and keep the arms mostly straight without locking the elbows aggressively.
- Brace before moving: Lightly tighten the abs as if preparing for a controlled side bend rather than a fast stretch.
Tip: The farther your feet are from the anchor point, the harder the exercise becomes. Start close enough that you can control every inch of the movement.
Execution (Step-by-Step)
- Start tall: Hold the handles with both hands, keep the straps tight, and align your head, ribs, hips, and feet.
- Lean under control: Allow your torso to bend sideways away from the anchor point while keeping your arms steady.
- Move through the waist: Let the side of your torso lengthen on one side while the opposite oblique controls the bend.
- Avoid twisting: Keep your chest facing forward. Do not rotate the shoulders or hips during the descent.
- Reach the bottom position: Stop when you feel a strong but controlled stretch and tension through the side core.
- Pause briefly: Hold the bottom position for a moment without bouncing, collapsing, or losing strap tension.
- Contract the obliques: Pull your torso back to the start by using the side of your waist, not by yanking with your arms.
- Reset your posture: Return to the starting line, breathe, and repeat for the planned reps.
- Switch sides: Turn around and perform the same number of reps on the opposite side.
Pro Tips & Common Mistakes
Pro Tips
- Keep the straps tight: Constant tension helps you stay balanced and keeps the movement controlled.
- Use a slow tempo: Lower for 2–3 seconds, pause briefly, then return with control.
- Think ribs to hips: The working-side oblique should shorten as you come back up.
- Keep the arms quiet: Your hands guide the body, but your core should perform the main work.
- Control the bottom range: Stop before your lower back arches or your shoulder position breaks.
- Train both sides evenly: Match reps, range, and tempo on the left and right side.
Common Mistakes
- Pulling with the arms: This reduces oblique work and turns the exercise into an upper-body movement.
- Twisting the torso: Rotation changes the target and can make the movement less precise.
- Dropping too low: A deep range is not useful if you lose control or feel your lower back compress.
- Shrugging the shoulders: Keep the neck long and shoulders relaxed so the core stays the focus.
- Letting the hips swing: The hips should stay controlled instead of drifting forward or backward.
- Moving too fast: Momentum makes the exercise easier but less effective for core control.
FAQ
What muscles does the Suspender Side Bend work?
The Suspender Side Bend mainly works the obliques. It also involves the transverse abdominis, rectus abdominis, quadratus lumborum, and shoulder stabilizers because the body must stay controlled while leaning against the straps.
Is the Suspender Side Bend good for beginners?
Yes, it can be beginner-friendly when the lean is small and the tempo is slow. However, beginners should focus on posture first. If balance feels difficult, step closer to the anchor point and use a shorter range.
Should I feel this exercise in my lower back?
You may feel light stabilizing effort around the side of the trunk, but the main tension should be in the obliques. If your lower back feels pinched, reduce the range, brace the ribs down, and avoid arching.
How can I make the Suspender Side Bend harder?
You can make it harder by stepping farther away from the anchor point, increasing the lean, slowing the tempo, or adding a longer pause at the bottom. Progress only when your reps stay smooth and controlled.
Is this exercise better than dumbbell side bends?
It is not necessarily better, but it gives a different training effect. Dumbbell side bends load the body vertically, while the suspension version challenges balance, body angle, and lateral core control.
Can I use this exercise for waist and oblique training?
Yes. This movement is useful for strengthening the side core and improving trunk control. For best results, combine it with anti-rotation drills, planks, carries, and full-body strength training.
Recommended Equipment
- Suspension Trainer Straps — the main equipment needed for the Suspender Side Bend and other bodyweight core exercises.
- Suspension Trainer Door Anchor — useful for setting up suspension straps safely at home when a fixed overhead anchor is not available.
- Non-Slip Exercise Mat — helps provide foot grip and floor comfort during suspension core training.
- Workout Training Gloves — can improve handle grip and reduce hand discomfort during strap-based exercises.
- Resistance Bands Set — useful for pairing with core stability, warm-up drills, and upper-body posture work.
Tip: Choose equipment that allows a secure anchor, comfortable grip, and stable foot placement. Better setup improves control and makes the exercise safer.