Forearm Pronation Exercise: Form, Benefits, Sets, Tips & FAQ
Learn how to perform the Forearm Pronation exercise to strengthen pronator muscles, improve wrist control, grip strength, and elbow stability with proper form, sets, tips, FAQs, and equipment.
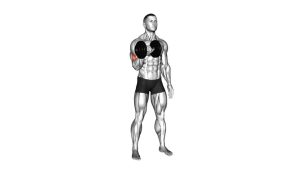
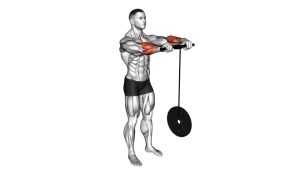
Forearm Pronation
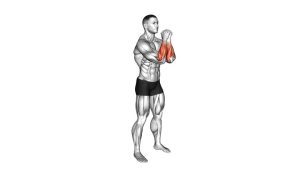
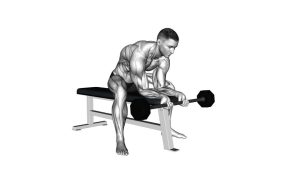
Forearm pronation is especially useful for lifters, racket-sport athletes, climbers, arm wrestlers, martial artists, and anyone who needs stronger rotational control through the wrist and elbow. In the demonstrated version, the forearm is supported while the hand rotates a dumbbell or weighted handle from a palm-up position toward a palm-down position.
Quick Overview
| Body Part | Forearms |
|---|---|
| Primary Muscle | Pronator teres and pronator quadratus |
| Secondary Muscle | Wrist flexors, wrist stabilizers, grip muscles, and elbow stabilizers |
| Equipment | Dumbbell, hammer-style handle, pronation/supination trainer, or light weighted bar |
| Difficulty | Beginner to Intermediate |
Sets & Reps (By Goal)
- Technique practice: 2–3 sets × 10–12 reps per side using a very light load.
- Forearm strength: 3–4 sets × 8–12 reps per side with slow control.
- Grip and wrist stability: 2–4 sets × 12–15 reps per side with a controlled pause at the bottom.
- Rehab-style control: 2–3 sets × 8–10 reps per side using pain-free range only.
- Sport performance: 3 sets × 10–15 reps per side after main strength work.
Progression rule: Increase control before increasing load. Add range, slower tempo, or a longer pause first. Only use heavier weight when the elbow stays still and the wrist does not collapse.
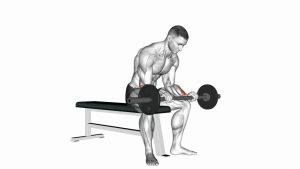
Setup / Starting Position
- Sit or kneel beside a bench: Support your forearm on a bench, thigh, or flat surface.
- Fix the elbow: Keep the elbow bent around 90 degrees and anchored so the upper arm does not move.
- Hold the weight: Grip one end of a dumbbell or handle so the load creates rotational resistance.
- Start palm-up: Begin with the palm facing upward or slightly angled upward.
- Keep the wrist neutral: Do not curl, extend, or bend the wrist sideways.
- Brace lightly: Keep the shoulder relaxed and avoid leaning your body into the movement.
The movement should happen through forearm rotation, not through shoulder twisting, wrist bending, or elbow drifting.
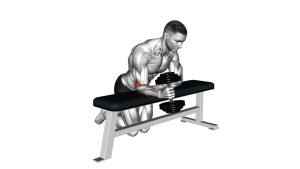
Execution (Step-by-Step)
- Begin in the palm-up position: Hold the dumbbell firmly while keeping the forearm supported.
- Rotate inward slowly: Turn the hand so the palm begins moving from upward-facing toward sideways.
- Control the weight: Let the dumbbell tilt gradually without dropping or swinging.
- Reach full pronation: Continue rotating until the palm faces downward or reaches your comfortable end range.
- Pause briefly: Hold for 1–2 seconds while keeping the wrist aligned.
- Return with control: Rotate back to the starting palm-up position slowly.
- Repeat cleanly: Keep each repetition smooth, quiet, and controlled.
Pro Tips & Common Mistakes
- Use light weight: A small dumbbell can feel heavy because the load is offset from the hand.
- Move slowly: Use a 2–3 second lowering phase to train real rotational control.
- Keep the elbow planted: The forearm should rotate, but the elbow should not slide or lift.
- Avoid wrist collapse: Keep the wrist straight instead of flexing, extending, or bending sideways.
- Do not swing: Momentum reduces tension and increases joint stress.
- Train both sides: Even if one arm feels stronger, work both arms evenly.
- Pair with supination: For balanced forearm development, also train the opposite rotation pattern.
- Stay pain-free: Mild muscular fatigue is fine; sharp pain around the wrist or elbow is not.
FAQ
What muscles does forearm pronation work?
Forearm pronation mainly targets the pronator teres and pronator quadratus. It also trains the wrist stabilizers and grip muscles because the hand must control the offset load.
Is forearm pronation good for grip strength?
Yes. While it is not a pure grip exercise, it improves rotational wrist control and helps the hand stay stable when gripping dumbbells, barbells, handles, rackets, or sport equipment.
Should I use a heavy dumbbell?
No. Start light. Because the load sits away from the center of the hand, even a small dumbbell creates strong rotational resistance. Heavy loading often causes wrist collapse or elbow compensation.
Where should I feel this exercise?
You should feel the working tension through the inner and front-side forearm near the pronator muscles. You may also feel your grip and wrist stabilizers working to control the handle.
Can this help with elbow stability?
It can support elbow stability by strengthening the muscles that control forearm rotation. However, if you already have elbow pain or an injury, use a pain-free range and consider professional guidance.
What is the difference between pronation and supination?
Pronation rotates the palm downward. Supination rotates the palm upward. Training both directions helps create balanced forearm strength and better wrist control.
Recommended Equipment
- Adjustable Dumbbell Set — useful for light, progressive forearm pronation training.
- Pronation / Supination Wrist Exerciser — designed specifically for controlled forearm rotation strength.
- Wrist Roller Forearm Strengthener — builds forearm endurance, grip strength, and wrist control.
- Forearm Grip Strengthener — complements pronation work by improving hand and grip strength.
- Adjustable Exercise Bench — provides stable forearm support for clean wrist and rotation drills.
Tip: For this exercise, choose equipment that allows very small load increases. Forearm rotation responds best to light resistance, clean control, and consistent practice.