EZ-Bar Seated Wrist Curl: Forearm Flexor Form, Sets, Tips & FAQ
Learn the EZ-Bar Seated Wrist Curl to build stronger forearm flexors, grip strength, and wrist control with proper setup, execution, sets, common mistakes, FAQs, and equipment.
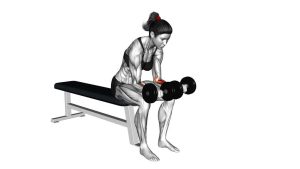
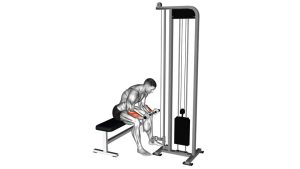
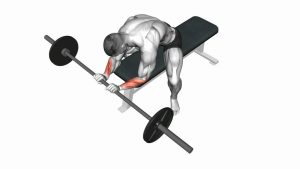
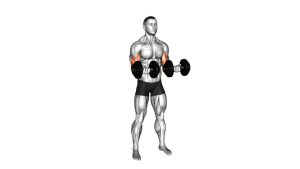
EZ-Bar Seated Wrist Curl
This exercise is simple, but it requires patience and control. The goal is not to swing the bar or lift the heaviest weight possible. The goal is to move through a clean wrist-flexion pattern: lower the bar into a deep but comfortable stretch, let the fingers open slightly, then close the fingers and curl the wrists upward into a strong forearm contraction.
The seated position makes the movement highly targeted. Because your forearms stay supported on your thighs, the biceps, shoulders, and torso should stay quiet. A proper rep should feel like the inside of the forearms is doing nearly all the work, especially near the top where the wrists curl up and the fingers squeeze the bar.
Quick Overview
| Body Part | Forearms |
|---|---|
| Primary Muscle | Forearm flexors |
| Secondary Muscle | Finger flexors, grip muscles, wrist stabilizers |
| Equipment | EZ bar, weight plates, flat bench |
| Difficulty | Beginner to Intermediate |
Sets & Reps (By Goal)
- Forearm hypertrophy: 3–4 sets × 10–15 reps with a controlled squeeze at the top.
- Grip endurance: 2–4 sets × 15–25 reps using lighter weight and smooth rhythm.
- Wrist strength: 3–5 sets × 6–10 reps with strict form and no bouncing.
- Beginner technique practice: 2–3 sets × 10–12 reps using very light weight.
Progression rule: Add reps first, then increase weight slowly. Forearm and wrist exercises respond best to controlled loading, clean range of motion, and consistent tension rather than aggressive jumps in weight.
Setup / Starting Position
- Sit on a bench: Place your feet flat on the floor and sit tall with your knees bent.
- Hold the EZ bar palms-up: Use a supinated grip on the angled handles of the bar.
- Rest your forearms on your thighs: Your wrists should hang just past your knees so they can move freely.
- Keep your elbows still: The forearms should stay planted and stable throughout the set.
- Start in a stretched position: Let the wrists extend downward under control without dropping the bar.
The bar should sit securely in your hands, but you do not need to crush it from the first second. Allowing the bar to roll slightly toward the fingers at the bottom can increase the stretch and strengthen the finger flexors.
Execution (Step-by-Step)
- Begin from the bottom: Let the wrists extend downward while keeping the forearms glued to your thighs.
- Allow a controlled finger stretch: Let the bar roll slightly toward the fingers without losing control.
- Close the fingers: Re-grip the bar first to activate the finger flexors.
- Curl the wrists upward: Flex the wrists and bring the bar up through a small, controlled arc.
- Squeeze the forearms: Pause briefly at the top and contract the inside of the forearms.
- Lower slowly: Reverse the motion under control until the wrists return to the stretched position.
- Repeat smoothly: Keep every rep strict, avoiding bouncing, swinging, or elbow movement.
Pro Tips & Common Mistakes
- Use full but comfortable range: Lower into a stretch, then curl as high as your wrists can control.
- Do not bounce at the bottom: Bouncing can irritate the wrist joint and reduce muscle tension.
- Keep the forearms pinned: If the forearms move, the exercise becomes less isolated.
- Let the fingers help: A slight finger roll at the bottom adds grip and finger-flexor involvement.
- Avoid overloading too soon: Heavy weight often turns this into a short, sloppy partial rep.
- Control the eccentric: The lowering phase is valuable for forearm growth and wrist strength.
- Keep wrists aligned: Avoid letting the wrists twist sideways during the curl.
- Train after larger lifts: Wrist curls are usually best near the end of an arm, pull, or forearm session.
FAQ
What muscles does the EZ-Bar Seated Wrist Curl work?
It primarily works the forearm flexors, the muscles on the palm-side of the forearm. It also trains the finger flexors, grip muscles, and smaller wrist stabilizers.
Is the EZ bar better than a straight bar for wrist curls?
The EZ bar can feel more comfortable because the angled grip may reduce wrist strain for some lifters. A straight bar also works, but the EZ bar is often easier to control during higher-rep forearm training.
Should I let the bar roll into my fingers?
Yes, but only under control. Letting the bar roll slightly toward the fingers at the bottom increases the stretch and adds finger-flexor work. Do not let the bar slip or drop suddenly.
How heavy should I go on seated wrist curls?
Start light enough to perform clean reps with a full range of motion. If you cannot pause at the top or control the lowering phase, the weight is too heavy.
Can this exercise help grip strength?
Yes. Because the bar rolls slightly through the fingers and requires a strong closing action, it can support grip endurance and finger-flexor strength. For complete grip development, combine it with carries, holds, and wrist-extension work.
Recommended Equipment
- EZ Curl Bar — the main bar used for this exercise and a wrist-friendly option for curls and extensions
- Adjustable Weight Plates — useful for small loading jumps and progressive overload
- Flat Weight Bench — provides a stable seated position for strict forearm isolation
- Weightlifting Wrist Wraps — optional support for lifters who need extra wrist stability during training
- Forearm Wrist Roller — a complementary tool for building wrist flexion, extension, and grip endurance
Choose equipment that allows small, controlled progressions. Forearm training works best when the wrist joint stays comfortable and the target muscles stay under tension.